
Use the Commit dialog to submit changes to the Git repository. The dialog is displayed when you do any of the following:
- Select File > Source Control > Commit from the TestComplete main menu.
- Right-click within the Project Explorer and choose Source Control > Commit from the context menu.
- Click
 Commit on the Source Control toolbar (if the toolbar is hidden, right-click the main menu and select Source Control in the ensuing context menu to show the toolbar).
Depending on the value of the Use TortoiseGit client option, TestComplete will display either the built-in Commit dialog (if the option is disabled), or the Commit dialog of the TortoiseGit client (if the option is enabled).
|
TestComplete Commit dialog ") Click the image to enlarge it. |
TortoiseGit Commit dialog  Click the image to enlarge it. |
This topic describes the built-in Commit dialog of TestComplete. The Commit dialog of the TortoiseGit client has similar functions. For detailed information about the TortoiseGit Commit dialog, please see TortoiseGit documentation.
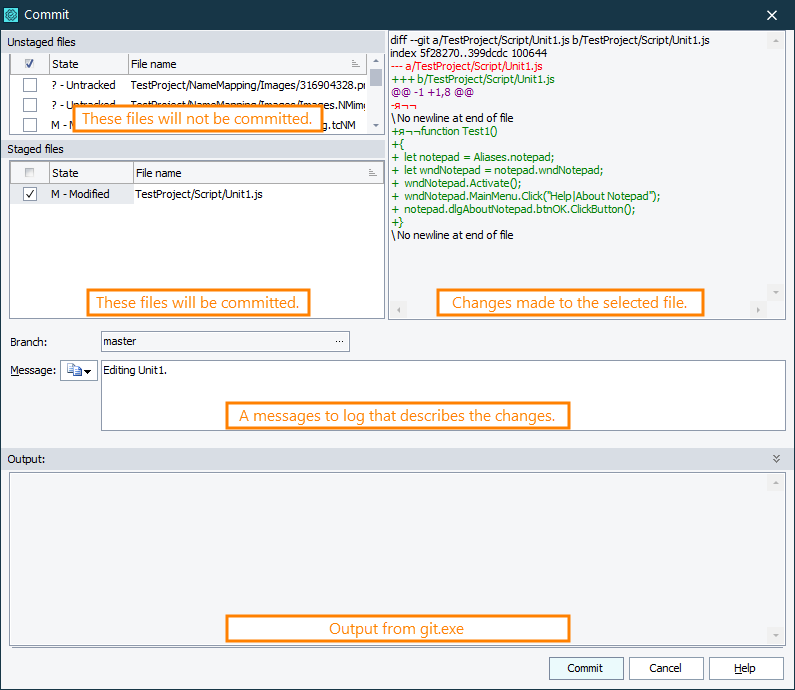
The built-in Commit dialog of TestComplete
In the left part, the dialog has two panels: Unstaged files and Staged files. They both list the changed files (including added, deleted and unversioned files). The Staged files panel lists the files that will be submitted upon the next commit, while the Unstaged files panel lists the files that were changed, but are not scheduled for the next commit.
If you do not want a changed file to be committed, just uncheck that file. If you want to include an unversioned file, just check that file to add it to the commit. Use the Ctrl or Shift keys to select multiple files simultaneously.
Both of the panels have similar context menu items:
 Reset Reset |
Reverts changes in the selected file(s).
Reverting files listed in the Unstaged files panel restores their Index state, that is, the latest staged for commit state of that file. If the file has not been staged recently, then it is reverted to the latest committed state of that file. Reverting files listed in the Staged files panel restores their HEAD state, that is, the latest committed state of that file. |
 Add to ignore list Add to ignore list |
Adds the selected untracked file(s) to the repository’s ignore list. Git will no longer track files from the ignore list. |
In the right part, the dialog shows what changes were made to the selected file (difference between the current file and its base copy). Lines that were added are highlighted in green. Lines that were removed are highlighted in red.
The Branch field denotes a branch the selected changed files will be submitted to. An ellipses button brings up the Branch Operation dialog where you can create a new named branch.
In the Message field, you need to enter a message that will describe the made changes. You may use the drop-down button to copy the message text from one of previous commits.
The Output field shows the output from the Git command-line utility (git.exe). This data is helpful to diagnose a problem in case of an error. The Output field is collapsed by default.
Select which files you want to submit to the repository, specify a commit message and click Commit. Cancel will close the dialog without performing any actions.