 |
The manual testing functionality is deprecated. Do not use it for creating new tests. It will be removed in a future TestComplete release. |
The Manual Test editor allows creating and modifying manual tests. This topic describes the structure of manual tests displayed in the Test Steps section of the editor and the Step Contents section that allows modifying descriptions and instructions of test steps.
Test Steps
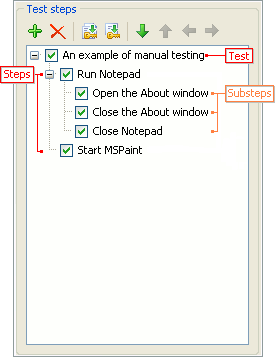
The Test steps section on the left side of the editor displays the list of existing test steps. The list is organized into a tree-like structure: the top-most node is a test node that has steps as its child nodes, steps can have substeps which, in their turn, can also have substeps, and so on.

Select or clear the check boxes shown by each step to include steps in or exclude them from the run (TestComplete will execute only those steps whose check boxes are enabled).
For information on how to manage steps in the test, see Working With the Manual Test Editor.
Step Contents
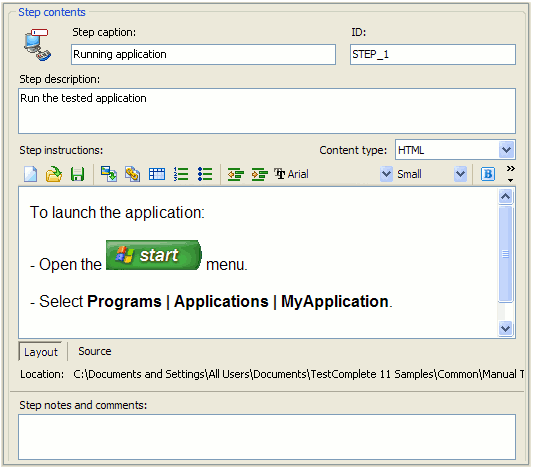
The Step contents section in the right part of the editor shows properties of the step selected in the Test steps list or the properties of the entire manual test (if the test node is selected in the step list).

The section contains fields and edit boxes which allow setting step properties and specifying step instructions:
ID
The ID edit box in the Step contents section contains a string that uniquely identifies the step (or the entire test). You can use this identifier in script routines or keyword tests that handle manual testing events to determine which step you are working with.
Caption, Description and Instructions
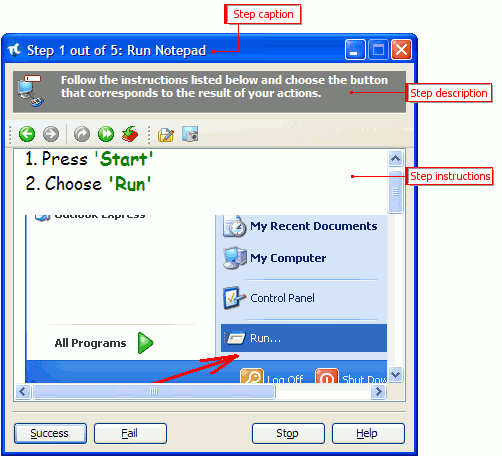
Using the Step caption and Step description edit boxes and the Step instructions section, you can specify the caption and description of a manual test step while providing detailed instructions on how to perform this step as well as the expected outcome of the application under test. You can then see the specified step caption, description and instructions in the Step Description dialog when you run the manual test.

The contents of the Step instructions section in the Manual Test Editor depends on the format the instructions are specified in. The instruction format is specified by the Content type combo box. Step instructions can be given in the form of an HTML or XML document or you can assign a keyword test to a manual test step so some keyword test operations can be automatically executed during the manual test run to perform some helper actions that do not need to be performed manually.
HTML Content Type
If Content type is set to HTML, the HTML code editor is displayed in this section. Using the editor’s toolbar you can load instructions from or save them to an HTML file, insert an image or a hyperlink into instructions and change the document’s font and paragraph parameters. By switching to the Source page of the Step instructions section, you can modify the source HTML code. The Layout page displays the resulting HTML page which you will see in the Step Description dialog during the test run.
| Note: | If you insert an image into the HTML step instructions, TestComplete will not store this image in the project, it will only save a reference (absolute path) to it. If you open the manual testing file from another computer, the reference may be broken. To avoid this, place the pictures to a shared folder and specify the path to this shared folder when inserting the image into step instructions.
When an image is inserted, make sure that the pictures are displayed in the browser. To do this:
|
XML+XSL Content Type
If Content type is set to XML+XSL, the Step instructions section contains two pages with edit boxes where you can specify the desired XML and XSL code. On the XML Source page, specify the test instructions in the XML format. On the XSL Source page, you need to specify the XSL code that will transform the XML instructions to an HTML document in order for it to be displayed in the Step Description dialog during the test run. Both these pages display toolbars which let you save an XML or XSL document to or load it from a file.
Keyword Test Content Type
If Content type is set to Keyword Test, the Step instructions section contains the Keyword Test box in which you can specify an existing keyword test to be performed during the selected test step’s run. To specify an existing keyword test, click the ellipsis button and choose the needed test in the ensuing Select Test dialog.
After you specify the keyword test, you can view its contents and modify it by clicking the  Jump to Keyword Test button.
Also, you can convert the selected manual test step with instructions in the HTML or XML format or the entire manual test to a keyword test (or a collection of keyword tests if you convert the entire manual test) by using the  and
and  buttons respectively - the buttons reside on the Test steps section’s toolbar. For more information about this, see Using Keyword Tests in Manual Tests.
The fully-qualified name of the file that contains an HTML or XML description of a test step is displayed in the Location field. In case of using a keyword test, this field contains the name of the keyword test and its location in the project hierarchy.
Notes and Comments
The Step notes and comments edit box is used for writing down notes and comments on the step.

 Test Steps