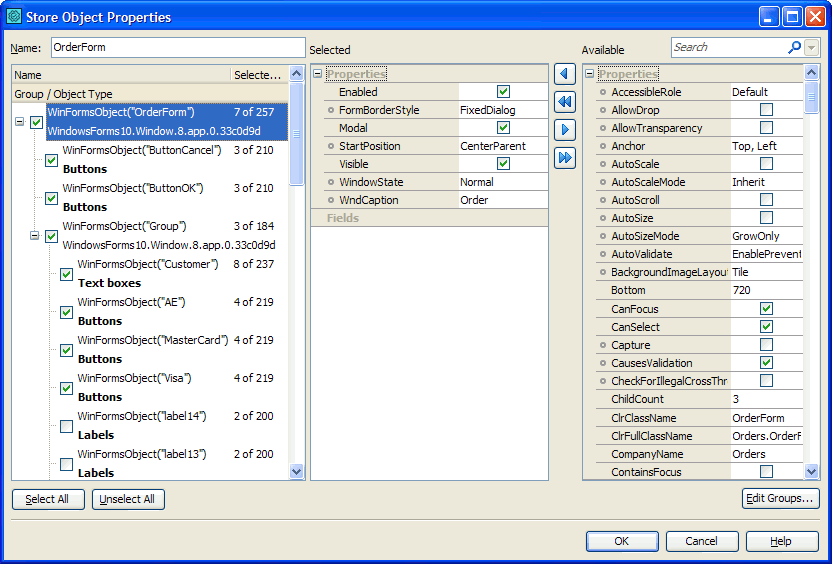
The Store Object Properties dialog allows you to select object properties to be included in an object checkpoint or to be stored in the Stores | Objects collection for custom use. The dialog appears when you do any of the following:
-
Press the Properties button on the Select Properties to Store page of the Object Checkpoint wizard.
-
Press the Properties button on the Select Properties to Store page of the Add Object wizard.
-
Select Store Object from the context menu of the Object Browser panel or the Object Spy window.

| Note: | The dialog's user interface may slightly vary depending on where the dialog is opened from and whether you store the data of the object only, or the data of both the object and its child objects. |
Specifying a Name for an Objects Collection Item
When you store object data from the Object Browser, the dialog contains the Name box where you can specify the name of the item to be created in the project’s Stores | Objects collection. This name will be used to refer to the stored object in tests.
When you create an object checkpoint or add a stored object from the Project Explorer, you specify the name of the Objects collection item to create in the appropriate wizard.
Selecting Objects to Store
When you store an object along with its child objects, the left part of the dialog displays the entire object hierarchy. Simply check the objects whose data you want to store and uncheck unneeded objects. To quickly check or uncheck all the objects, use the Select All and Unselect All buttons.
The object tree has the following columns:
| Column | Description |
|---|---|
| Group / Object Type | The object’s class name. If the class name belongs to a particular object group (see below), this column displays the group name in bold. |
| Name | The object's name. This is the same name that you can see in the Object Browser and that is returned by the object’s Name property. |
| Selected Properties | Indicates the number of the selected properties to store, out of the total number of properties that the object has. |
Once you have selected the objects you want to store, you need to specify the stored properties for each of the objects.
Selecting Object Properties to Store
The object properties selected to be used in an object checkpoint or for storing are displayed in the Selected list. The other object properties are displayed in the Available list.
 What properties are stored by default
You can add and remove stored properties by moving the properties between these lists using the arrow buttons:
-
To add a new property to store, select it in the Available list and click
 .
. -
To store all the properties of a specific category, select the category name in the Available list and press
 .
. -
To store all the object properties, click
 .
. -
To delete a property from the stored properties, choose it in the Selected list and press
 .
. -
To delete all the properties of a specific category from the stored properties, choose the category name in the Selected list and click
 .
. -
To clear the list of stored properties, click
 .
.
 |
Certain object properties cannot be stored or used in object checkpoints, and thus they are not displayed in the dialog. These are:
|
Tips on Selecting Properties to Store
Searching for Properties
If the object contains a lot of properties and fields, you can quickly find the needed one using one of the following techniques:
-
Start typing the property (field) name. TestComplete will select the property (field) whose name starts with the entered characters and highlight these characters in the name. To select the next matchable property (field), press Ctrl+Down, to select the previous one - Ctrl+Up.
-- or --
-
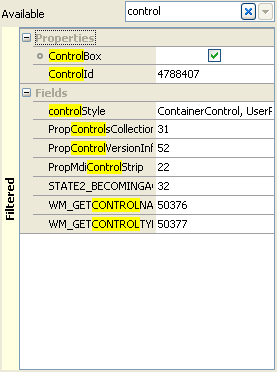
Type the property (field) name or its part in the Search box. TestComplete will filter the property (field) list to display only those properties (fields) whose names contain the specified text:

To remove the search filter, clear the Search box or click
 .
.
Using Object Groups
Selecting stored properties individually for each object can be a tedious process. To make it easier, you can customize the default set of stored properties for various objects, so that you do not have to select them manually each time. This can be done by using object groups.
An object group defines one or more object classes and specifies the default set of stored properties selected for all objects of these classes (these properties must be common to all object classes in the group). If you store objects along with their child objects, you can also use object groups to specify which object classes are selected for storing by default (they are checked in the object tree) and which are not.
To define a new object group or view, modify or remove existing groups, click Edit Groups and use the subsequent Edit Groups dialog. For example, to define the default stored properties for a group, list their names in the Properties selected by default box of the Edit Groups dialog.
Group definitions are saved to the %ProgramData%\SmartBear\TestComplete\14.0\ObjectGroups.xml file (typically, C:\ProgramData\SmartBear\TestComplete\14.0\ObjectGroups.xml). You can copy this file to other machines in order to share group definitions among team members.
See Also
Object Checkpoint Wizard - Select Baseline Data Page
Add Object Wizard - Select Properties to Store Page
Edit Groups Dialog

 Specifying a Name for an Objects Collection Item