 |
The information below concerns legacy mobile tests that work with mobile devices connected to the local computer. For new mobile tests, we recommend using the newer cloud-compatible approach. |
This topic describes how to prepare iOS applications in Xcode 9 - 12.3 for testing with TestComplete.
 Do not submit instrumented applications to the App Store. Instrumented applications use private APIs and will be rejected. Create a separate build configuration for test builds.
 We recommend instrumenting your applications in TestComplete UI instead of Xcode.
 1. Add Test Devices to the Application Provisioning Profile
 2. Create a Build Target for Testing
 3. Add the TestComplete Agent Library to Your Project
Supported Applications
Information in this topic applies to Objective-C and Swift iOS applications created in Xcode 9 - 12.3.
Requirements
-
A Mac computer with Xcode 9 - 12.3, iOS SDK and an iOS development license.
-
Access to a Windows computer with TestComplete installed.
1. Add Test Devices to the Application Provisioning Profile
If you have the iOS Developer Program (not the iOS Developer Enterprise Program), your application can run only on test devices specified in the provisioning profile for the application. You need to add the test devices to the provisioning profile before you build the application. For instructions, see Registering iOS Devices for Testing (Legacy).
2. Create a Build Target for Testing
To keep your release builds intact, create a new build target for test builds:
-
Open your application project in Xcode.
-
Select the project in the Navigator area to view the list of targets.
-
Right-click the target you want to test and select Duplicate from the context menu.
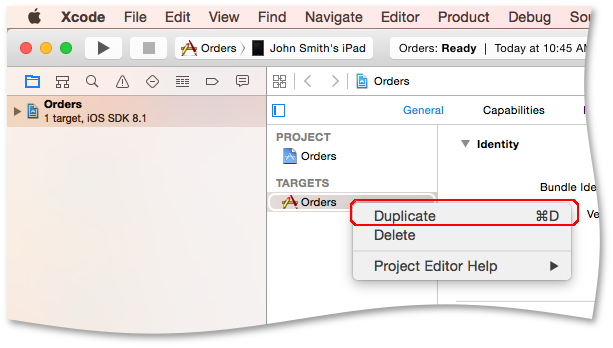
Xcode will make a copy of this target with the name App_Name copy.
-
Rename the new target to App_Name TestComplete or similar to mark it as a test-only build.
-
Rename the target’s scheme, settings and associated files to match the new target name:
-
From Xcode’s menu, select Product > Scheme > Manage Schemes and rename the scheme from App_Name copy to App_Name TestComplete.
-
In the project navigator, rename the App_Name copy-Info.plist file to App_Name TestComplete.plist.
-
In the target’s Build Settings, under the Packaging section:
-
Set Info.plist File to App_Name TestComplete.plist.
-
Set Product Name to App_Name TestComplete.
-
-
3. Add the TestComplete Agent Library to Your Project
You need to compile your iOS application with the TestComplete Agent library.
If your application was prepared for testing with an earlier version of the TestComplete Agent library, it will be unavailable to newer versions TestComplete. To avoid this issue, recompile the application with the library that is shipped with your current TestComplete version.
To add the library to your project, do the following:
-
On a Windows computer with TestComplete installed, find the following file:
<TestComplete>\Bin\Extensions\iOS\libTestComplete-agent-static.a
Copy or send this file to your Mac.
-
From Xcode’s menu, select File > Add Files to App_Name.
-
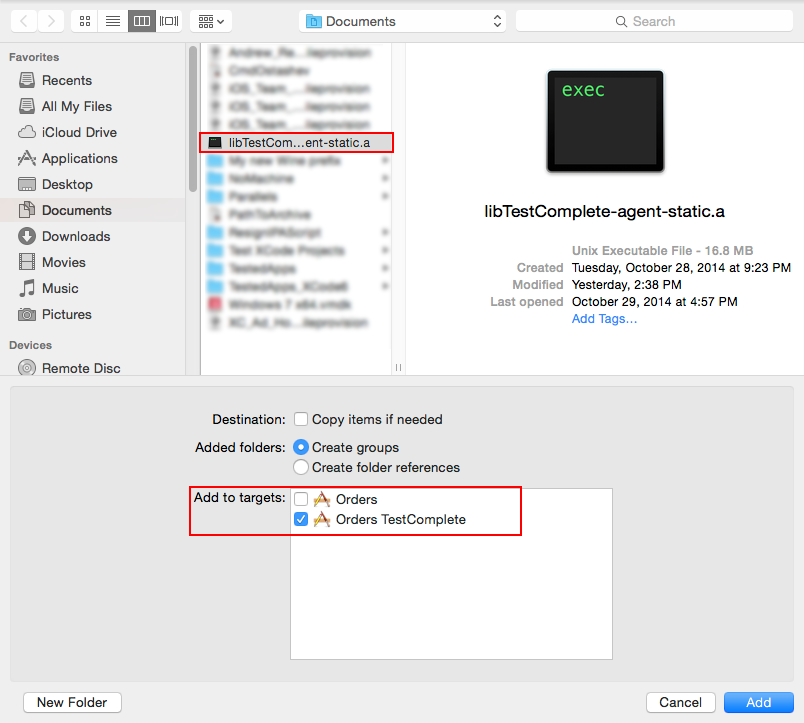
In the dialog that appears, select the libTestComplete-agent-static.a file.
-
In the Add to targets list, select only your test build target and unselect the other targets.
-
Click Add.
4. Change Build Settings
To configure the build settings for test builds:
-
In Xcode, select your project in the Navigator area.
-
Select the App_Name TestComplete target to view its settings.
-
Switch to the Build Settings page.
-
Under the Linking section, set Other Linker Flags setting to -all_load -ObjC.
-
(Only if you use Xcode 8 and later) Under the Build Settings section, set the Enable Bitcode setting to No.
5. Create an IPA File
An IPA file is an iOS application archive file that contains the application. You need to create an IPA file to distribute your application to testers or automatically install it on a device from tests.
The first time you create an IPA file, configure the archiving settings to archive the release (not debug) version of your application:
-
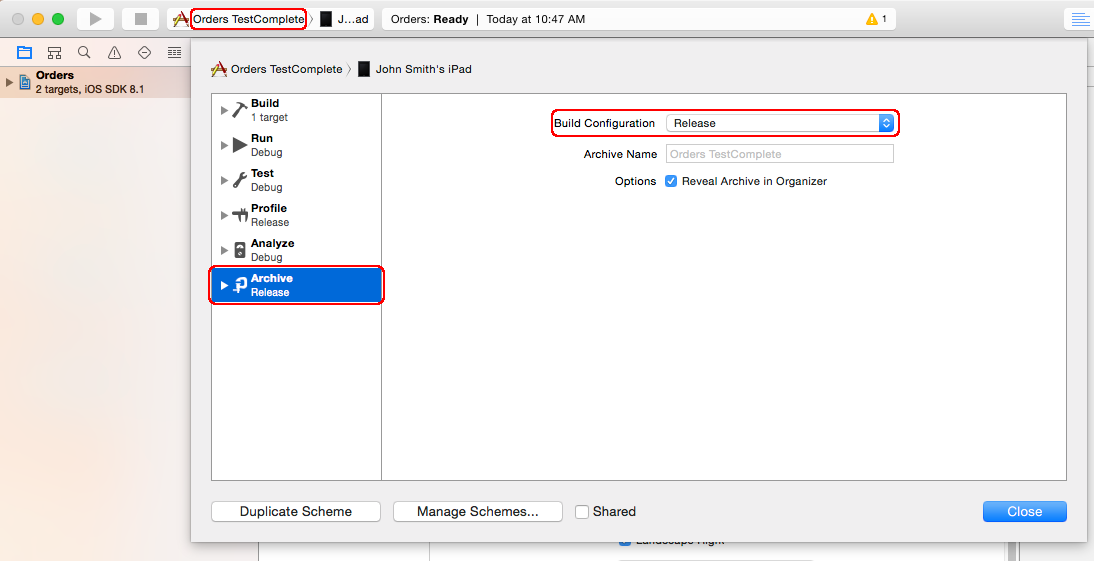
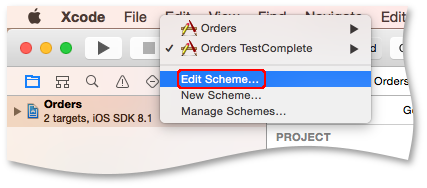
In Xcode, select Edit Scheme from the Scheme toolbar menu.
-
Select App_Name TestComplete from the Scheme menu at the top of the dialog.
-
Select Archive in the left column.
-
Set Build Configuration to Release and click Close.
To create an IPA file:
-
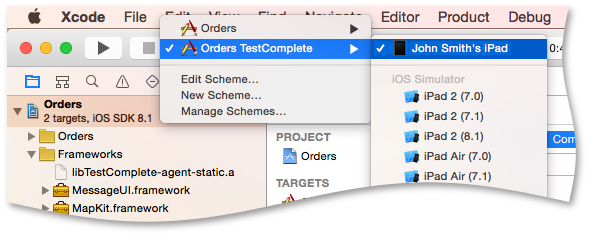
From the Scheme toolbar menu in Xcode, select the App_Name TestComplete scheme. In the submenu, select either iOS Device or the connected device’s name.
-
From Xcode’s menu, select Product > Archive and follow the instructions to complete the process.
Xcode will display the created archive in the Archives organizer.
-
Select the created archive and click Export.
-
In the subsequent dialog, select one of the following options:
- Save for Development Deployment (available in Xcode 8 and later), or
- Save for Ad Hoc Deployment, or
- Save for Enterprise Deployment
The option to choose depends on the developer program you have:
-
If you have the iOS Developer Program (not the iOS Developer Enterprise Program), select Save for Development Deployment. This way you will be able to run your iOS application from TestComplete.
To use the Enterprise option, you need to have the iOS Developer Enterprise Program.
-
If you have the iOS Developer Enterprise Program, you can select any of these options. We recommend that you choose Save for Development Deployment.
-
Xcode will display the production provisioning profile it chose for your .ipa file. Click Save to complete the file creation.
If Xcode chose an incorrect profile, cancel the file creation dialog and modify your certificates and provisioning profile settings in Apple’s Member Center, the Keychain Access application on your Mac and Xcode’s Preferences > Accounts dialog.
Deploying the IPA File to Device
You can either deploy the IPA file to your device manually, or configure TestComplete to automatically install it on devices as part of tests. To do this:
-
Copy or send the IPA file from your Mac to the TestComplete computer.
-
Add this IPA file as a tested application to your TestComplete project.
-
Configure the project settings to automatically deploy the application to the test device during the test run.
For more information, see Deploying iOS Applications to Devices (Legacy).
Other Preparatory Actions
Before you can test your iOS application with TestComplete, you also need to configure the TestComplete computer. For more information, see Preparing Test Computers and TestComplete for iOS Testing (Legacy).
See Also
Preparing iOS Applications (Legacy)
Preparing Test Computers and TestComplete for iOS Testing (Legacy)
Preparing iOS Devices (Legacy)
Testing iOS Applications - Overview (Legacy)

