 |
The information below concerns legacy mobile tests that work with mobile devices connected to the local computer. For new mobile tests, we recommend using the newer cloud-compatible approach. |
The easiest way to create Android tests is to record them. You can record tests in the Mobile Screen window. However, multi-touch gestures can be recorded on physical devices only.
If your Android application is instrumented, TestComplete records object-based tests. For unprepared applications, TestComplete records image-based tests.
Before Recording
-
Before recording an Android test for the first time, configure TestComplete, your Android device and (optionally but highly recommended) your Android application. For instructions, see Preparing for Testing Android Applications (Legacy).
-
Open the Mobile Screen window and connect to your device.
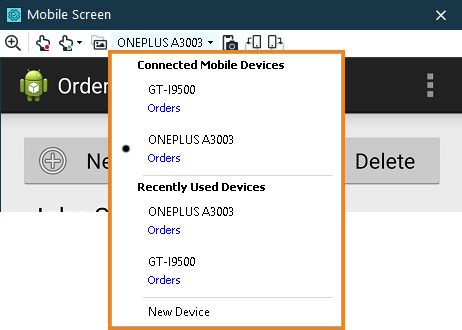
If multiple devices are connected to TestComplete, select the needed device from the drop-down list at the top of the Mobile Screen window:

-
(For image-based tests) If you use Android 4.0-4.0.2, do something in the Mobile Screen window, for example, touch somewhere. This will ensure correct recording.
Recording Tests
-
To start recording, do any of the following:
-
Click
 Record Keyword Test or
  Record Script on the Test Engine toolbar.
 -
Select Test > Record > Record Keyword Test or Test > Record > Record Script from the TestComplete main menu.
-
Press Shift+F1 (the shortcut can be changed in the Global Shortcut Options).
The Recording toolbar will appear on the screen.
-
-
Perform test actions in the Mobile Screen window.
Tips:
-
To record text input, click the text field in the Mobile Screen window and then enter text using your computer’s keyboard. See below.
-
To record pressing device buttons (Home, Back and others), click the corresponding buttons in the Mobile Screen’s footer. See Simulating Physical Button Events (Legacy).
-
To record a multi-touch gesture, click
 Record Gesture on the Mobile Screen toolbar and follow the onscreen instructions. See Recording Gestures (Multi-Touch Events) (Legacy).
-
-
To stop recording, do any of the following:
-
Press
 Stop on the Recording toolbar.
 -
Press Shift+F2 (the shortcut can be changed in the Global Shortcuts Options).
-
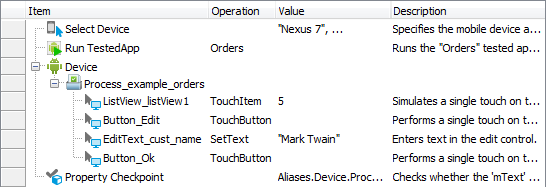
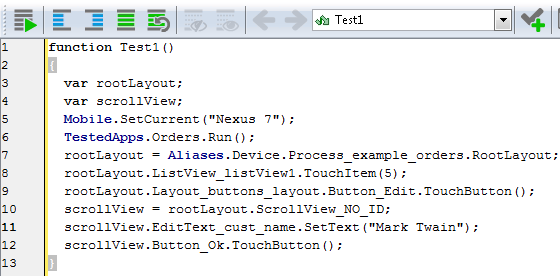
TestComplete will open the recorded test in an editor, so that you can review and change it, if needed.

Sample recorded keyword test

Sample recorded script
Recording Text Input
Text input on a mobile device is usually made by using an onscreen keyboard. Currently, TestComplete is unable to record text input from the onscreen keyboard. To record test input, use the host computer's keyboard:
-
During test recording, select the appropriate text field in the Mobile Screen window.
-
Type the desired text using your computer’s keyboard.
TestComplete always records text input using the SetText action.
Notes
-
During test recording, TestComplete actively exchanges data with the tested Android application. If you are recording a test on a virtual machine, or on a physical Android device connected via Wi-Fi, the data goes through your local network. So, you might experience a slowdown when interacting with the tested application, especially if your local network is busy.
For physical devices, a possible workaround is to use USB-connected devices for test recording, and to use Wi-Fi connections for test runs.
-
During recording, TestComplete captures images of the device screen and displays them in the Test Visualizer panel. These images help you understand what operations your test performs.
-
When recording white-box tests, TestComplete does not record user actions on disabled (grayed) Android controls. If you need your test to simulate such actions, create the corresponding test commands manually.
See Also
About Testing Android Applications (Legacy)
Creating Tests for White-Box Android Applications
Image-Based Testing in Android Applications (Legacy)
Simulating Basic Touch Actions Over Android Devices (Legacy)
Simulating User Actions Over Android Devices (Legacy)
Simulating Gestures (Multi-Touch Events) (Legacy)

 Before Recording