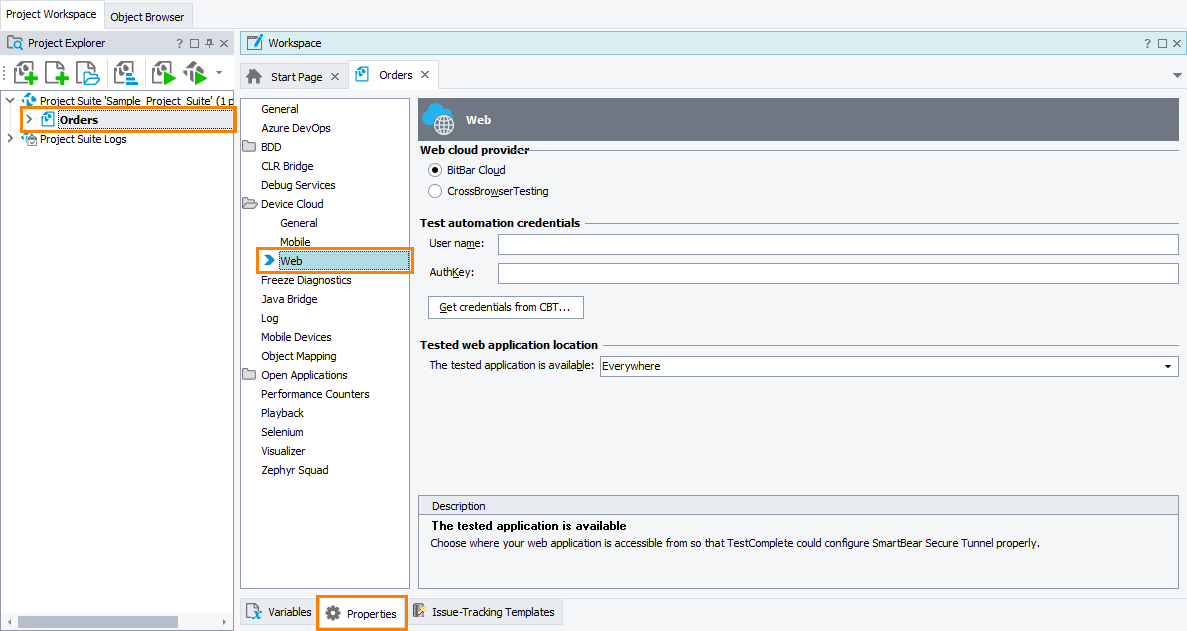
You use the Device Cloud - Web project properties to select a provider of a device cloud in which you will run your web tests.
Requirements
-
TestComplete 14.8.
-
An active license for the TestComplete Web Module.
-
The Web Testing plugin and the Cross-Platform Web Testing plugin must be enabled in TestComplete (they are installed and enabled by default).
-
TestComplete must have access to the device cloud provider you are going to use. If there are any firewalls or proxies in your network, make sure that they allow traffic from the TestComplete workstation to that provider.
Currently, the only available provider is CrossBrowserTesting.com. To access it, configure the firewall to allow outbound connections on ports 80 and 443 to CrossBrowserTesting.com.
To view or modify properties
-
Select Tools > Current Project Properties from the TestComplete menu.
– or –
Double-click the project in the Project Explorer. In the project editor that opens, select the Properties tab.
– or –
From the context menu of the project in the Project Explorer, select Edit > Properties.
-
In the tree on the left of the project properties editor, select Device Cloud > Web.
Available properties
-
Web Cloud provider - Specifies the device cloud provider to use to run web tests. You can select:
-
BitBar Cloud - This option is reserved for a future release and has not been implemented yet.
-
CrossBrowserTesting - Your web tests will run in the device cloud provided by CrossBrowserTesting.com.
-
If the CrossBrowserTesting device cloud is selected, the following properties become available:
-
User name and Authkey are used to access the CrossBrowserTesting API. To get these values, you can:
Use the existing CrossBrowserTesting account
-
Click Get credentials from CBT.
-
Enter your email address and password you use to connect to CrossBrowserTesting.
-
Click Sign In.
Sign up for a free trial
-
Click Get credentials from CBT.
-
In the resulting dialog, click Try for free.
-
Enter your email and password you will use to connect to CrossBrowserTesting.
-
Click Start Trial.
CrossBrowserTesting accounts are time-limited. Also, they limit the number of concurrent test runs, the number of test minutes and the number of subaccounts. You can find information on your account on the Account Details form in TestComplete or on your account page of the CrossBrowserTesting web site.
To learn about CrossBrowserTesting terms of use, see Terms of Service and Privacy Policy.
The
Authkeyvalue will be stored in the project in an encrypted form.TestComplete will get the user name and AuthKey values from CrossBrowserTesting and fill the appropriate fields automatically.
-
-
The tested application is available - Specifies where your tested web application is located. Configure the property to command TestComplete to open a secure tunnel between your tested web application and your testing environment.
If your tested web page or web application is not available publicly but resides on your local computer or in your local network behind a firewall, CrossBrowserTesting environments will not be able to access it and your tests will fail. For the testing environments to be able to access your tested page or application, a secure tunnel between the device cloud and the application location must be opened. To learn more about secure tunnels, see Access Web Applications Behind a Firewall.
The following options are available:
-
Everywhere - Your tested web application is available publicly from any location. No tunnel configuration is required.
-
In a local network - Your tested web application resides in your local network behind a firewall. Select this option to open a secure tunnel between your local network and SmartBear Device Cloud.
-
On a local computer - Your tested web application resides on your local computer. Select this option to open a secure tunnel between your local computer and SmartBear Device Cloud.
-
Tested application directory - Specifies the path to the folder on your local computer where your tested web pages are located. You can enter the path manually or you can click the ellipsis button and browse for the folder in the resulting Browse for Folder dialog.
-
-
Via proxy - Select this option to command TestComplete to route traffic to your tested web application through a remote proxy server. You may need this to simulate requests sent to your tested web application from a remote location.
-
Proxy server IP address and Proxy server port - Specify the public IP address and port of the remote proxy server you want to use.
-
Proxy server login and Proxy server password - Specify the username and password you use to access the proxy server you want to use.
-
-
The default values for these properties that will be used in new TestComplete projects are specified in the Default Project Properties - Web Option dialog.
See Also
About Cross-Platform Web Tests
BitBar
Managing Projects, Project Suites and Project Items


 Use the existing CrossBrowserTesting account