 |
The information below concerns legacy mobile tests that work with mobile devices connected to the local computer. For new mobile tests, we recommend using the newer cloud-compatible approach. |
Before you start creating mobile tests, you need to set up TestComplete and your mobile device. This topic explains how to configure your TestComplete environment for mobile testing. For information on configuring mobile devices and applications, see other topics of the Preparing for Testing Android Applications (Legacy) section.
 3. Enable legacy Android support in TestComplete
 4. Enable USB Support in TestComplete Virtual Machine
 6. Specify Android SDK and Java Paths in TestComplete Settings
 7. Add “Show Mobile Screen” Toolbar Button
1. Install JDK
To test Android applications, you need to have Java Runtime Environment or Java Development Kit (JRE or JDK) ver. 8 and later installed on the computer where TestComplete is installed. You can download it from –
 http://java.com/en/download/windows_manual.jsp
| Note: | You can use any supported versions of Java SE Runtime Environment (JRE) or Java SE Development Kit (JDK). However, the preferable version is 8. |
For testing, it is enough to have JRE installed, but you may need to download and install JDK, as JDK includes JRE modules.
If you use a 64-bit version of Windows, you can use both the 32-bit and 64-bit Java versions.
If using the 64-bit Java version is not critical for you, we recommend installing the 32-bit Java version. Some packages of the Android SDK (that should also be installed on your test machine, see below) work with 32-bit Java.
After you install JDK, you need to specify the path to it in TestComplete settings (see below).
2. Install the Android SDK
TestComplete uses the following modules of the Android SDK:
-
Android Debug Bridge (ADB, adb.exe) - To communicate with Android devices.
-
Android Asset Packaging Tool (aapt.exe) - To work with packages.
 You need to have the Android SDK installed on each computer where you are going to create or run mobile tests.
You can get the Android SDK from the Android Developer web site:
 https://developer.android.com/sdk/index.html
Android Studio (Default Download)
You can download the Android SDK along with Android Studio:
 https://developer.android.com/studio/index.html
-
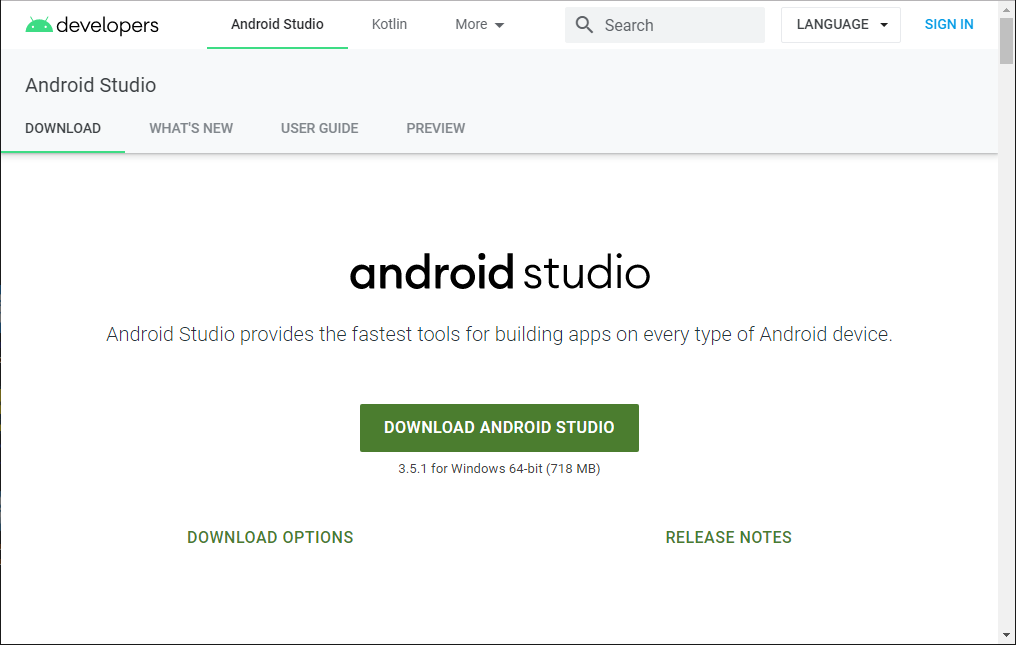
Click Download Android Studio to download an installer that contains both the SDK files and Android Studio needed for Android application development:
-
Follow the installation instructions on the Android Studio web site.
-
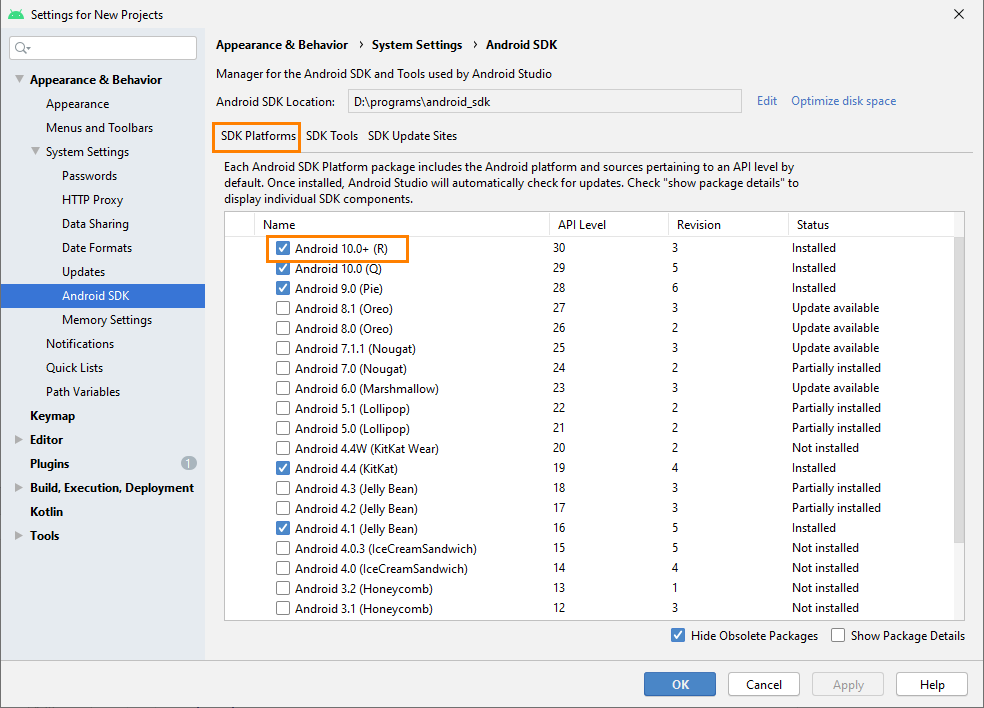
After the studio is installed, launch it and select Configure > SDK Manager, or select File > Settings and then select Appearance & Behavior > System Settings > Android SDK:
-
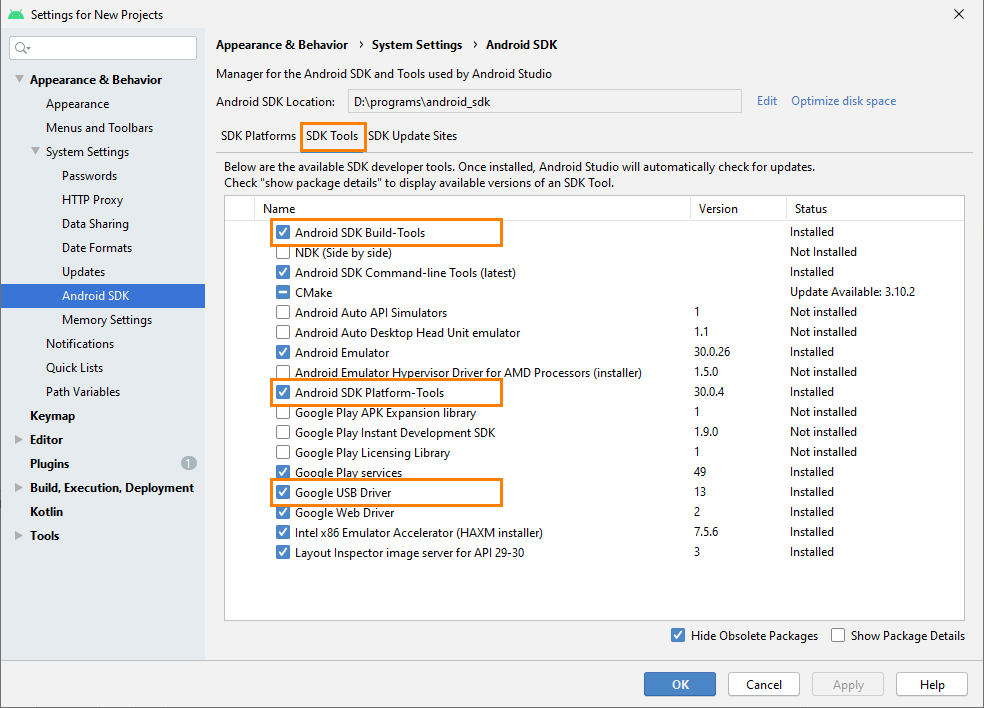
In the SDK Manager, make sure the following items are selected:
The SDK Platforms tab
- Android 10.0+ (R)
The SDK Tools tab
-
Android SDK Platform-tools
-
Android SDK Build-tools ver. 26.0.2 or later
-
If you are going to test on Google Nexus devices: Google USB Driver
-
If you are going to use Android emulator for testing:
Intel x86 Atom System Image for Android 4.0.3 (API 15) or later
Intel x86 Emulator Accelerator (HAXM)
-
Click OK to install packages, if needed. Accept the license agreement and proceed with the installation.
After you install Android Studio and all the needed packages, specify the path to the SDK files in TestComplete settings. Usually, the path is <AppData>\Local\Android\Sdk. See below.
SDK Tools
You can download and install the SDK platform tools only:
 You need to have the 32-bit version of Java JRE or JDK installed on your computer.
-
In your web browser, navigate to the Downloads page of the Android Developer web site:
 https://developer.android.com/studio/index.html#downloads
Scroll to the Command line tools only section:
-
Locate the SDK tools package named sdk-tools-windows-NNN.zip and download it.
-
Extract the packed files to a folder on your computer.
-
Find the sdkmanager utility in the folder where the extracted files are located. Usually, it resides in the <sdk-tools-windows-NNN>/tools/bin folder.
-
Use the utility to install the following items:
-
Android 10.0+ (R) (on the SDK Platforms tab)
-
Android SDK Platform-tools
-
Android SDK Build-tools ver. 26.0.2 or later
-
If you are going to test on Google Nexus devices, Google USB Driver
-
If you are going to use Android emulator for testing:
Intel x86 Atom System Image for Android 4.0.3 (API 15) or later
Intel x86 Emulator Accelerator (HAXM)
To do this, run the utility with the following command-line parameters:
sdkmanager "platform-tools" "platforms;android-NN" "build-tools;NN.N.N" "extras;google;usb_driver" "emulator" "system-images;android-NN;default;x86"Where NN is the version of the API for which you want to install the SDK tools.
For detailed information on the sdkmanager utility command-line parameters, see the utility description on the Android Developer web site.
-
-
Specify the path to the Android SDK in TestComplete settings (see below).
3. Enable legacy Android support in TestComplete
You can test Android applications by using the legacy mobile support only if:
-
You have an active license for the TestComplete Mobile module.
-
The following plugins must are enabled in TestComplete:
- Mobile Support - Provides basic features for mobile testing.
- Android Support - Provides support for interacting with Android devices, virtual machines and emulators.
The plugins are installed and enabled automatically during TestComplete installation.
-
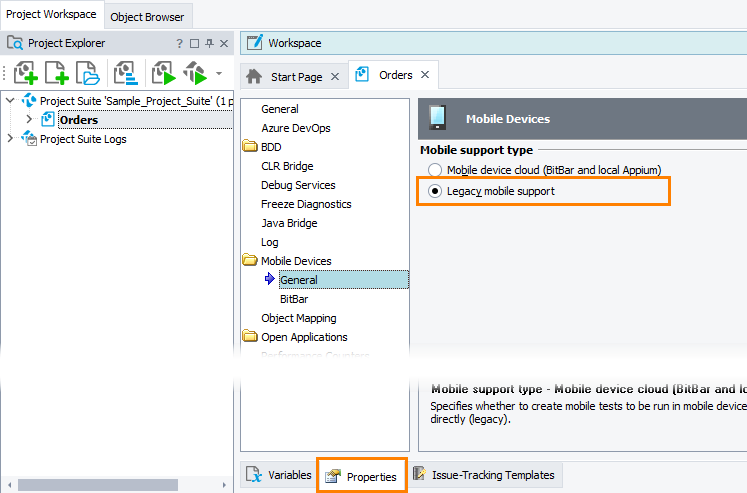
The legacy support is enabled in your current TestComplete project. Enable it on the Properties > Mobile Devices > General page of your project:
4. Enable USB Support in TestComplete Virtual Machine
TestComplete can run on virtual machines. If you are using a physical mobile device for testing, the TestComplete virtual machine needs USB support to be able to access physical devices connected to the host computer. For instructions on how to enable USB support in a virtual machine, refer to the virtual machine’s documentation.
 |
Applications typically run slower on virtual machines than on physical machines. To use TestComplete on a virtual machine, make sure your host configuration provides the highest virtual machine performance possible. If you experience performance issues, use more powerful host hardware. |
5. Install Device USB Drivers
TestComplete can automate tests on physical mobile devices that are connected to the computer via USB cable. For that you need to install the device USB driver on the TestComplete computer:
-
In the Get OEM drivers table in the Android documentation, find the USB driver that is appropriate for your mobile device:
 https://developer.android.com/studio/run/oem-usb.html#Drivers
Note: If you are using a Google Nexus device, use the Google USB driver. -
Download the needed driver from the vendor's web site.
-
Follow the instructions in the Android documentation to install the driver:
To check whether the needed driver is installed and functions properly, you can use the Android Debug Bridge utility:
-
Connect your Android device to your computer via a USB cable.
-
Command the Android Debug Bridge utility to list the devices connected to your computer:
adb devices -
If the utility detects your device correctly and shows its serial number, the driver is installed and functions properly.
6. Specify Android SDK and Java Paths in TestComplete Settings
Before you start creating mobile tests, specify the Android SDK and Java paths in TestComplete.
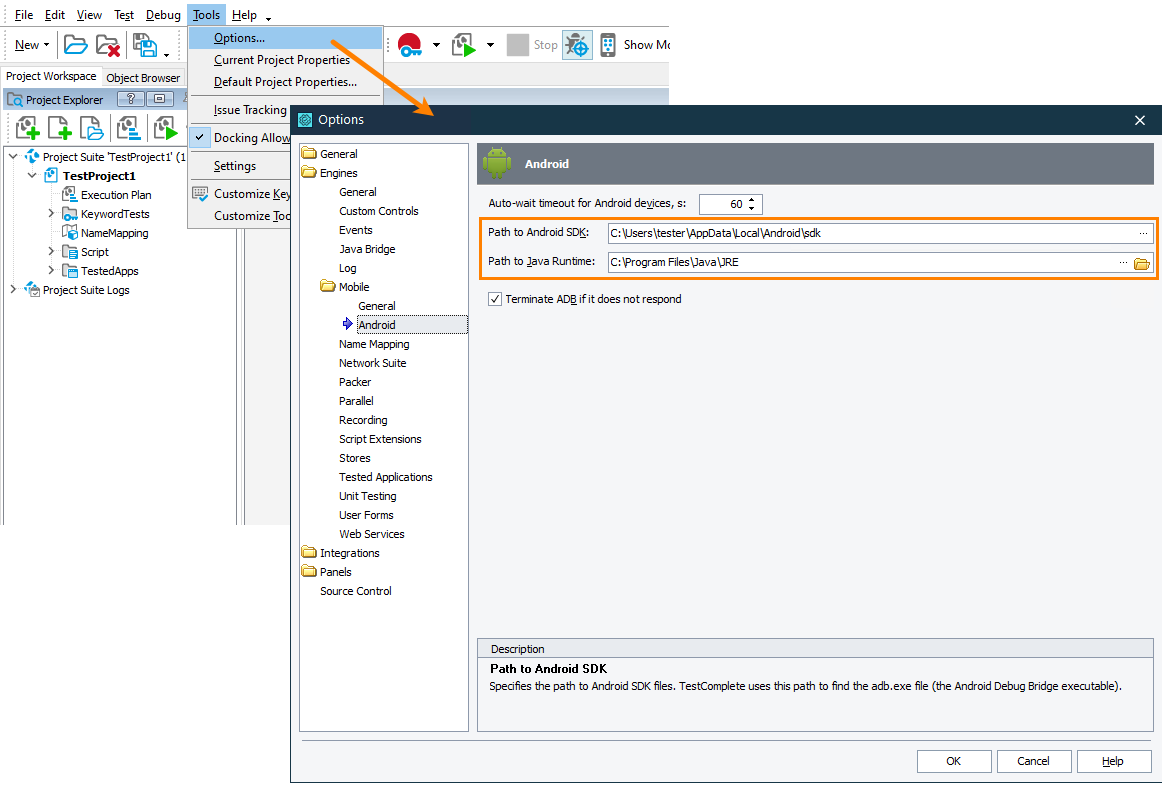
When you install TestComplete, the installation program tries to find these paths automatically on your computer. If it is unable to do so, you may need to specify these paths in TestComplete manually:
-
From the TestComplete main menu, select Tools > Options. This will open the Options dialog.
-
On the left of the dialog, select the Engines > Mobile > Android category.
Note: This category is available only if the Android Support plugin is installed and enabled in File > Install Extensions. -
In the Path to Android SDK edit box, specify the folder where you installed the Android SDK on your computer. For example, C:\Android SDK.
-
In the Path to Java Runtime edit box, specify the folder where Java is installed on your computer. For example, C:\Program Files\Java\jre8.
-
Click OK to close the dialog and save the settings.
7. Add “Show Mobile Screen” Toolbar Button
To create Android tests, you use the TestComplete built-in Mobile Screen window. It displays the screen of the connected mobile device and lets you manipulate the device remotely.
By default, the Show Mobile Screen command is on the Test Engine toolbar. If the command is not available, add it to the toolbar manually:
-
Right-click within the toolbar area and select Customize from the context menu.
-
In the Customize dialog, switch to the Commands tabbed page.
-
Select Mobile in the category list on the left and then drag the Show Mobile Screen item to a toolbar.
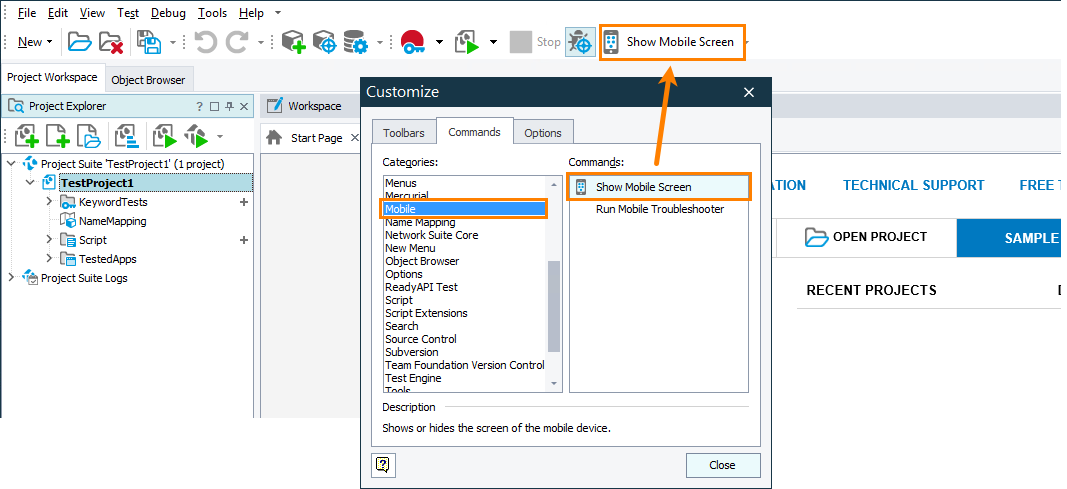
When done, close the dialog.
8. Close Other TestComplete and TestExecute Instances
When testing Android applications, do not run TestComplete and TestExecute at the same time on a computer (in the same Windows session, or in different sessions in Windows Server editions). Otherwise, the two Android testing engines will conflict and cause unexpected behavior.
Other Preparatory Actions
After you prepared TestComplete for testing, you need to check settings of your mobile device and application under test.
See Also
Preparing for Testing Android Applications (Legacy)
Preparing Physical Android Devices for Testing (Legacy)
Preparing Android Virtual Machines for Testing (Legacy)
Preparing Android Applications (Legacy)
About Testing Android Applications (Legacy)

