You can add objects to the Name Mapping repository directly from your application or from TestComplete IDE:
To map a single object
-
Run your application and make sure the needed window or control is on the screen or can be invoked quickly.
 If you are testing mobile applications, open the Mobile Screen window. You will use it to select objects.
 If you are testing a web application and want to map its web objects by using XPath expressions and CSS selectors, make sure that the Use XPath and CSS selectors for web objects option of your project is enabled.
 -
Do one of the following:
-
In the Object Browser or in a Visualizer frame, right-click an object and select Map Object from the context menu.
– or –
-
Click
 Add Object on the Tools toolbar or on the toolbar of the Name Mapping editor.
 -
Use the
 target glyph or the “point and fix” mode to select an object on screen or in the Mobile Screen window (for mobile applications).
The “target glyph” is the easiest way to select a window or control, but it requires this window or control to be visible on the screen. The “point and fix” mode is helpful if you need to select an object that is not currently on the screen, and you need to perform some actions to make it visible. For instance, you use this mode to map menu items (to make an item visible, you first need to display that menu on the screen).
-
-
If your project does not have the NameMapping item yet, TestComplete prompts you to add it.
-
If mapping web objects by using XPath expressions and CSS selectors is enabled, and the selected object is a web object, it will be mapped automatically along with its parent objects if they are not mapped yet either.
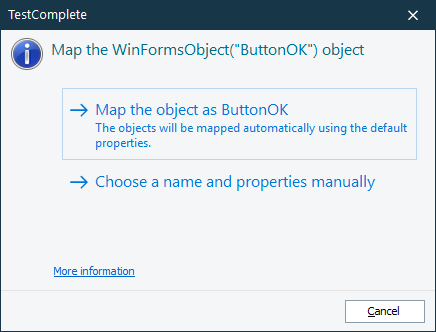
Otherwise, if the option is disabled or if the object is not a web object, in the resulting dialog, choose if you want to map the object with the default alias and identification properties automatically or if you want to specify them manually:

If you have chosen to use the default settings, then you are done.
If you have chosen to customize them, move to the next step.
-
If the parent objects of the selected object are not in the Name Mapping repository yet, TestComplete displays a list of them. Click Yes to continue.
-
For each object being added to the Name Mapping repository:
-
If there are several name mapping templates that match this object, TestComplete prompts you to select the template to use.
-
TestComplete displays the Object Name Mapping dialog where you can enter the object alias and select the identification properties.
-
To batch-map child objects
-
Do one of the following:
-
In the Name Mapping editor, right-click the parent object in the Mapped Objects tree and select Map Child Objects from the context menu.
-
In the Object Browser, right-click the parent object and select Map Child Objects from the context menu.
-
-
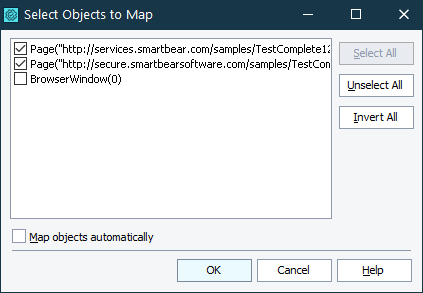
In the dialog, select the check boxes next to the child objects you want to map.

-
To map all the objects automatically using the default aliases and identification properties, select the Map objects automatically check box and click OK.
To specify the object aliases and identification properties manually, leave the Map objects automatically check box unchecked, click OK and follow the on-screen instructions.
Tip: To map multiple objects
Mapping objects automatically during the test recording is the easiest and fastest way to map multiple objects. See Mapping Objects Automatically
See Also
Adding Objects to the Name Mapping Repository
Name Mapping
Mapping Objects Automatically
Mapping Objects From Tests

 To map a single object