 |
This topic describes how you can connect to the CrossBrowserTesting.com service by using the CrossBrowserTesting manager. This method of integrating with CrossBrowserTesting.com is deprecated starting with TestComplete 14.40. We recommend using the Device Cloud add-on instead. See About Cross-Platform Web Tests for details. |
1. Add and Open the CrossBrowserTesting Manager
If your project suite does not have the CrossBrowserTesting manager, add it. To do this, right-click your project suite node in the Project Explorer and then click Add > CrossBrowserTesting.
TestComplete will open the manager. If the manager is not opened automatically, open it manually by double-clicking the CrossBrowserTesting node in the Project Explorer.
This is where you connect to the CrossBrowserTesting cloud and control test runs in environments:
| Note: | If the node is not available, make sure you use TestComplete version 12.2 or later and the Web plugins are enabled in TestComplete. |
The Tests section of the manager (on the left) contains tests and test items to be run in CrossBrowserTesting environments.
In the Environments section of the manager (on the right), you specify environments where the tests will run.
2. Add a Test to the CrossBrowserTesting Manager
Let’s add a test to the CrossBrowserTesting manager:
-
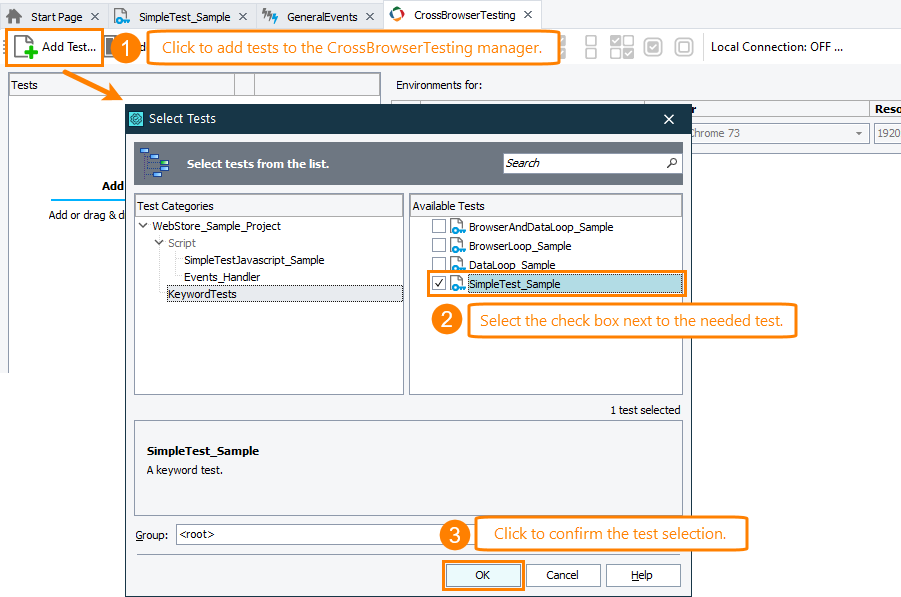
In the CrossBrowserTesting manager, click
 Add Test on the toolbar.
 -
In the resulting dialog, select Keyword Tests in Test Categories on the left. Then, select the check box next to SimpleTest_Sample in Available Tests on the right.
-
Click OK to confirm the selection and close the dialog.
3. Assign Environments to the Test
Let's add several environments in which the assigned test will run. For example, the following environments:
| Operating System | Web Browser | Screen Resolution |
|---|---|---|
| Windows 7 | The latest supported version of Google Chrome | 1920 × 1080 |
| Windows 7 | The latest supported version of Mozilla Firefox | 1600 × 1200 |
To add an environment:
-
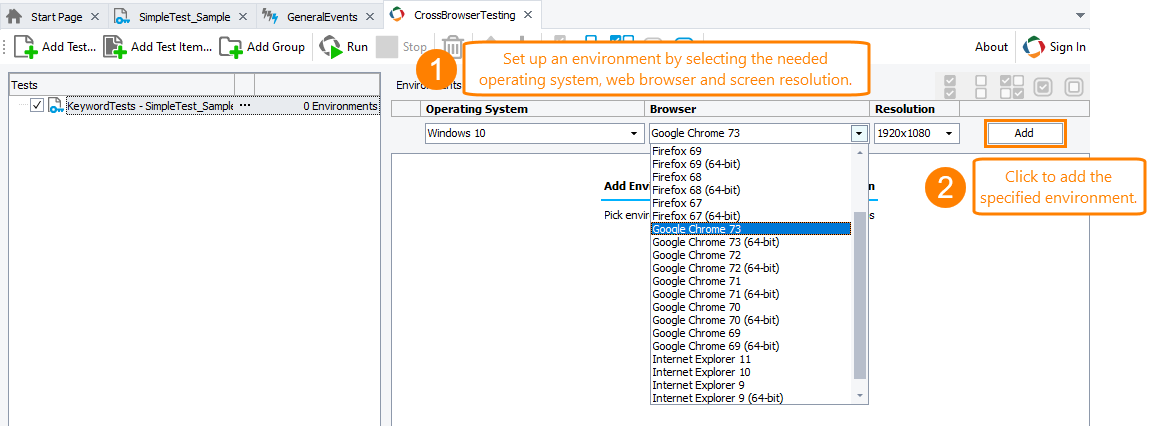
Select the added test in the Tests section of the manager.
-
Specify the environment you want to add by selecting the appropriate values from the drop-down lists:
-
Click Add to add the specified environment to the list.
Repeat the steps to add other environments to the list:
The CrossBrowserTesting manager now specifies a test and environments assigned to it.
Now we will show how to connect to CrossBrowserTesting.com to run the test in the environments.
See Also
Running Tests in CrossBrowserTesting Environments - Tutorial
Integration With CrossBrowserTesting.com


 Prev
Prev