The Name Mapping repository stores all your tested objects with the identification criteria that TestComplete uses to find the objects in applications. By default, TestComplete uses one or more property-value pairs to identify the objects. You can combine those pairs into conditional expressions to create more flexible criteria. This way, you will be able to:
-
Specify multiple possible values for a property.
-
Use the AND and OR logical operators to combine identification properties.
-
Use operators other than equals to specify identification property values (for example, greater than ( > ), less than ( < ), does not equal and so on).
For example:
WndCaption = "Select" OR WndCaption = "Open File" OR WndCaption = "Browse"
ObjectType = "List" AND ChildCount > 0
Note: To learn how to create conditional combinations of XPath or CSS selectors to map web objects, see XPath Expressions and CSS Selectors.
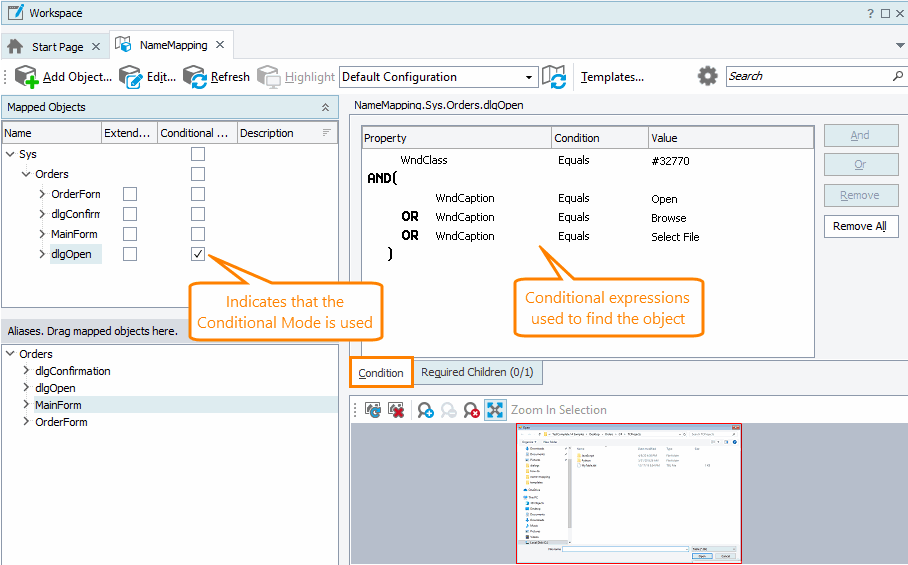
The objects TestComplete finds by using conditional expressions have the Conditional Mode check box selected in the Mapped Object tree, and have the Condition tab page where you can set conditions:
Note: The Conditional Mode check box is read-only. To learn how to enable the conditional mode for an object, see below.
If the Conditional Mode check box is not visible in the Mapped Objects tree, right-click anywhere within the tree and then click Field Chooser. Drag the Conditional Mode column from the Customization dialog to the tree.
Enable or disable conditional mapping mode
-
 Launch your tested application and make sure the object exists in it.
 -
Double-click the object in the Name Mapping editor. This will open the Edit Name Mapping Item dialog.
-
To enable the conditional mode, click Conditional Mode.
To disable the conditional mode, click Basic Mode.
-
Click OK to close the dialog.
| Note: | If you have multiple name mapping configurations, the conditional mapping criteria are shared among all the configurations. |
Create and edit conditions
You can edit conditional expressions in the Name Mapping editor or in the Edit Name Mapping Item dialog.
To add a new expression
-
Select an expression to be combined with the new one.
-
Click the And or Or button, depending on the logical operator you want to use. This will add a new row to the property table.
-
Enter the property name, value and select the comparison operator.
Tip: You can use wildcards (* and ?) to mask variable parts of string property values. In this case, the Equal condition can work like Begins with, Contains or Ends with. See the tips on using conditions below. Also, you can use regular expressions in the ”regexp:pattern“ format to specify more complicated parts of a caption.
To change an expression
To change a property name or value:
-
Click the ellipsis button next to the property name or value. This will open the Edit Value dialog.
-
In the dialog, set a value.
To change the comparison operator, select a new operator from the drop-down list.
To delete an expression
To delete a specific expression, select it and click Remove.
To delete all the expressions from a condition, click Remove All.
Custom conditions
You can use the * wildcard to define string patterns for those cases that are not covered by the built-in comparison operations:
| Custom condition | How to create it | |
|---|---|---|
| Operator | Property value | |
| Contains | Equal | Value enclosed by the * character. For example, *Order*. |
| Does not contain | Not equal | Value enclosed by the * character. For example, *Order*. |
| Begins with | Equals | Value followed by the * character. For example, Order*. |
| Not begins with | Not equal | Value followed by the * character. For example, Order*. |
| Ends with | Equal | Value preceded by the * character. For example, *Order. |
| Not ends with | Not equal | Value preceded by the * character. For example, *Order. |

