 The information in this topic applies to web tests that implement the default approach (rely on Name Mapping and run in local environments).
To test a Flash or Flex application, you need to create a wrapper web page. The Flash or Flex application under test will be embedded into the page. You can do that in different ways:
 From Adobe Flash Professional IDE
 From Flash Builder or Flex Builder IDE
From Adobe Flash Professional IDE
To automatically generate a wrapper HTML page for your application from Adobe Flash Professional, perform the following steps:
-
Open your application project in Adobe Flash IDE.
-
Select File | Publish Settings from the main menu of IDE or press Ctrl+Shift+F12 to open the Publish Settings dialog.
-
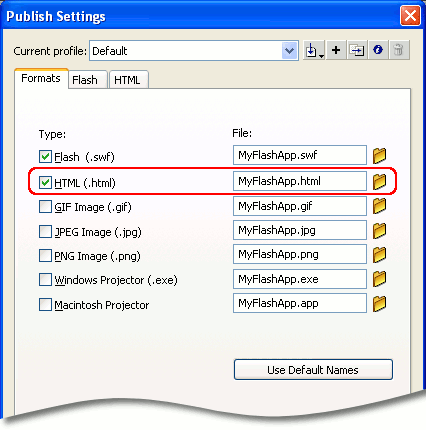
On the Formats tabbed page of the dialog, select the HTML (.html) check box. The HTML tabbed page will appear. On this page, you can configure some parameters of the web page to be created.
-
In the edit box to the right of the HTML (.html) check box, specify the file name of the web page to be created.

-
Click OK to close the Publish Settings dialog and save the changes.
-
Select File | Publish from the main menu or press Shift+F12 to republish your Flash application with the wrapper HTML page.
To improve the test performance, you can modify source code of the created page according to the tips below.
From Flash Builder or Flex Builder IDE
If you use Adobe Flash Builder 4 or Flex Builder 3 to develop your applications, you can generate the wrapper HTML page by modifying the Flash Builder (or Flex Builder) project properties:
-
Open your project in Flash Builder (or Flex Builder).
-
Right-click the project node in Flash Builder’s Package Explorer (Flex Navigator in Flex Builder) and select Properties from the context menu, or select Project | Properties from the main menu of the IDE. This will bring up the Properties dialog.
-
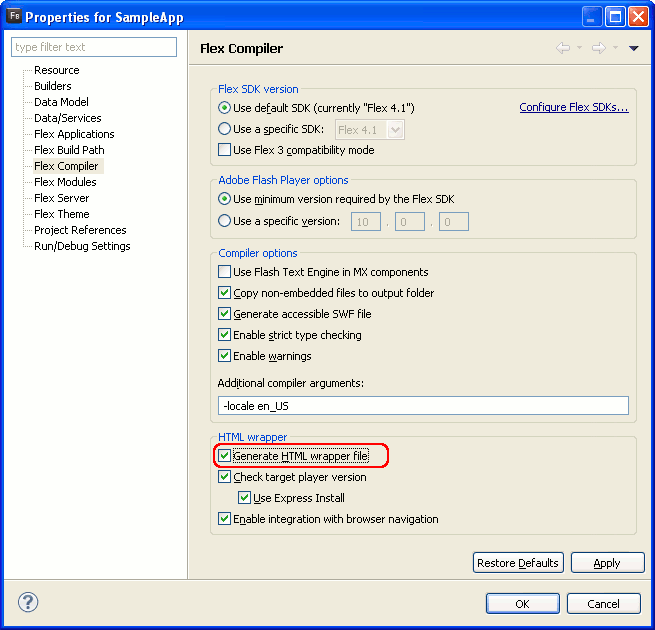
Select the Flex Compiler category and enable the Generate HTML wrapper file option:

-
Save the changes and rebuild the project.
To improve the test performance, you can modify the source code of the created page according to the tips below.
From HTML Templates Included in Flex SDK
Flex SDK includes a set of template HTML pages that you can use to create a wrapper for the tested application. These templates are located in the <Flex SDK>/templates folder. Each template contains tokens (for example, ${swf}) that you will need to replace with values appropriate for your application. For more information about using the templates, see the About the HTML templates topic in Flex documentation (http://help.adobe.com/en_US/flex/using/index.html).
To improve the test performance, you can modify the source code of the created page according to the tips below.
Manual Creation
You can create a wrapper HTML page yourself, using any text or HTML editor. Below you will find the typical code of a wrapper page. Simply copy this code, paste it into the editor and modify the highlighted elements to match the tested Flash and Flex application:
-
Replace MyApp.swf with the name of the tested application’s SWF file.
-
Specify the application’s size (in pixels) in the
widthandheightattributes. -
Specify the
idattribute of theOBJECT(orEMBED) tags that you use to insert your movie into the page. TestComplete uses this attribute to address the movie in tests. Also, this will improve the test performance. The attribute must start with a letter (A..Z, a..z) and contain only letters (A..Z, a..z), digits (0..9) or underscore characters (_).
After that, save the wrapper file into the same folder where the tested application resides. Note that the wrapper file must have the .htm or .html extension.
HTML
<html>
<body>
<script language="JavaScript">
document.write("<object id='MyAppId' width='500' height='300' classid='clsid:D27CDB6E-AE6D-11cf-96B8-444553540000'");
document.write(" codebase='http://download.macromedia.com/pub/shockwave/cabs/flash/swflash.cab#version=10,0,0,0'>");
document.write("<param name='movie' value='MyApp.swf'/>");
document.write("<param name='quality' value='high'/>");
document.write("<param name='allowscriptaccess' value='always'");
document.write("<embed id='MyAppId_2' width='500' height='300' src='MyApp.swf' quality='high'");
document.write(" allowscriptaccess='always'");
document.write(" type='application/x-shockwave-flash' pluginspage='http://www.adobe.com/go/getflashplayer'/>");
document.write("</object>");
</script>
<noscript>
<object id="MyAppId" width="500" height="300" classid="clsid:D27CDB6E-AE6D-11cf-96B8-444553540000"
codebase="http://fpdownload.macromedia.com/pub/shockwave/cabs/flash/swflash.cab#version=10,0,0,0">
<param name="movie" value="../../../../_topics/testing-applications/common/MyApp.swf" />
<param name="quality" value="high" />
<embed id="MyAppId_2" width="500" height="300"
src="../../../../_topics/testing-applications/common/MyApp.swf" quality="high"
allowScriptAccess="always"
type="application/x-shockwave-flash"
pluginspage="http://www.adobe.com/go/getflashplayer" />
</object>
</noscript>
</body>
</html>
Below are tips on creating the HTML page:
-
To insert a Flash movie into a web page, you use the
OBJECTorEMBEDtags. These tags can contain childOBJECTorEMBEDtags. It is recommended that you specify the id attribute for each of theseOBJECTandEMBEDtags to improve the test performance. -
The
OBJECT(orEMBED) tags that you use to insert your Flash movie have the allowScriptAccess attribute. It is recommended that you use the “always” value for this attribute as this will provide better performance. Specifying the “sameDomain” value in the attribute can significantly slow down the test performance.
See Also
Preparing Flash and Flex Applications for Testing with the FlexClient Library
