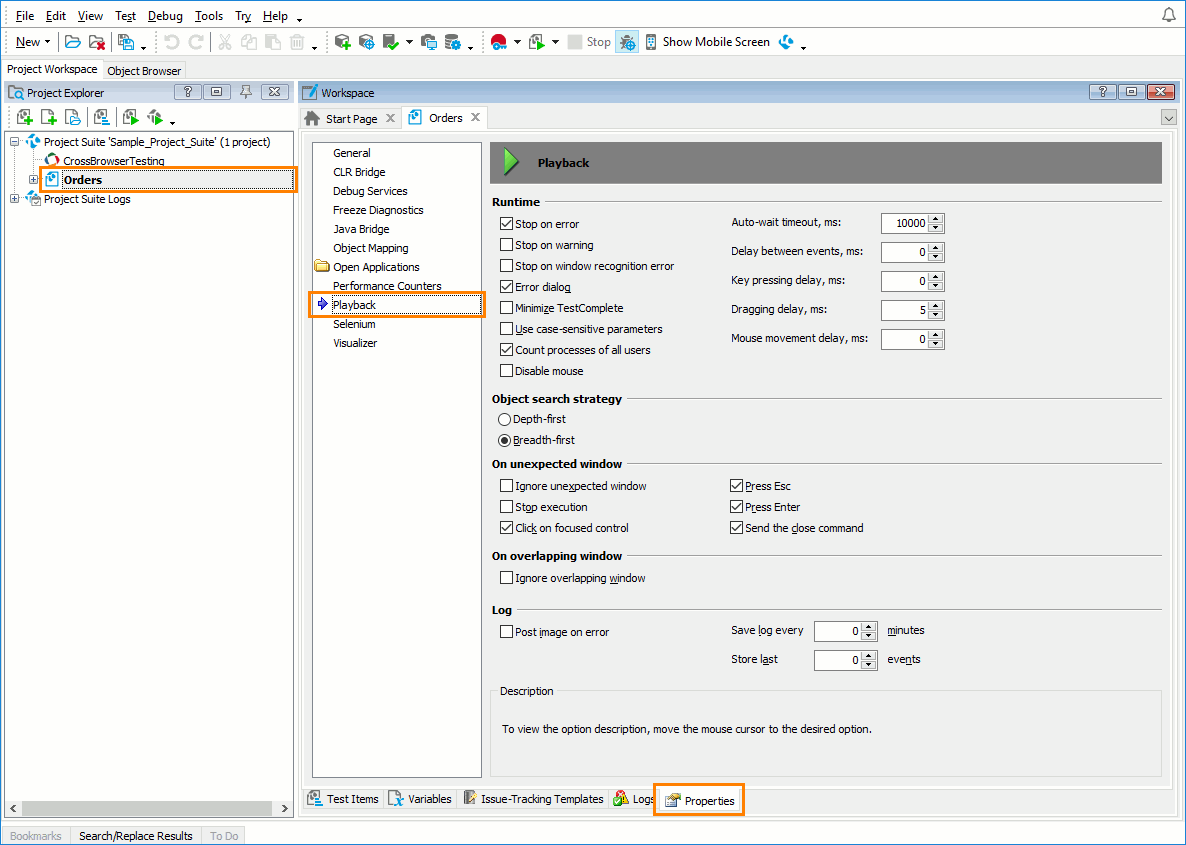
The Playback options let you specify how TestComplete should process some situations that occur during the test execution.
To view or modify playback options:
-
Open the Properties page of the project editor and then choose Playback in the list on the left of the page.
You can change the following options:
-
Runtime
-
Stop on error - If this option is enabled, test execution ends whenever an error message is posted to the test log.
To obtain the value of this option in scripts, use the
Options.Run.StopOnErrorproperty.Note: Do not confuse this option with the Stop on error setting of test items. Using this setting, you can configure TestComplete to behave in a certain way when an error occurs during the test run. For more information, see Stopping Tests on Errors and Exceptions - Overview. -
Stop on warning - If it is enabled, test execution ends whenever a warning message is posted to the test log.
To obtain the value of this option in scripts, use the
Options.Run.StopOnWarningproperty. -
Stop on window recognition error - Not counting Auto-wait timeout cases, a test at any point may refer to an object that is not available in the system. If the Stop on window recognition error option is enabled, the test run will end whenever TestComplete fails to find a window object specified via the
Process.Window,Window.Window,Process.WaitWindoworWindow.WaitWindowmethod. If the option is disabled, TestComplete will simply continue, ignoring the failure.To obtain the value of this option in scripts, use the
Options.Run.StopOnRecognitionErrorproperty. -
Error dialog - If the option is enabled and an error is encountered during playback, TestComplete displays a dialog informing you about the error. If the option is disabled, TestComplete continues the test execution without showing information about the error.
To obtain the value of this option in scripts, use the
Options.Run.ErrorDialogproperty.Note: Do not confuse this option with the Stop on exception setting of test items. Using this setting, you can configure TestComplete to behave in a certain way when an exception occurs during the test run. For more information, see Stopping Tests on Errors and Exceptions - Overview. The functionality of the dialog is sometimes a little different: In most cases, the dialog describes the occurred error and asks you whether to continue the test execution or stop the test. However, during execution of scripts written in JavaScript, JScript, Python, VBScript, C#Script or C++Script, the dialog only informs you about the error without suggesting to abort the test execution.
-
Minimize TestComplete - If the option is enabled TestComplete minimizes before the test playback. This stops TestComplete from overlapping the tested applications’ windows.
-
Use case-sensitive parameters - Sets whether methods that simulate user actions (
ClickItem,DblClickItem,SelectItemand others) will process their string parameters as case-sensitive. These methods belong to objects that correspond to various controls supported by TestComplete (for instance,Win32ListView).To obtain the value of this option in scripts, use the
Options.Run.CaseSensitiveproperty. -
Count processes of all users - If this option is enabled when launching the tested application, TestComplete will count all instances of the tested application running under different accounts. If the number of instances exceed the
Countproperty of the tested application, new instance will not be launched. If this option is disabled, TestComplete will only count processes of the user for the account that the application is to be launched under. For more information on testing applications under different accounts, see Testing Applications Running Under Another User Account). -
Disable mouse - If this option is enabled, the test engine disables the mouse when the test starts. That is, mouse movements will not cause the mouse cursor to move on the screen. This functionality lets you ensure that human intervention will not affect the simulated user actions during the test. The mouse is enabled after the test is over or if you press Ctrl+Alt+Del. See Disabling the Mouse Before Automated Testing for more information.
-
Auto-wait timeout, ms - Default: 10000. When a test acquires a reference to a process or window object, or when it activates an object (for example, opening a minimized window), the object may not be available immediately. Likewise, when a test commands a change in the onscreen state of a window (e.g. minimizing an open window), or when TestComplete attempts to close an unexpected window, the change may not occur instantaneously. Auto-wait timeout is the number of milliseconds allowed for the object to become available, or for the desired change to occur, before a timeout error message is posted to the test log. If the object becomes available or the desired change occurs within the delay allowed, the test proceeds immediately. If the timeout elapses, what happens after the error is posted is determined by the Stop on Error option.
Auto-wait timeout affects the following test methods that return references to new objects:
To change this option from your tests, use the
Options.Run.Timeoutproperty. -
Delay between events, ms - Milliseconds to wait after the test simulates any user action (click, keystroke, window command, and so on) during playback. The default is 0; any positive integer can be specified to slow down test execution.
To change this option from your tests, use the
Options.Run.Delayproperty. -
Key pressing delay, ms - Milliseconds to wait after each keystroke event is simulated by the test. Valid values range between 0 and 1000. 0 is the default.
-
Dragging delay, ms - Milliseconds it takes the mouse cursor to pass 20 pixels while performing a dragging operation during test playback. Valid values range between 0 and 1000. 5 is the default.
-
Mouse movement delay, ms - Milliseconds it takes the mouse cursor to pass 20 pixels during test playback. Valid values range between 0 and 1000. 0 is the default.
Note: The Key pressing delay, Dragging delay and Mouse movement delay options do not affect simulating user actions in mobile applications. -
-
Object search strategy - Specifies the order in which TestComplete traverses the object tree when searching for an object using the
Findmethods (Find,FindEx,FindChild, andFindChildEx). Depending on your application, changing this option can speed up the search.Possible values:
-
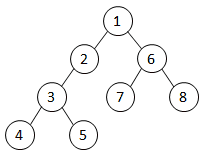
Depth-first - Search as deep as possible in each branch of the object tree before moving to the next branch. This is the default setting for projects created in TestComplete versions up to 11.
-
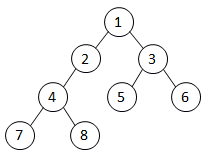
Breadth-first - Search level by level: start at a given object, search its direct child objects, then move to the next level child objects, and so on. This is the default setting for projects created in TestComplete 12.
The images below demonstrate the difference in the search order:

Depth-first search
Breadth-first searchTo change this option from your tests, use the
Options.Run.ObjectSearchStrategyproperty.Note: This option does not affect Name Mapping. Extended Find always uses breadth-first search. -
-
On unexpected window - The following options specify how TestComplete should respond to an unexpected window (for instance, an error window from the application). See Handling Unexpected Windows.
Note: Handling unexpected windows does not work for windowless objects and for objects in mobile applications. -
Ignore unexpected window - If this option is enabled, TestComplete simply ignores unexpected windows that occur during the test run. At that, the other options in this group will be ignored.
-
Stop execution - Ends the test run immediately. To read the option from scripts, use the
Options.Run.StopOnUnexpWindowproperty. -
Click on focused control - Simulates a mouse click on the control that has the focus within the unexpected window (it is often the OK button). To read the option from scripts, use the
Options.Run.ClickOnButtonproperty. -
Press Esc - Simulates an Esc keystroke within the unexpected window (which should normally close it). To read the option from scripts, use the
Options.Run.PressEscproperty. -
Press Enter - Simulates an Enter keystroke within the unexpected window. To read the option from scripts, use the
Options.Run.PressEnterproperty. -
Send the close command - Sends the close command to the unexpected window. To read the option from scripts, use the
Options.Run.SendWMCloseproperty.
-
-
On overlapping window - Such an event occurs when one or several windows are in front of the window addressed by the test. By default, TestComplete tries to bring focus to the desired window. However, some overlapping windows cannot be sent to the background (for instance, when the window is modal or has the "Always on top" attribute).
Note: Handling overlapping windows does not work for windowless objects and for objects in mobile applications. See Handling Unexpected Windows for more information. The following option determines the TestComplete behavior in such situations.
-
Ignore overlapping window - When the option is disabled, TestComplete posts an error to the log and stops the test execution. If this option is enabled, TestComplete performs user actions at recorded coordinates (ignoring windows that overlap the control to be clicked or dragged) and proceeds with the test execution.
To obtain the value of this option in scripts, use the
Options.Run.IgnoreOverWindowproperty.Note: Keep in mind that when the option is enabled, the actions may be simulated on the overlapping window instead of the desired window.
-
-
Log
-
Post image on error - Specifies whether the test engine will post a desktop screenshot to the test log when an error occurs. This option also affects the
Log.Errormethod. If you do not pass any image as a parameter to this method, and if the option is enabled, the method will post a desktop image to the test log. If the property is disabled, no image will be posted.Note: If a mobile device is connected to the test PC, the image posted to the test log will contain a screenshot of the mobile device desktop. That happens, because TestComplete recognizes the connected device as a default test platform. If you need the image of the PC desktop to be posted to the test log, disconnect the mobile device from the PC. -
Save log every … minutes - Specifies the time interval, in minutes, in which TestComplete automatically saves test results when a script is being executed. This protects the test log against a crash or power outage. If the option is 0, the auto-save functionality is disabled.
Note: The log saved during the test execution has the Incomplete status and is marked with a special icon. When the test execution is over, the incomplete log is replaced with a generic test log. -
Store last … events - Specifies the number of the last event messages that must be posted to the test log before an error message is posted to the log. 0 means that all event messages must be stored.
Use this option to remove unnecessary event messages from the log and reduce its overall size.
-
The default values of the Playback settings that will be used in new TestComplete projects are specified by the Default Project Properties - Playback Options dialog.
See Also
Running Tests
Handling Unexpected Windows
Default Project Properties - Playback Options
Project Properties

