
In TestComplete, you can create tests in two ways:
-
Create tests manually - You enter all the needed commands and actions via script objects or keyword test commands. This approach is helpful when you need to create very powerful and flexible tests or if you have good experience in creating tests. However, creating tests manually requires a lot of time and does not prevent you from various problems. For example, you must know the classes and names of your application objects you want to work with.
-
Record tests - Allows you to create tests easily. You can perform some actions against the tested application once, and TestComplete will automatically recognize these actions, and then convert them to script lines or keyword test operations. You create a test visually, and, in one sense, you record the performed actions to a script or keyword test. This approach does not require much experience in creating tests.
In this tutorial, we will show you how to record tests with TestComplete.
The recording includes three steps:
-
You start recording. You can do this by selecting Test > Record > Record Keyword Test or Test > Record > Record Script from the TestComplete main menu or from the Test Engine toolbar. You can also start recording by clicking
 Record Test on the Start Page.
You can record tests of various kinds: keyword tests, scripts, and low-level procedures. The menu item that you use to start the recording defines the main recorded test: keyword test or script code. Other tests will be recorded after the recording starts. The main recorded test will contain special commands that will run these tests.
TestComplete will switch to the recording mode and display the Recording toolbar on the screen. By default, the toolbar is collapsed and shows only the most commonly used commands you may need during the recording:

You can click the
 arrow button to expand the Recording toolbar and view all its buttons:
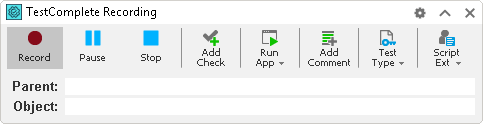
You use the toolbar to perform additional actions during recording, pause or stop recording, and change the type of the recorded test (keyword test, script code, or low-level procedure).
-
After starting the recording, perform the desired test actions: launch the tested application (if needed), work with it by clicking command buttons, selecting menu items, typing text, and so on.
-
After all the test actions are over, stop the recording by selecting
 Stop from the Recording toolbar.
For complete information on test recording, see Recording in TestComplete.
 Prev
Prev