
 The object-driven testing (ODT) functionality is deprecated. Do not use it to create new tests. It will be removed from the product in one of the future releases. As an alternative, you can create custom classes in your scripts. For more information, see Alternatives to the ODT functionality.
The custom objects you create in the ODT project item not only holds testing data, but also controls the testing process. To simplify the control process, the project item provides specific means for filtering test data, for walking down the object hierarchy and running methods of each object and for selecting the methods to be run. These capabilities are useful for large projects that use lots of testing data. They save the time needed to handle object-driven tests. The current topic describes these means and explains how you can use them. It assumes that you are familiar with the basic concepts of the ODT project item described in the ODT Project Item topic.
Walking Down the Object Hierarchy
In most cases, the hierarchy of custom objects has a tree-like structure. The root of this tree is the ODT.Data object; the tree nodes are variables, custom objects, array items, etc. The test script and keyword test can walk the tree and call methods of objects stored in tree nodes. The main test will have to initiate the “walk”.
Let’s continue with an example: suppose that the application under test is a text processor and you need to test the Find and Find and Replace dialogs of this application. To obtain reliable results, each dialog should be tested on several files and using several sets of testing values. In addition, the operation each dialog performs can be tested using different conditions: the search can be case-sensitive or not, it can be performed in different directions (forward or backward), with enabled and disabled regular expressions, etc. The testing will include the following steps:
-
Launch the tested application.
- Open the first testing file in the application.
- Open the Find dialog.
- Input the test values into the dialog’s edit fields.
- Set the search conditions, press the Find button to start the search, and then see if the application has found the appropriate text.
- Change the search conditions (for instance, change the search direction) and start the search again.
- Change the search conditions again and repeat the search.
- etc...
- Input other testing values into the dialog’s edit boxes.
- Repeat the same sequence of testing actions that were performed for the first testing values.
- Continue testing the dialog using different testing values.
Once the Find dialog is tested using all possible testing values, the tests can continue with another dialog.
- Input the test values into the dialog’s edit fields.
- Open the Find and Replace dialog.
- Input the testing values into the dialog’s edit fields.
- Set the search condition, press the Find and Replace button and then see if the application performed the replacements correctly.
- Change the search conditions (for instance, make the search case-sensitive) and repeat the search.
- etc...
- Repeat the testing steps for the Find and Replace dialog several times using different testing values.
- Input the testing values into the dialog’s edit fields.
- Open the Find dialog.
- Open another test file.
- Test the Find dialog using the method described above.
- Test the Find and Replace dialog.
- Continue testing using more files...
- Open the first testing file in the application.
The hierarchy of objects that perform testing in the described way looks like this:
The order in which the objects are organized can be modified via the  Move Up or
  Move Down commands of the context menu. This makes it possible to alter the walk-down path. You can move the items that belong to the same hierarchy level, but you cannot transfer an item to an upper or lower level. Also you cannot mix object-specific and class-specific properties and methods.
Objects of the upper levels will hold references to objects of lower levels. Methods of the topmost object launch the application and perform different initialization actions. Objects on the second level operate with testing files. Their methods open these files in the application under test. Objects of the next level show the Find and Find and Replace dialogs on the screen, etc.
Besides the code of the class methods, you need to create a script routine or a keyword test that walks down the tree and calls object methods at each level. As we mentioned above, the ODT project item provides a method that is used for this task: ODT.Data.Run. It walks down the tree and processes each tree node in the following manner:
- If a tree node (data group, variable, object, array, etc). holds an ordinary value (string, integer, etc.), no action is performed and the method goes to the next tree node of the same level.
- If a tree node holds an array, the
Runmethod checks each item of this array.- If an item holds an ordinary value, no action is performed and the method goes to the next item.
- If an item holds an object, the method processes this object in the manner described below.
- If an item holds an array, the method processes each item of this array in the same way it processes the variable’s array.
- If a tree node holds an object, the
Runmethod “processes” this object in the following manner:- Executes all object methods that are specified as Init. These methods are executed in order of appearance in the editor. You can change the order using the editor's context menu items. See How to Create, Modify and Delete Methods.
- Analyzes the object properties. If a property holds an object, the
Runmethod processes this object (i.e. executes its methods and processes the properties) in the described manner. If a property holds an array, the method processes each item of this array in the manner described below. If a property holds an ordinary value, it is ignored. - Calls non-Init methods (the methods are called in order of appearance in the editor. For information, on how to change the method position, see How to Create, Modify and Delete Methods).
Using the ODT.Data.Run method you can perform the test very easy. Just write a script routine or a keyword test that calls this method.
Data groups, objects and arrays contain methods similar to ODT.Data.Run. They differ from ODT.Data.Run in that they start processing from the level to which the data group, object or array belongs, while ODT.Data.Run processes all of the data groups.
The ODT project item offers specific means for excluding tree nodes from testing. Once the tree nodes have been excluded, ODT.Data.Run will not process them. This is also applied to other Run methods. The means for excluding are described in the following section.
Selecting Data and Objects For Testing
By default, all data groups, variables, custom objects and arrays are included in testing. That is, the Run method processes each of these elements. The ODT, Classes and Data editors include two means to exclude objects from testing: check boxes and data filters.
Check boxes allow you to include elements to and exclude them from testing by checking (unchecking) them in the ODT or Data editor. For instance, to exclude a data group, open the editor and uncheck the data group there. To include the data group in testing tasks, simply check it. The following icons indicate whether an element is included or excluded:
| Icon | Description |
|---|---|
 |
The object is included in testing and all of its child objects are also included in testing. If the object’s icon does not have the  element, the object is excluded from testing. element, the object is excluded from testing. |
 |
If an object contains the  element in the icon, this means the object is included in testing, but at least one of its child objects (direct child, grandchild, great-grandchild, etc.) is excluded. element in the icon, this means the object is included in testing, but at least one of its child objects (direct child, grandchild, great-grandchild, etc.) is excluded. |
| Grayed icon | The grayed icon, e.g.  , means that the object is excluded from testing because one of its parent objects is excluded from testing. , means that the object is excluded from testing because one of its parent objects is excluded from testing. |
| Note: | The graphic elements described above can be combined with graphic elements added by data filters (see below). |
When you uncheck objects in the ODT or Data editor, you make these objects unavailable for the Run methods only. The objects still exist, you can call their methods in tests, modify properties, etc.
Besides data groups, objects and arrays, you can also exclude and include object methods in testing. Once you have excluded a method, it is not called by the Run method. To exclude a method:
- Select any property of the desired object in the ODT or Data editor. This will update the Methods page of this editor so that it will display methods of the desired object.
- Switch to the Methods page and uncheck the desired method.
Note that if you uncheck an object method, you make it unavailable for the Run methods only. You still can call this method in your scripts and keyword tests.
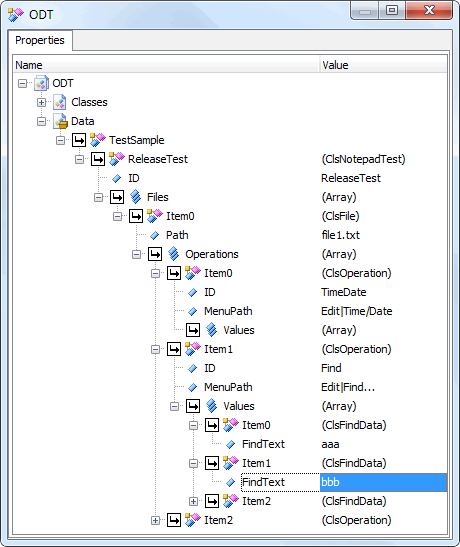
Checking and unchecking allows you to specify what objects and methods should participate in testing and what objects and methods should be excluded from it. If you use a lot of testing data and have lots of tree nodes, checking and unchecking can become an annoying task. To solve the problem, you can use data filters. Filters allow you to easily exclude objects from testing by unchecking the value of one of the object properties in the Filter dialog. Let’s illustrate this on a sample: suppose you have a class for testing the Find dialog. One of the properties of this class holds an array of ClsReplaceData objects. The ClsReplaceData objects hold testing values (that is, values stored in properties of this objects are entered into the dialog’s edit fields). Suppose there are several ClsReplaceData, whose FindText property holds the string bbb. We want to exclude these objects from testing. To do this:
- Open the ODT or Classes editor.
- Select the
ClsReplaceDataclass in the editor. - Click the
 icon next to the
 FindTextproperty. This will call the Filter dialog that lists all values stored in this property: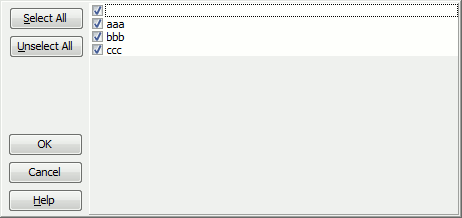
-
Uncheck bbb in the list. This will exclude all objects whose
FindTextproperty stores the unchecked value. TheRunmethod will ignore these objects (it will not process the object’s properties and will not call the object’s methods). If you want to exclude objects in which theFindTextproperty holds either bbb, or extension, uncheck both bbb and extension in the dialog. The empty string at the top of the dialog indicates that there are objects whoseFindTextproperty does not hold any values. By unchecking this check box, you can exclude these objects from testing.To check all values, press Select All. To uncheck all values, press Unselect All.
- To apply a filter, click OK. Cancel will close the dialog discarding any changes.
TestComplete uses the following icons to indicate that objects were or were not excluded by the filter. Note that “filter” graphic elements in object icons are combined with the and graphic elements (see above):
| Icon | Description |
|---|---|
 |
The object is excluded from testing because a filter is applied to one of its properties. The Since the “filter” graphic elements can be combined with “non-filter” elements, the following combination is possible: |
 , , |
If an icon includes the  element, it means that one or more child objects are excluded by a filter. For instance, the icon means the object is excluded by a filter and at least one of its child objects is excluded by a filter. means the object is included in testing, but one of its child objects is excluded by a filter. element, it means that one or more child objects are excluded by a filter. For instance, the icon means the object is excluded by a filter and at least one of its child objects is excluded by a filter. means the object is included in testing, but one of its child objects is excluded by a filter. |
| Red frame | An icon with a red frame, e.g.  , means that the object is excluded from testing because one of its parent objects is excluded by a filter. The icon contains . This means the object is checked in the editor and if you remove the filter, the object will be included in testing. , means that the object is excluded from testing because one of its parent objects is excluded by a filter. The icon contains . This means the object is checked in the editor and if you remove the filter, the object will be included in testing.  means the object is excluded by the filter which is applied both to this object and to one of its parent objects. means the object is excluded by the filter which is applied both to this object and to one of its parent objects. |
,  |
The icon is displayed for class properties only. It indicates that you can apply a filter to a property. Pressing the icon displays the Filter dialog. For properties whose values do not match the filter, TestComplete displays the red filter icon ( in classes,  - in objects). This allows you to easily find the property by which the filter excludes the object. - in objects). This allows you to easily find the property by which the filter excludes the object. |
 . It means the object is excluded by a filter and at least one of its child objects is unchecked.
When you uncheck values in the Filter dialog, you make objects unavailable for the Run methods only. You do not “disable” the objects. You can call their methods in scripts or keyword tests, modify properties, etc.
One important note: in order for you to be able to use filters, the testing data needs to be organized properly. For example, you can store testing values for the Find dialog using one of these methods:
- You can use a multidimensional array. Each “row” of this array will hold a set of input values and the number of “columns” in the array will be equal to the number of controls on the tested dialog.
- You can use an array of objects. The object properties hold testing values that will be entered into the dialog’s edit fields.
Filters are applied to objects, but not to ordinary values. Therefore, you will not be able to use filters if you organize your data as a multidimensional array.
Note that data filters are independent of check marks, which you can set for each object in the ODT or Data editor. An object is excluded from testing if it is unchecked in the editor or if it is excluded by a filter. To include the object in testing, change the filter so that it “includes” the object and make sure the object is checked in the editor.
To specify a method as an Init:
- Select any property of the desired object in the ODT panel. This will update the Methods page of this panel so that it displays methods of the desired object.
- Switch to the Methods page and find the desired method.
- Press the method's icon until it is
 . The other two possible icons are
  and
and  . They specify whether the method is included in or excluded from testing (more below).
To specify a method as an Init:
- Select any property of the desired object in the ODT panel. This will update the Methods page of this panel so that it displays methods of the desired object.
- Switch to the Methods page and find the desired method.
- Press the method's icon until it is . The other two possible icons are and . They specify whether the method is included in or excluded from testing (more below).
See Also
Object-Driven Testing
ODT Editor
Classes Editor
Data Editor
ODT Object