
Web service methods can use both ordinary (string, numeric and so on) and complex parameters (objects and arrays). Use the Complex Parameter dialog to specify complex method parameters.
The dialog is called when you click the ellipsis button of the Parameter Value column in the Specify Parameters page of the Create Web Service Checkpoint wizard.
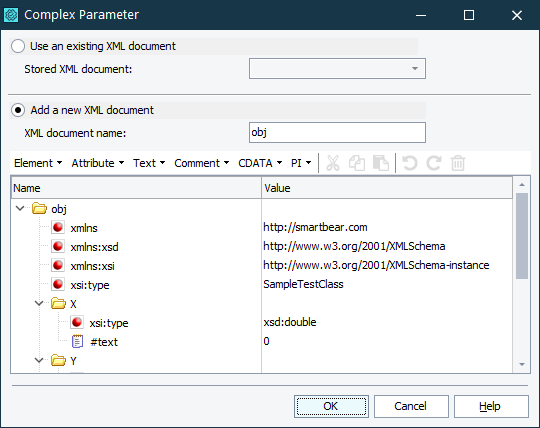
Complex parameters are described by an XML document. You can load the document from an XMLCheckpoint project element or you can create the document from scratch and add it to the Stores > XML collection.
By default, TestComplete generates an XML document for parameters according to the web service’s WSDL document.
TestComplete generates pre-defined values for the elements that correspond to the object’s properties or array items. For instance, if the property (or item) has the integer type, TestComplete will use the predefined value 0. If the property is a string, the predefined value will be Autogenerated. You should replace these predefined values with the values to be used in a method call.
If the parameter is an array, TestComplete will generate XML code only for one array item. You should add more items, if needed using the dialog’s XML editor.
The object may contain a property that refers to another object. TestComplete will generate XML code for these referred objects. However, it will not generate recursive object references. You should use the dialog to create these object structures. To indicate recursive references, TestComplete inserts the Generating the contents will cause recursion string into the generated XML code.
If you create a new element, specify its name. Remember that the name will be used to address the element from tests. Therefore, the name must be a valid identifier. To specify the name that will match the rules of any supported scripting language, enter the string that starts with a letter and that contains only letters, digits and underscore symbols.
How to Edit XML Data
To add a node to the tree
To add a new element, attribute or some other node to the XML document, select an item from the menu that is displayed at the top of the node’s tree. This menu contains the following submenus:
-
Element - Adds a new element to the document.
-
Attribute - Adds a new attribute to an element.
-
Text - Adds a text node (
#text) to the document. -
Comment - Adds a comment (
<!-- Comment text -->) to the document. -
CDATA - Adds a CDATA node to the document (
<![CDATA[ ... ]]>). -
PI - Adds a processing instruction (
<?xml-stylesheet type="text/xsl" href="../../myTemplate.xsl"?>) or xml declaration nodes to the document (<?xml version="1.0"?>).
Each of these submenus contains three items: Before, After and Child. They specify the position of the new node relative to the currently selected node. For instance, if the currently selected node corresponds to an element, then the Element | After menu item will insert a new element after the currently selected node. The Element | Child item will append a new element as a child of the currently selected element.
The Before, After and Child menu items can be disabled or enabled according to the context. If some menu item is disabled, this means that the appropriate node cannot be added to the document at the appropriate position. For instance, processing instructions, comments or CDATA nodes cannot be child nodes of attributes. So, if the currently selected node corresponds to an attribute, the PI | Child, Comment | Child and CDATA | Child menu items are disabled.
Each element has an appropriate icon:
 or
or  - Element (for information on differences between these icons, see below)
 - Attribute
 - Text
 - CDATA
 - Comment
 - Processing instruction
 - DOCTYPE
To rename a node
-
Select the desired node’s name in the tree.
-
Click the node name or press F2. This will activate the in-place editor.
-
Enter a new name into the in-place editor. Press Enter to confirm the changes or Esc to cancel them.
To modify the node’s data
-
Select the cell containing the desired node’s value.
-
Click the node name or press F2. This will activate an in-place editor.
-
Enter the desired value into the in-place editor. Use Ctrl+Enter to enter a line break.
To confirm changes, press Enter. To cancel changes, press Esc.
| Note: | An element’s node may have the #text node) that stores the element’s value. In this case, to set the element’s data, you should modify the value of this child node.
The |
To change the node’s position
- Select the desired node.
- Move the selected node to the desired position in the tree. When moving a node, keep the cursor over the node names rather than icons.
– or –
- Select the desired node.
- Choose
 Cut from the dialog’s toolbar. This will remove the node from the tree and copy it to the clipboard. If the node has child nodes, they will also be removed and copied.
 - Select the node that will be parent for a new node.
- Choose
 Paste from the toolbar to insert the copied node into the new position. If the copied node has child nodes, they are also inserted.
To copy a node to another location
- Select the desired node in the tree.
- Press Ctrl and hold it pressed while dragging the node to the desired location, keeping the cursor over the node’s names rather than the icons.
– or –
- Select the desired node in the tree.
- Choose
 Copy from the dialog’s toolbar. This will copy the selected node along with its child nodes to the clipboard.
 - Select the node that will be the parent.
- Choose Paste from the toolbar to insert the copied node into the new position.
A node is copied along with its child nodes.
To delete a node from the tree
- Select the desired node in the tree.
- Press Del.
You can also delete the selected node by choosing  Delete from the toolbar that is displayed above the tree.
If the selected node has child nodes, they are also deleted.
To undo or redo changes
To undo or redo changes made to the XML data, use the  Undo and
  Redo toolbar items that are displayed above the tree.
To save the changes and close the dialog, click OK. Cancel will close the dialog and discard the changes.
See Also
Checkpoint Wizard - Specifying Method Parameters (Web Service Checkpoints)
About Web Service Checkpoints