Use Web Audits checkpoints to run audits against a web page and learn how the page performs. You can create Web Audits checkpoints in several ways:
 Create Quick Checkpoints during test recording
Quick Checkpoints
-
Start recording your test.
-
Make sure that Quick Checkpoints are enabled:

-
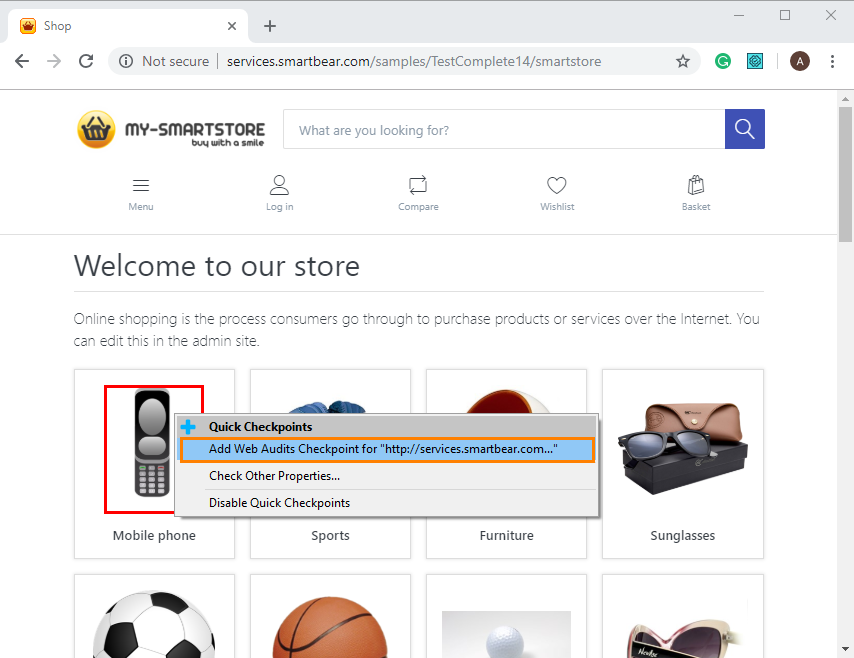
During the test recording, TestComplete highlights UI elements, with which you are interacting, with a red frame. It also shows the
 icon near your mouse pointer.
Move the mouse pointer to any object on the web page you want to verify and wait for a red frame to appear.
-
Stop moving the mouse pointer and wait until the
 icon becomes opaque. Move the mouse pointer to the icon:
 -
TestComplete will show the Quick Checkpoints context menu:

-
Select the Add Web Audits Checkpoint item from the context menu.
-
TestComplete will add a Web Audits checkpoint to your test and show a notification about this:

Create Checkpoints by Using the Checkpoint Wizard
1. Launch the Wizard
The way you call the wizard depends on whether you are recoding a test or creating a test manually:
-
If you are recording a test
-
Click Add Check on the Recording toolbar.
-
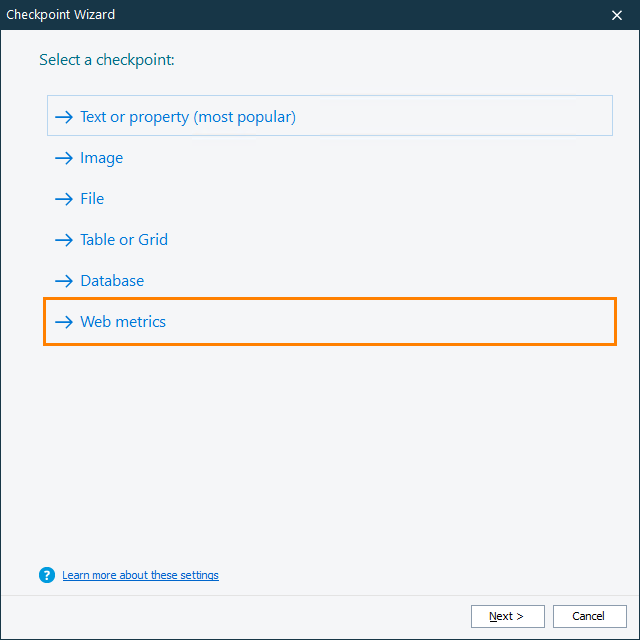
In the Checkpoint Wizard, select Web metrics, and then click Next.

-
-
If you are editing a keyword test
-
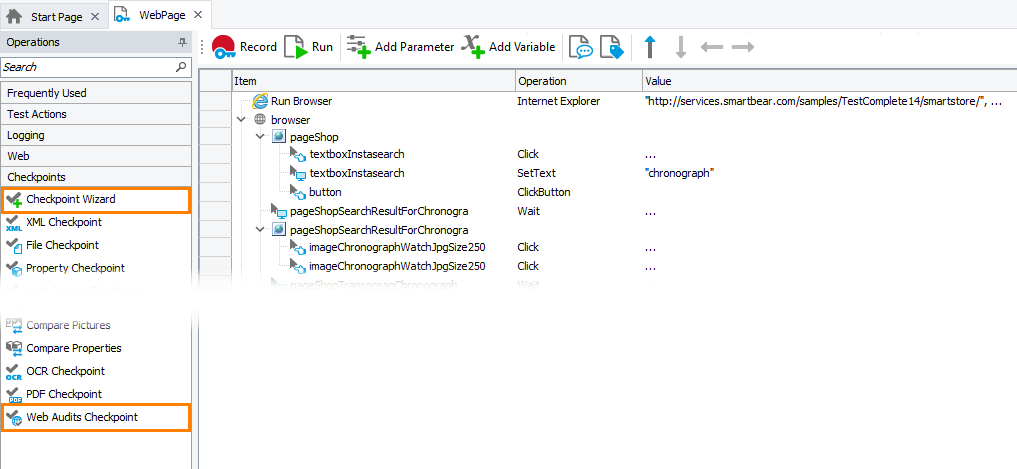
Select the Checkpoints category in the Operations panel of the Keyword Test editor.
-
Find the Checkpoint Wizard operation in the list and drag it to your test. In the Checkpoint wizard, click Web metrics.
– or –
Find the Web Audits Checkpoint operation in the list and drag it to your test.

-
-
If you are editing a script
-
Open the script to be edited.
-
Click
 on the Code Editor toolbar:
-
In the Checkpoint Wizard, select Web metrics, and then click Next.
-
2. Specify Checkpoint Parameters
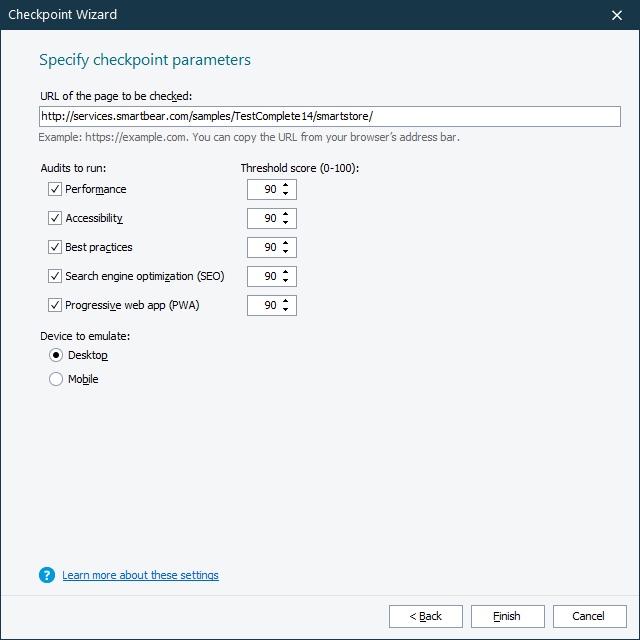
On the next page of the wizard, specify the web page to be verified, the needed audits and the threshold values for them. You can also specify the type of the device to be used for emulation:

To specify checkpoint parameters, do the following:
-
Enter the web page URL to be verified in the URL of the page to be checked edit box.
-
Enable required audits in the Audits to run section and specify threshold values for them:
-
Performance - The checkpoint will verify the performance of the page is being checked.
-
Accessibility - The checkpoint will verify how well the page complies with the content accessibility rules.
-
Best practices - The checkpoint will verify how well the page complies with the best practices used to improve the quality of software.
-
Search engine optimization (SEO) - The checkpoint will verify how well the page is optimized for search engine scanning.
-
Progressive web app (PWA) - The checkpoint will verify how well the page complies to best practices for Progressive web applications.
Threshold scores for all of these audits can be specified as a number between 0 and 100.
By default, the threshold value is 90. It indicates a well-performing web page. To learn more about threshold scores, see the Lighthouse tool documentation.
-
-
Specify the type of the device you want to emulate to check the behavior of your web page on it:
-
Desktop - The web page behavior will be checked on a desktop computer.
-
Mobile - The web page behavior will be checked on an emulated mobile device (Nexus 5X will be emulated).
-
3. Close the Wizard
Click Finish to exit the Checkpoint wizard. TestComplete will add the checkpoint statement to your test.
If you are creating a checkpoint while editing a script test, TestComplete will show the Copy Text to Clipboard dialog containing the generated checkpoint code. Copy it to the Clipboard and paste it to the needed place in your script test.
See Also
Web Audits Checkpoints
About Web Audits Checkpoints
Checkpoint Wizard
Analyzing Web Audits Checkpoint Results
