 |
Information in this topic applies to desktop and web applications. |
You use Quick Checkpoints to create property checkpoints for windows and controls during the test recording quickly and easily.
In This Topic
Requirements
-
Quick Checkpoints are available only for desktop and web applications. You cannot create them for mobile applications.
-
By default, Quick Checkpoints are enabled in TestComplete. If you do not need them for some reason, you can disable them at any time. It is quite possible that you may want to disable them temporarily during the test recording and enable a few moments later.
Create a Quick Checkpoint
You create Quick Checkpoints during the test recording:
-
If Quick Checkpoints are enabled, then TestComplete highlights a control, with which you are interacting during the test recording, with a red frame. It also shows the
 icon that follows your mouse pointer:
 -
While you are moving the mouse pointer, the
 icon remains transparent. Stop moving the pointer and wait until the
  icon becomes opaque. Then move the mouse pointer to the
  icon. This will show the Quick Checkpoint menu:
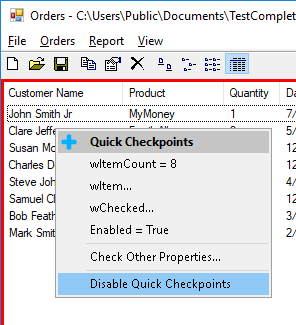
The Quick Checkpoint menu lists the most commonly used properties for which you can create a property checkpoint.
-
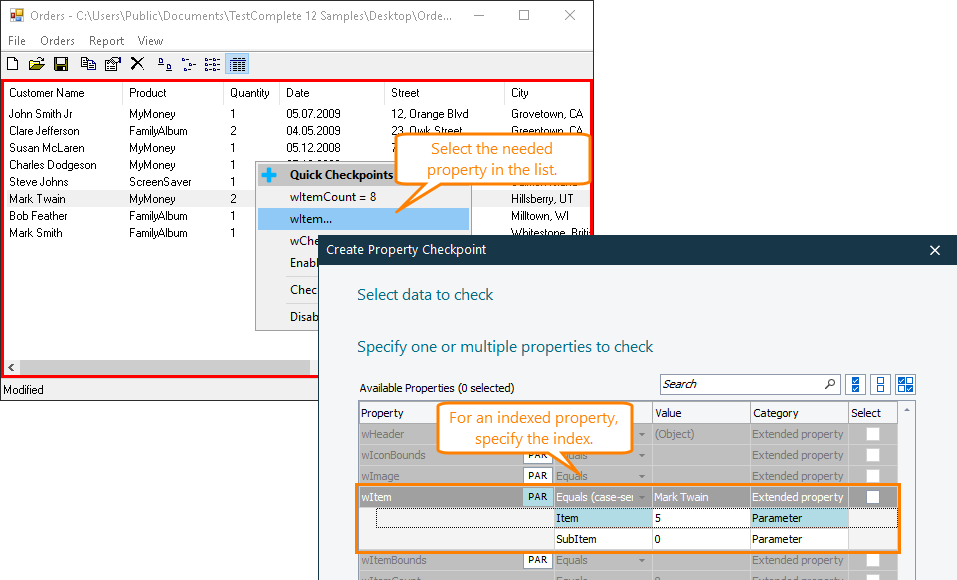
Select the needed property in the list.
If the property is indexed (provides access to an array of values by index), TestComplete will open the Select Data to Check page where you can specify the index:
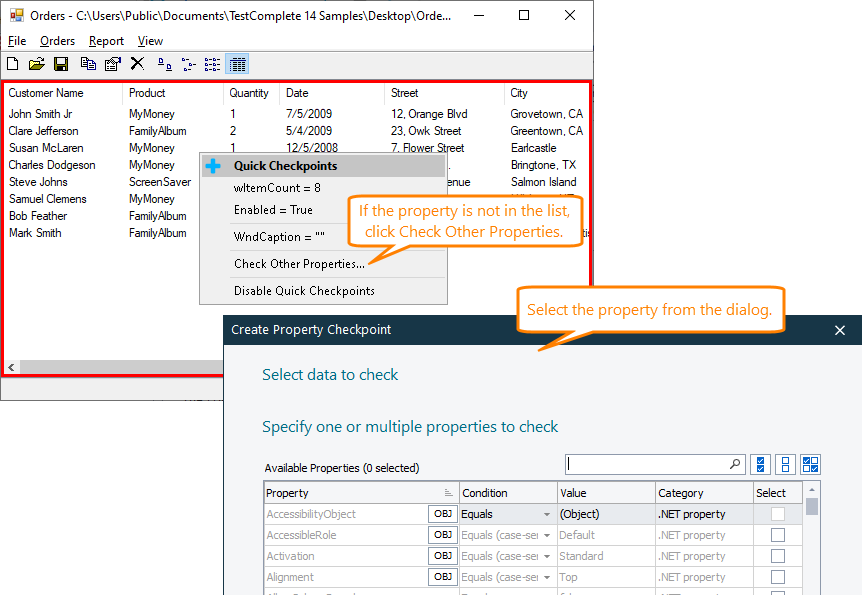
If the needed property is not on the list (or if you want to verify the property against a condition or baseline value other than suggested ones), click Check Other Properties:
This will open the Select Data to Check page that shows the list of all object properties.
-
Select the property you want to check from the list.
To find the needed property faster, you can type its name or value in the Search box. The wizard will filter out the property list according to the text you are typing.
-
Select the Selected check box for the property you want to check.
-
In the Condition column, select the needed verification condition.
-
In the Value column, enter the expected value of the object property. By default, it holds the current property value.

The object property value and the expected value should be of the same type. If the compared values are of different types, TestComplete will try to convert the object property value to the type of the expected value and then perform a verification. In this case, the comparison may be performed incorrectly.
Click Finish to close the page and add the checkpoint for the selected property.
-
-
A message box will notify you that a checkpoint for the selected property has been created successfully:

-
You can continue the recording.
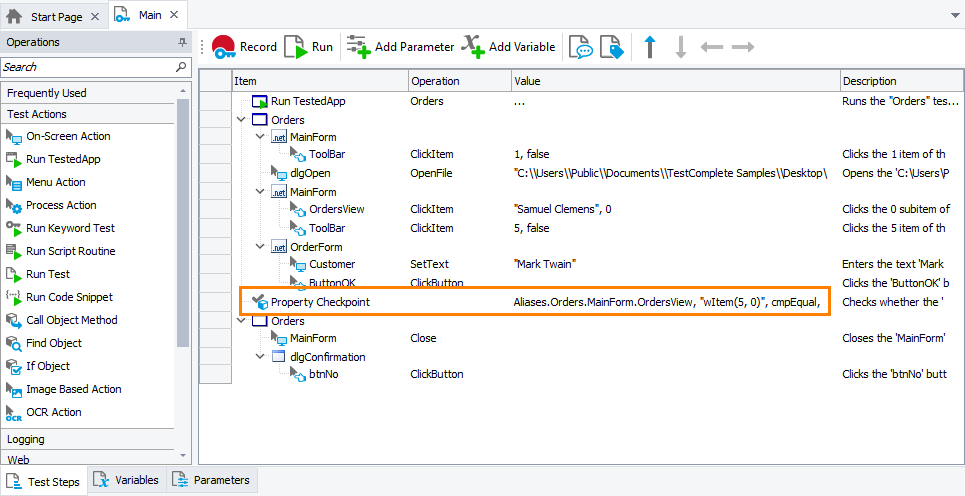
After the recording is over, you can see the recorded Quick Checkpoint in your test. During the test run, it will verify the selected property against the recorded baseline value:
Recently Used Properties
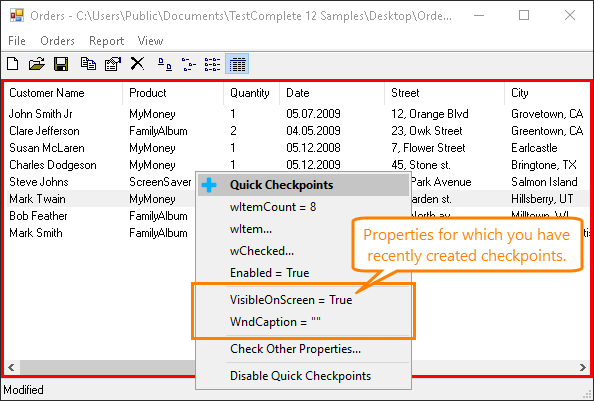
The properties that the Quick Checkpoint menu lists depend on the current control type. The menu contains the most frequently used properties. Also, it contains recently created checkpoints. This feature helps you quickly create similar checkpoints for different controls of the same type in your tested application.
The list of recent checkpoints contains the recent Quick Checkpoints, as well as property checkpoints that you created recently in the Create Checkpoint wizard.
The recently used properties are available for all objects that have the appropriate properties regardless of the object type and the application to which the object belongs.
Enabling and Disabling Quick Checkpoints
You can disable and enable Quick Checkpoints during the test recording and at design time. By default, Quick Checkpoints are enabled.
During Test Recording
Click  on the Recording toolbar and then select or clear the Enable Quick Checkpoints check box:

As an alternative, to disable quick checkpoints, you can select Disable Quick Checkpoints from the Quick Checkpoints menu:
At Design Time
-
Select Tools > Options from the TestComplete main menu.
-
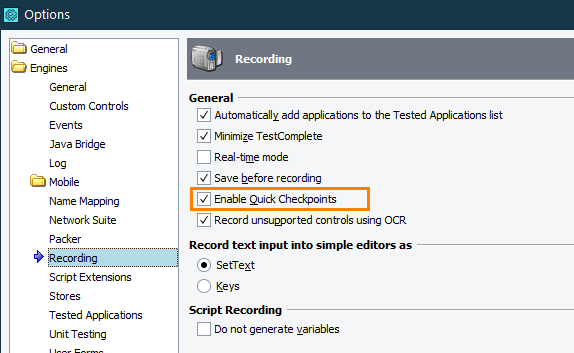
In the Options dialog, select Engines > Recording.
-
Select or clear the Enable Quick Checkpoints check box:
Known Issues
When creating Quick Checkpoints for a Flex application running in Edge, it may take several seconds to highlight the selected element.

 Requirements

