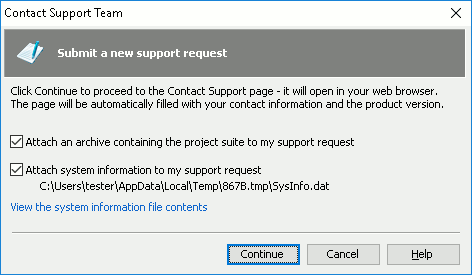
Use the Contact Support Team dialog to submit a request to SmartBear’s support team. To invoke the dialog, select Help | Contact Support Team from the main menu.

Before sending the support request, the Contact Support Team dialog suggests attaching an archive with the project suite currently opened in TestComplete to the request. You can clear the Attach an archive containing the project suite to my support request check box if you do not want to send your project suite to the support team. This check box is unavailable if no project suite is opened in TestComplete when you invoke the Contact Support Team dialog. We recommend that you attach your project suite since it can help the support team solve your problem quicker.
A few notes on attaching a project suite to the support request:
-
TestComplete puts the entire folder that contains the project suite file (the .pjs file) and all the subfolders with their contents into the archive.
-
If the project suite contains references to external files used by the project suite (for instance, references to test items from another project suite located outside of the project suite folder), TestComplete asks whether you want to add these files to the archive to be created. If you confirm adding the files to the archive, TestComplete puts them in the root folder of the archive.
-
If the total archive size exceeds 30 MB, it will be reduced until its total size becomes less than 30 MB (see below). This size restriction is imposed by the rules of SmartBear's web site.
-
If the created archive contains image files (.jpg, .bmp, .png, .gif, etc.) whose total size exceeds 5 MB, TestComplete notifies you that the archive is too large due to a lot of images and its uploading may take longer. TestComplete asks whether you want to remove large image files from the archive. If you confirm that you want to remove them, TestComplete will exclude large image files in the order of decreasing size until the total size of image files is halved. If the total size of images in the archive is still more than 5 MB, TestComplete excludes images until the total size is less than 5 MB. If after that the archive size exceeds 30 MB, TestComplete excludes images from it until the archive size is less than 30 MB. If after excluding all the image files from the archive its size still exceeds 30 MB, TestComplete shows a message informing you that the archive cannot be attached to the message.
Also, the Contact Support Team dialog suggests attaching a file with some system information collected on your computer to the request. You can clear the Attach system information to my support request check box if you do not want to send this additional information to the support team. Under the check box, you can see the fully-qualified name of a temporary file that contains the collected system information. The name of the generated file is SysInfo.dat. This file and the archive with the project suite are stored in a temporary folder (you can see its path under the Attach system information to my support request check box) that is immediately removed along with the files after sending the support request and closing the Contact Support Team dialog.
You can preview the collected system information before sending it to the support team and then make a decision whether you want to send this information or not. To preview the information, click the View the system information file contents link at the bottom of the Contact Support Team dialog. Then, the System Information dialog will be displayed where you can view the collected information. It contains the version of your operating system, free and total memory size, lists of running processes, services and installed programs, user privileges, and a lot more system information that can be helpful for the support team when solving the problem described in the request.
Click the Continue button in the Contact Support Team dialog and it will load the Contact Support page (https://support.smartbear.com/message/?prod=TestComplete) to your web browser. The request form on the page will be automatically filled in with the name and version of the product on which you submit the request and with your contact information specified when you activated your license. You only need to describe your problem and specify the type of request in the appropriate fields of the form. Also, if you previously selected the Attach an archive containing the project suite to my support request and Attach system information to my support request check boxes in the Contact Support Team dialog, the archive with the project suite and the SysInfo.dat file with the collected system information will be automatically attached to the request.
Note that you can also open the above mentioned web page in your web browser manually to submit a request, without using the Contact Support Team dialog. However, in this case, you will need to manually fill in all required information in the request form. Also, the archive with your project suite and the file with the system information that is collected when you use the Contact Support Team dialog will not be attached to the request. So, we recommend that you submit your support requests via the Contact Support Team dialog.
