 |
Flash Player has reached end of life on December 31, 2020. Support for Flash and Flex applications is now deprecated in TestComplete and will be removed in a future release. |
 The information in this topic applies to web tests that locate web objects by using internal identification properties provided by TestComplete and run in local environments.
In order for TestComplete to be able to recognize objects in your Adobe Flash and Flex applications, you need to compile your application with the FlexClient library included into the application. FlexClient is a helper library which is shipped along with TestComplete. Its purpose is to expose applications’ internal objects, methods and properties to TestComplete. This topic provides detailed instructions on how you can compile your application in the Adobe Flash Professional IDE.
To include the FlexClient library in your application using the Adobe Flash Professional IDE, do the following:
-
Open your application project in the Adobe Flash Professional IDE.
-
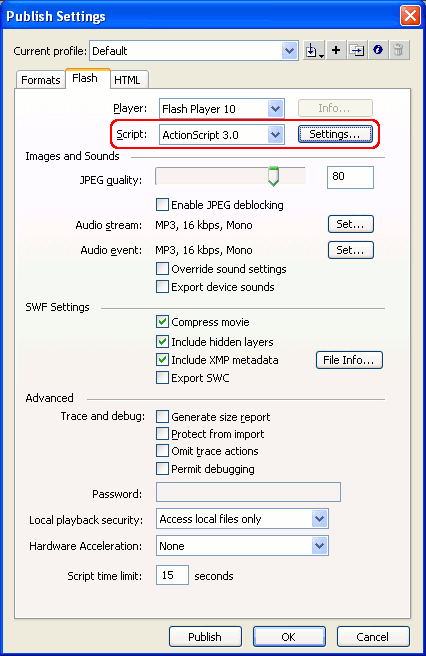
Select File | Publish Settings from the main menu of the IDE or press Ctrl+Shift+F12 to invoke the Publish Settings dialog.
-
In the dialog, switch to the Flash tabbed page. If it is not displayed, select the Flash (.swf) option on the Formats page of the dialog.
-
On the Flash page, click the Settings button to the right of the Script combo box. Note that ActionScript 3.0 or later version must be chosen in this combo box (that is, your Flash application must be created with the use of ActionScript 3.0 or later), since earlier versions of ActionScript do not allow including external SWC libraries in SWF modules of Flash applications.

-
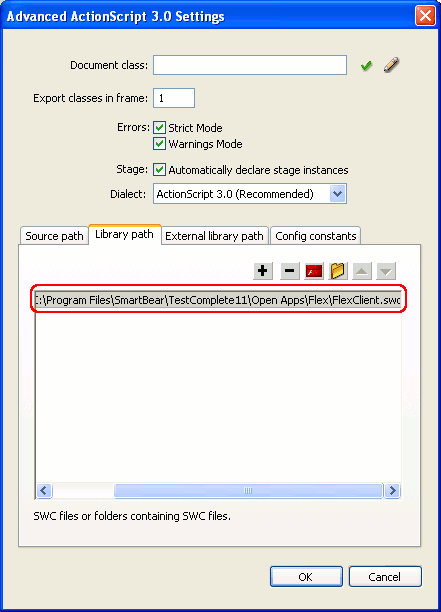
In the ensuing Advanced ActionScript Settings dialog, add the fully-qualified name of the FlexClient.swc file to the list of SWC libraries to be included in the application. For this purpose:
-
Switch to the Library path tabbed page.
-
Click the Browse to SWC file button.
-
Choose the FlexClient.swc file in the subsequent standard Open File dialog.
The fully-qualified name of the chosen file will be added to the list of SWC libraries on the Library path page:

-
-
Click OK in the Advanced ActionScript Settings and Publish Settings dialogs to apply the changes to the application project.
-
Add code for initialization of the FlexClient.swc library to the source code of your Flash application. Depending on whether you store the source code of your application within a Flash document file (.fla) or in a separate ActionScript file (.as), you add the initialization code in one of the following ways:
-
If you store the application source code in a .fla file:
-
Select Window | Actions from the main menu of Flash IDE (or press F9) to display the Actions panel.
-
Select a scene in the Script navigator pane of the Actions panel and type the following code in the Script pane that displays the script code of the selected unit:
ActionScript
import FlexClient.Agent;
FlexClient.Agent.initApplication(stage);Note: Since you need to initialize the library at the application startup, add this initialization code to the beginning of the script. Do not enclose it in a function or class method call. -
Close the Actions panel.
-
-
If you store the application source code in a .as file:
-
Open the ActionScript source code file (.as) with the implementation of the main class of your Flash application.
-
Add the following code snippet to the beginning of the script to import the
FlexClient.Agentclass:ActionScript
import FlexClient.Agent;
-
Call the
FlexClient.Agent.initApplicationmethod from the constructor of your application’s main class. For instance:ActionScript
import FlexClient.Agent;
// The application's main class
public class MyApp extends MovieClip
{
// The class constructor
public function MyApp()
{
...
FlexClient.Agent.initApplication(stage);
...
}
} -
Save the changes and close the source code file.
-
-
-
Save the changes made to your application project.
-
Select File | Publish from the main menu or press Shift+F12 to republish the application with the FlexClient.swc library included.
After you perform the steps above, the resulting SWF file of your Flash application will contain the FlexClient library and be ready for testing. TestComplete provides scripting access to the application’s internals (see Accessing Native Properties and Methods of Flash and Flex Objects for more information).
After you have compiled your Flash or Flex application with the FlexClient library included, you may need to perform some additional steps to prepare your application to properly test it with TestComplete. For instance, you may need to create a wrapper HTML page for the application and configure your web browser. For more instructions, see Preparing Flash and Flex Applications for Testing with the FlexClient Library.
See Also
Accessing Native Properties and Methods of Flash and Flex Objects
Testing Flash and Flex Applications
