
This topic describes how you can perform functional testing of applications created in Sybase PowerBuilder Classic. The following sections will explain how to prepare your PowerBuilder application for testing and set up a TestComplete project. The sample script in the end of the topic provides an example of how to simulate various actions over a PowerBuilder application’s user interface and obtain data from a DataWindow control.
 Supported PowerBuilder Versions
Configuring PowerBuilder Application
Configuring TestComplete Project
Supported PowerBuilder Versions
With TestComplete, you can create and run tests for applications created with PowerBuilder Classic version 12.0, 12.5, 12.5.2 and 12.6.
General Notes
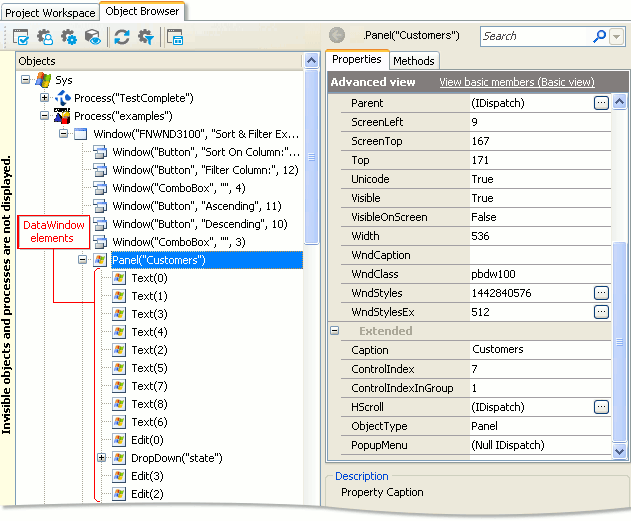
In order for TestComplete to simulate user actions over an application’s controls, it needs to have access to them. If you explore a PowerBuilder application in the Object Browser (for example, the PB Examples application that is shipped with PowerBuilder), you can see that by default TestComplete can access most controls on the application’s forms, except for DataWindow controls (the Window("pbdw100", "", 1) object on the image below). The reason for this is that DataWindow is a non-standard control. So, to interact with DataWindow controls and retrieve data from them you need a way to make DataWindow elements visible to TestComplete.

Since applications created in PowerBuilder Classic 12.0 support Microsoft Active Accessibility (MSAA), you can access DataWindow elements using the TestComplete MSAA engine. This engine is included in the Microsoft Active Accessibility Support plugin (this plugin is installed and enabled automatically. To use the plugin, you must have a license for the TestComplete Desktop module).
In order for the MSAA engine to provide access to DataWindow elements, you need to add the DataWindow control’s class name to the list of objects that the engine will expose. This list is individual for each TestComplete projects and can be customized in the project’s MSAA Options.
Note also, that in order to recognize controls (both windowed and non-windowed) exposed via Active Accessibility, TestComplete uses their accessible names and roles (see Addressing Objects in MSAA Open Applications). To simplify the recognition process, you can modify your PowerBuilder application so that the controls you are going to access from tests have specific accessible names.
The rest of this topic provides detailed instructions on how to configure the tested PowerBuilder application and the TestComplete MSAA engine. For more information on testing applications that support Active Accessibility, see Using Microsoft Active Accessibility.
Configuring PowerBuilder Application
To specify accessibility properties for controls of your PowerBuilder application, do the following:
-
Open your PowerBuilder project.
-
Open the windows with the desired controls in PowerBuilder’s Window Painter.
-
In the Properties window, switch to the Other tabbed page. Here you can specify accessibility properties of the desired PowerBuilder application controls:
AccessibleName,AccessibleDescriptionandAccessibleRole: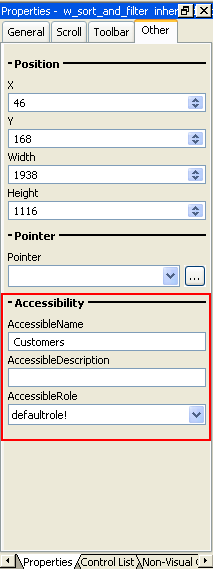
TestComplete uses the
AccessibleNameandAccessibleRoleproperties to identify and address controls. You can leave theAccessibleRoleproperty unchanged, but it is recommended that you specify theAccessibleNameproperty value for controls. This will make it easier for you to identify the controls in the recorded tests and to address controls when you create tests manually. -
Save the changes made and re-build your PowerBuilder application.
Configuring TestComplete Project
To enable the TestComplete MSAA engine to expose internal elements of DataWindow controls in the tested PowerBuilder application, you need to configure the project’s MSAA settings:
-
Open your TestComplete project.
-
Right-click the project node in the Project Explorer panel and select Edit | Properties from the context menu. This will open the project editor in the Workspace panel and display the Properties page.
-
Select the Open Applications | MSAA group on the left of the page. TestComplete will display the list of MSAA properties on the right. This list contains windows class names and their properties will be accessed via the TestComplete MSAA engine.
-
To make the MSAA engine provide access to DataWindow elements, add the pbdw* item to the List of accepted windows:
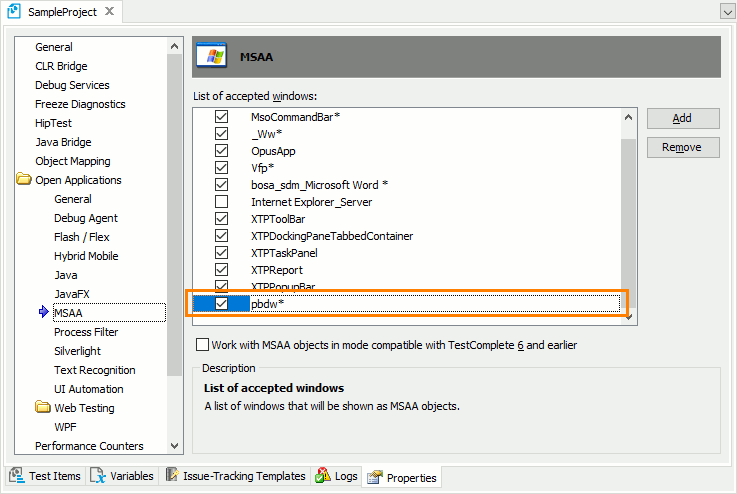
Enabling the “*” item will make the MSAA engine expose internal elements of any window and control.
-
Select File | Save All from the TestComplete main menu or press Ctrl+S to save the changes.
Exploring the Application in the Object Browser
After you have set up the MSAA options, TestComplete has access to DataWindow elements. These elements are displayed in the Object Browser with the  icon. The name of each MSAA node consists of its type name, which indicates the element’s accessible role, and the element’s accessible name. For example, on the following figure the
 Panel("Customers") object on the image below corresponds to a DataWindow control with the accessible name of “Customers” and its child objects correspond to DataWindow cells:
To determine which name a particular object has in the Object Tree, you can use the TestComplete target glyph:
-
Click the
 Display Object Spy button on the Tools toolbar.
 -
Activate your PowerBuilder application.
-
In the Object Spy window, click the Drag the target to point to the object icon, drag its glyph (
 ) to the desired application window or control, wait until the red frame appears around the object and release the mouse button. TestComplete will display the object’s properties, methods and events in the Object Spy window. The object’s full name, which is used to address the object in the script, is specified by the
 FullNameproperty. You can right-click the value of the property in the Object Spy window, select Copy from the context menu and then paste the copied object name to the script in the Code Editor.
For more information about how TestComplete addresses objects exposed by the MSAA engine, see Addressing Objects in MSAA Open Applications.
Example
The sample script below demonstrates how you can simulate user actions over controls in PowerBuilder applications and retrieve data from DataWindow controls. The script works with the PB Examples sample application that is shipped with PowerBuilder 12 and can be found in the <PowerBuilder 12>\Code Examples\Example App\ folder. The application must be running before you launch the script.
This example also requires that the List of accepted windows in the project’s MSAA Options contains the pbdw* item and that the Work with MSAA objects in mode compatible with TestComplete 6 and earlier option in the same category is turned off.
JavaScript
function Main()
{
var p, tabExamples, tvExamples, frmSFExample, grid, cells, i;
// Obtain the PB Examples process
p = Sys.Process("examples");
// If you run the application from PowerBuilder, use the following code:
// p = Sys.Process("Pb100");
// Launch the "Sort & Filter" example
tabExamples = p.Window("FNWND3100", "PowerBuilder 12. Code Examples").Window("PBTabControl32_100", "", 2);
tabExamples.ClickTab("Examples");
tvExamples = tabExamples.Window("FNUDO3100", "Examples").Window("PBTreeView32_100");
tvExamples.DblClickItem("|PowerBuilder Examples|DataWindows|Runtime Modification|Sort & Filter");
// Obtain the example's main form
frmSFExample = p.Window("FNWND3100", "Sort & Filter Example");
// Filter the data: Display customers from California only
frmSFExample.Window("ComboBox", "", 2).ClickItem("state");
frmSFExample.Window("ComboBox", "", 4).ClickItem("=");
frmSFExample.Window("ComboBox", "", 1).ClickItem("CA");
frmSFExample.Window("Button", "&Filter").Click();
// Post information from the DataWindow to the test log
grid = frmSFExample.Window("pbdw100");
// Get the number of cells in the DataWindow
cells = grid.FindAllChildren("ObjectType", "Edit", 1);
for (let i = 1; i < cells.length; i += 8)
{
Log.AppendFolder(grid.Edit(i+1).Text + " " + grid.Edit(i+4).Text);
Log.Message("Customer ID: " + grid.Edit(i).Text);
Log.Message("Company Name: " + grid.Edit(i+7).Text);
Log.Message("Phone: " + grid.Edit(i+3).Text);
Log.Message("Address: " + grid.Edit(i+2).Text);
Log.Message("City: " + grid.Edit(i+5).Text);
Log.Message("ZIP: " + grid.Edit(i+6).Text);
Log.PopLogFolder();
}
}
JScript
function Main()
{
var p, tabExamples, tvExamples, frmSFExample, grid, cells, i;
// Obtain the PB Examples process
p = Sys.Process("examples");
// If you run the application from PowerBuilder, use the following code:
// p = Sys.Process("Pb100");
// Launch the "Sort & Filter" example
tabExamples = p.Window("FNWND3100", "PowerBuilder 12. Code Examples").Window("PBTabControl32_100", "", 2);
tabExamples.ClickTab("Examples");
tvExamples = tabExamples.Window("FNUDO3100", "Examples").Window("PBTreeView32_100");
tvExamples.DblClickItem("|PowerBuilder Examples|DataWindows|Runtime Modification|Sort & Filter");
// Obtain the example's main form
frmSFExample = p.Window("FNWND3100", "Sort & Filter Example");
// Filter the data: Display customers from California only
frmSFExample.Window("ComboBox", "", 2).ClickItem("state");
frmSFExample.Window("ComboBox", "", 4).ClickItem("=");
frmSFExample.Window("ComboBox", "", 1).ClickItem("CA");
frmSFExample.Window("Button", "&Filter").Click();
// Post information from the DataWindow to the test log
grid = frmSFExample.Window("pbdw100");
// Get the number of cells in the DataWindow
cells = grid.FindAllChildren("ObjectType", "Edit", 1).toArray();
for (i = 1; i < cells.length; i += 8)
{
Log.AppendFolder(grid.Edit(i+1).Text + " " + grid.Edit(i+4).Text);
Log.Message("Customer ID: " + grid.Edit(i).Text);
Log.Message("Company Name: " + grid.Edit(i+7).Text);
Log.Message("Phone: " + grid.Edit(i+3).Text);
Log.Message("Address: " + grid.Edit(i+2).Text);
Log.Message("City: " + grid.Edit(i+5).Text);
Log.Message("ZIP: " + grid.Edit(i+6).Text);
Log.PopLogFolder();
}
}
Python
def Main():

  # Obtain the PB Examples process
  p = Sys.Process("examples");
  # If you run the application from PowerBuilder, use the following code:
  # p = Sys.Process("Pb100");

  # Launch the "Sort & Filter" example
  tabExamples = p.Window("FNWND3100", "PowerBuilder 12. Code Examples").Window("PBTabControl32_100", "", 2);
  tabExamples.ClickTab("Examples");
  tvExamples = tabExamples.Window("FNUDO3100", "Examples").Window("PBTreeView32_100");
  tvExamples.DblClickItem("|PowerBuilder Examples|DataWindows|Runtime Modification|Sort & Filter");

  # Obtain the example's main form
  frmSFExample = p.Window("FNWND3100", "Sort & Filter Example");

  # Filter the data: Display customers from California only
  frmSFExample.Window("ComboBox", "", 2).ClickItem("state");
  frmSFExample.Window("ComboBox", "", 4).ClickItem("=");
  frmSFExample.Window("ComboBox", "", 1).ClickItem("CA");
  frmSFExample.Window("Button", "&Filter").Click();


  # Post information from the DataWindow to the test log
  grid = frmSFExample.Window("pbdw100");

  # Get the number of cells in the DataWindow
  cells = grid.FindAllChildren("ObjectType", "Edit", 1);
  cells = VBArray(cells).toArray();

  i = 1;
  while (i < cell.length):
    Log.AppendFolder(grid.Edit(i+1).Text + " " + grid.Edit(i+4).Text);
    Log.Message("Customer ID: " + grid.Edit(i).Text);
    Log.Message("Company Name: " + grid.Edit(i+7).Text);
    Log.Message("Phone: " + grid.Edit(i+3).Text);
    Log.Message("Address: " + grid.Edit(i+2).Text);
    Log.Message("City: " + grid.Edit(i+5).Text);
    Log.Message("ZIP: " + grid.Edit(i+6).Text);
    Log.PopLogFolder();
    i += 8;
VBScript
Sub Main
Dim p, tabExamples, tvExamples, frmSFExample, grid, cells, i
' Obtain the PB Examples process
Set p = Sys.Process("examples")
' If you run the application from PowerBuilder, use the following code:
' Set p = Sys.Process("examples")
' Launch the "Sort & Filter" example
Set tabExamples = p.Window("FNWND3100", "PowerBuilder 12. Code Examples").Window("PBTabControl32_100", "", 2)
tabExamples.ClickTab("Examples")
Set tvExamples = tabExamples.Window("FNUDO3100", "Examples").Window("PBTreeView32_100")
tvExamples.DblClickItem("|PowerBuilder Examples|DataWindows|Runtime Modification|Sort & Filter")
' Obtain the example's main form
Set frmSFExample = p.Window("FNWND3100", "Sort & Filter Example")
' Filter the data: Display customers from California only
frmSFExample.Window("ComboBox", "", 2).ClickItem("state")
frmSFExample.Window("ComboBox", "", 4).ClickItem("=")
frmSFExample.Window("ComboBox", "", 1).ClickItem("CA")
frmSFExample.Window("Button", "&Filter").Click
' Post information from the DataWindow to the test log
Set grid = frmSFExample.Window("pbdw100")
' Get the number of cells in the DataWindow
cells = grid.FindAllChildren("ObjectType", "Edit", 1)
For i = 1 To UBound(cells)
Log.AppendFolder(grid.Edit(i+1).Text & " " & grid.Edit(i+4).Text)
Log.Message("Customer ID: " & grid.Edit(i).Text)
Log.Message("Company Name: " & grid.Edit(i+7).Text)
Log.Message("Phone: " & grid.Edit(i+3).Text)
Log.Message("Address: " & grid.Edit(i+2).Text)
Log.Message("City: " & grid.Edit(i+5).Text)
Log.Message("ZIP: " & grid.Edit(i+6).Text)
Log.PopLogFolder
i = i + 8
Next
End Sub
DelphiScript
procedure Main;
var p, tabExamples, tvExamples, frmSFExample, grid, cells, i;
begin
// Obtain the PB Examples process
p := Sys.Process('examples');
// If you run the application from PowerBuilder, use the following code:
// p := Sys.Process('examples');
// Launch the 'Sort & Filter' example
tabExamples := p.Window('FNWND3100', 'PowerBuilder 12. Code Examples').Window('PBTabControl32_100', '', 2);
tabExamples.ClickTab('Examples');
tvExamples := tabExamples.Window('FNUDO3100', 'Examples').Window('PBTreeView32_100');
tvExamples.DblClickItem('|PowerBuilder Examples|DataWindows|Runtime Modification|Sort & Filter');
// Obtain the example's main form
frmSFExample := p.Window('FNWND3100', 'Sort & Filter Example');
// Filter the data: Display customers from California only
frmSFExample.Window('ComboBox', '', 2).ClickItem('state');
frmSFExample.Window('ComboBox', '', 4).ClickItem('=');
frmSFExample.Window('ComboBox', '', 1).ClickItem('CA');
frmSFExample.Window('Button', '&Filter').Click;
// Post information from the DataWindow to the test log
grid := frmSFExample.Window('pbdw100');
// Get the number of cells in the DataWindow
cells := grid.FindAllChildren('ObjectType', 'Edit', 1);
for i := 1 to VarArrayHighBound(cells, 1) do
begin
Log.AppendFolder(grid.Edit(i+1).Text + ' ' + grid.Edit(i+4).Text);
Log.Message('Customer ID: ' + grid.Edit(i).Text);
Log.Message('Company Name: ' + grid.Edit(i+7).Text);
Log.Message('Phone: ' + grid.Edit(i+3).Text);
Log.Message('Address: ' + grid.Edit(i+2).Text);
Log.Message('City: ' + grid.Edit(i+5).Text);
Log.Message('ZIP: ' + grid.Edit(i+6).Text);
Log.PopLogFolder;
i := i + 8;
end;
end;
C++Script, C#Script
function Main()
{
var p, tabExamples, tvExamples, frmSFExample, grid, cells, i;
// Obtain the PB Examples process
p = Sys["Process"]("examples");
// If you run the application from PowerBuilder, use the following code:
// p = Sys["Process"]("Pb100");
// Launch the "Sort & Filter" example
tabExamples = p["Window"]("FNWND3100", "PowerBuilder 12. Code Examples")["Window"]("PBTabControl32_100", "", 2);
tabExamples["ClickTab"]("Examples");
tvExamples = tabExamples["Window"]("FNUDO3100", "Examples")["Window"]("PBTreeView32_100");
tvExamples["DblClickItem"]("|PowerBuilder Examples|DataWindows|Runtime Modification|Sort & Filter");
// Obtain the example's main form
frmSFExample = p["Window"]("FNWND3100", "Sort & Filter Example");
// Filter the data: Display customers from California only
frmSFExample["Window"]("ComboBox", "", 2)["ClickItem"]("state");
frmSFExample["Window"]("ComboBox", "", 4)["ClickItem"]("=");
frmSFExample["Window"]("ComboBox", "", 1)["ClickItem"]("CA");
frmSFExample["Window"]("Button", "&Filter")["Click"]();
// Post information from the DataWindow to the test log
grid = frmSFExample["Window"]("pbdw100");
// Get the number of cells in the DataWindow
cells = grid["FindAllChildren"]("ObjectType", "Edit", 1)["toArray"]();
for (i = 1; i < cells["length"]; i += 8)
{
Log["AppendFolder"](grid["Edit"](i+1)["Text"] + " " + grid["Edit"](i+4)["Text"]);
Log["Message"]("Customer ID: " + grid["Edit"](i)["Text"]);
Log["Message"]("Company Name: " + grid["Edit"](i+7)["Text"]);
Log["Message"]("Phone: " + grid["Edit"](i+3)["Text"]);
Log["Message"]("Address: " + grid["Edit"](i+2)["Text"]);
Log["Message"]("City: " + grid["Edit"](i+5)["Text"]);
Log["Message"]("ZIP: " + grid["Edit"](i+6)["Text"]);
Log["PopLogFolder"]();
}
}
Possible Problems
On some computers running under 64-bit editions of Windows XP or Windows Server 2003, TestComplete may be unable to record user actions over PowerBuilder applications properly. The problem can be caused by printer drivers installed in the operating system. To solve the problem and use TestComplete to test your PowerBuilder application on these operating systems, try uninstalling the printer drivers.
Testing PowerBuilder .NET Applications
Since PowerBuilder 12.0, the PowerBuilder utility is divided into PowerBuilder Classic 12.0 and PowerBuilder .NET 12.0. The approach above describes how you can test applications created in PowerBuilder Classic 12.0. However, there is another approach that you should use when testing applications created in PowerBuilder .NET 12.0 with TestComplete. To learn more, see Testing PowerBuilder .NET Applications with TestComplete.
See Also
Testing PowerBuilder Applications
Testing PowerBuilder .NET Applications with TestComplete
Using Microsoft Active Accessibility
Supported Development Tools