With the ReadyAPI built-in browser, you can record requests to a website, filter them, and create an API definition for them. To describe this process, ReadyAPI uses the Discovery term.
When you need to record requests you cannot simulate from a browser, you can command ReadyAPI to behave like a proxy. In this case, only the requests you send through the proxy will be recorded. This allows you to avoid obtaining unnecessary information, and record only those requests that are required for testing.
1. Open the Discovery Dialog
-
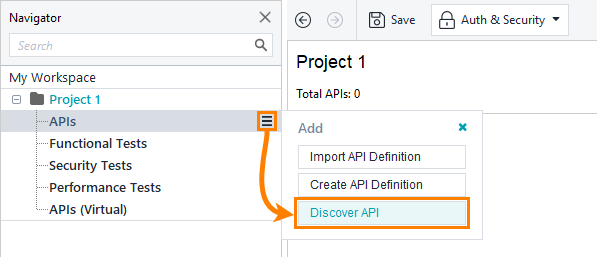
Click
 next to the APIs node and select Discover API:
— or —
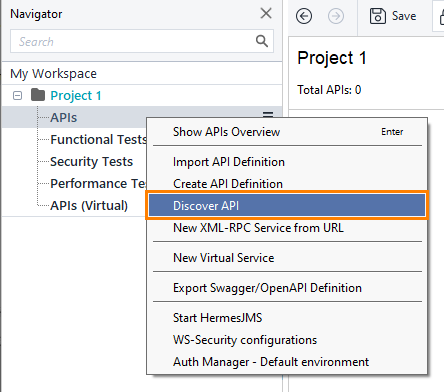
Right-click the APIs section in the Navigator and select Discover API.
-
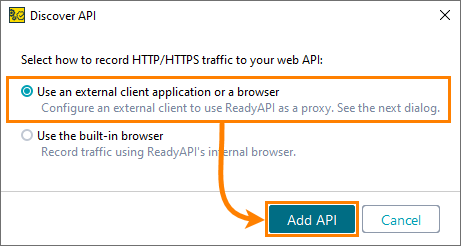
Select Use the built-in browser and click Add API:
-
Click Add API to start recording.
-
ReadyAPI will offer you to specify an API definition to filter the recorded requests. If you have a definition and want to record requests related to this API, specify the definition file and select Add and Record. Otherwise, click Record without Definition.
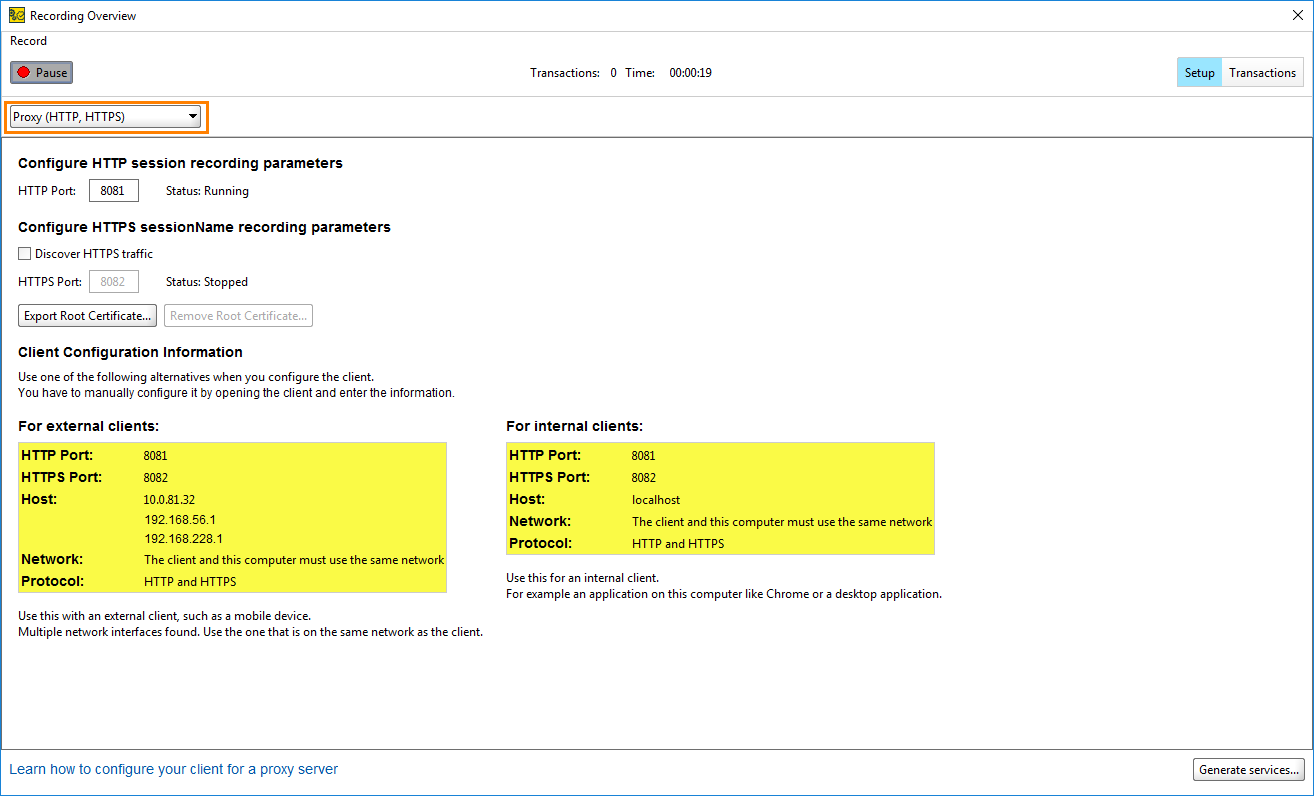
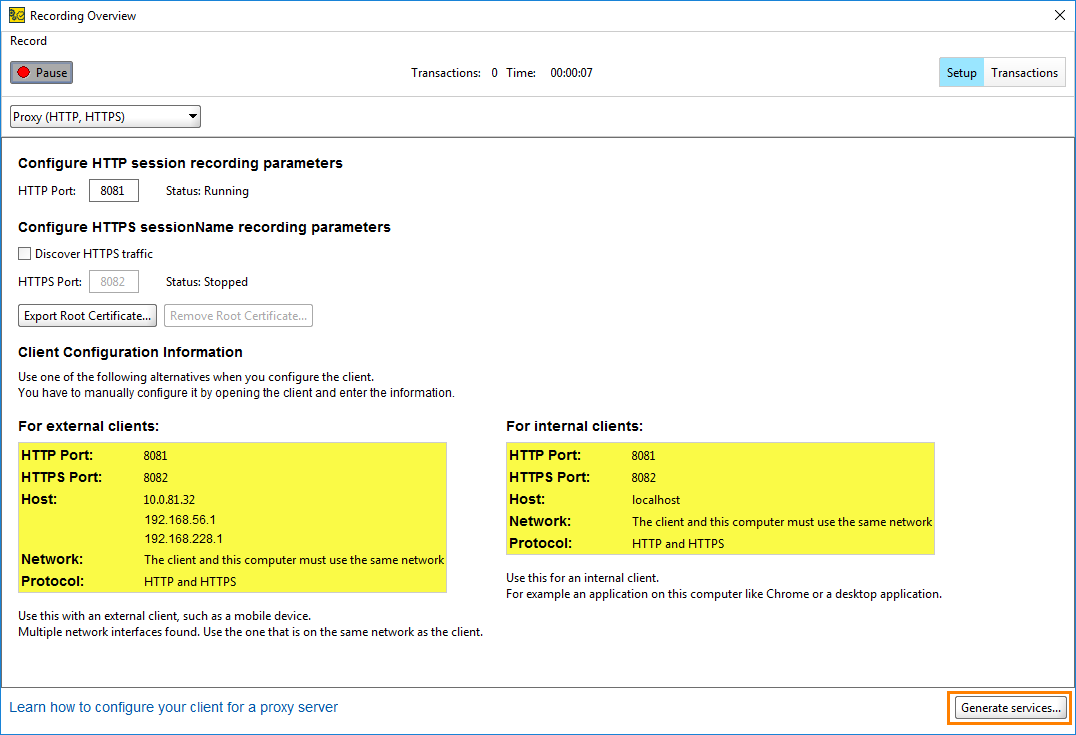
In either case, ReadyAPI will open the Record Overview dialog. Make sure to select the Proxy (HTTP, HTTPS) option from the drop-down list. You can start recording the request to the target service.
2. Record Requests
When you start discovering in the Proxy mode, ReadyAPI starts acting as a proxy and records all requests and responses that go through it. You need to configure your browser to use the ReadyAPI proxy as described in your browser documentation. You can also use external clients such as virtual machines, mobile devices or other computers in the network to send the requests.
 |
ReadyAPI can record either HTTP or HTTPS. You cannot use the same address for both protocols. |
Configure Proxy Address
When working with the ReadyAPI proxy, you can specify the HTTP and HTTPS ports it runs on in the HTTP Port and HTTPS Port boxes of the REST Discovery dialog. Other applications must not use the ports you have specified.
ReadyAPI provides information about the available connection address in the For external clients and For internal clients boxes.
Internal clients are clients that run on the same host as ReadyAPI. External clients are clients run in the same network as ReadyAPI.
Configure Client
Desktop Browser
When you enable routing, ReadyAPI is set as a system proxy. Most browsers use system proxies by default, so you do not need to configure them manually. If the requests you send are not recorded, go to the browser network settings and configure your browser to use the proxy ReadyAPI provides.
Android Device
To record requests from your Android device, you configure HTTP proxy settings for a Wi-Fi network to use ReadyAPI as a proxy. The instructions below are for devices that run Android 4.0 or later. On some devices, you may need to perform different steps to set up an HTTP proxy.
Requirements
-
Your Android device must be connected to a Wi-Fi network and must support proxy servers for Wi-Fi connections. Some devices do not support proxy servers. Please see your device manual or contact your device manufacturer to learn this.
-
The application must use HTTP or HTTPS. ReadyAPI cannot record both HTTP and HTTPS traffic on the same port.
Set the Device Proxy
-
Disable the Internet connection on the device to make all traffic go through Wi-Fi.
-
Open the Settings menu.
-
In the Wireless & networks settings, touch Wi-Fi.
-
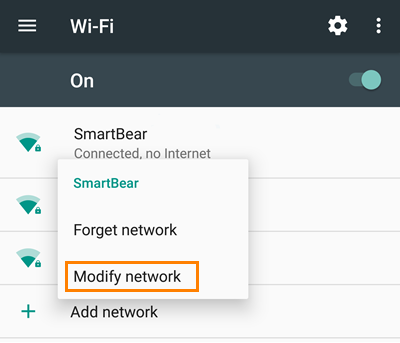
Press and hold your Wi-Fi network and select Modify network.
-
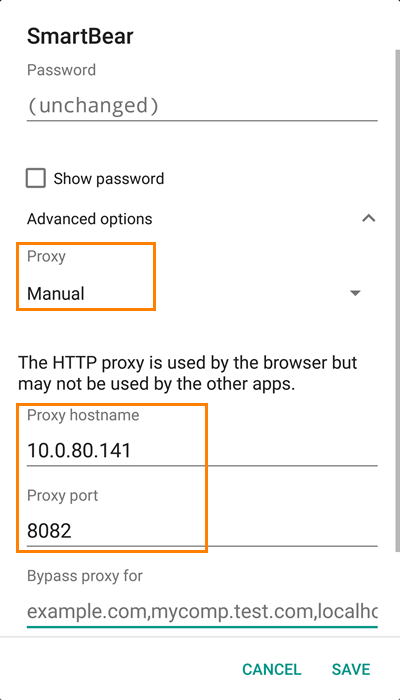
Tap on Advanced options.
-
Change Proxy to Manual and enter the IP address and port number provided by ReadyAPI for external clients.
-
Tap Save.
Now ReadyAPI will catch the requests you send from your Android device and record them.
 |
Remember to remove the proxy settings after you finish recording, otherwise, your mobile applications will be unable to access the Internet. |
iOS device
To record requests from your iOS device, you configure HTTP proxy settings for the Wi-Fi network to use ReadyAPI as a proxy.
Requirements
-
Your iPhone or iPad must be connected to a Wi-Fi network.
-
You can record only HTTP or HTTPS traffic at a time. Currently, ReadyAPI cannot record both HTTP and HTTPS traffic on the same port.
Set the Device Proxy
-
Disable the Internet connection on the device to make all traffic go through Wi-Fi.
-
Go to Settings > Wi-Fi.
-
Tap on the Wi-Fi network you need. You must be connected to the network.
-
Move down to the HTTP Proxy section and select Manual.
-
Enter the Server IP address and the Port provided by ReadyAPI for external clients. Leave Authentication disabled.
-
Close the settings.
Now ReadyAPI will catch the requests you send from your iOS device and record them.
 |
Remember to remove the proxy settings after you finish recording, otherwise, your mobile applications will be unable to access the Internet. |
Record HTTP Traffic
Configure the browser or application to use the provided proxy and send the requests you need. ReadyAPI will record all HTTP requests.
To view the recorded transactions, switch to the Transactions page.
Record HTTPS Traffic
The HTTPS protocol provides a secure connection to the web service. The HTTP proxy cannot intercept and decode HTTPS messages, so ReadyAPI will not record any requests. To record HTTPS traffic:
-
Select Discover HTTPS traffic.

You need to install the SmartBear Software CA certificate to work with HTTPS. ReadyAPI uses the certificate to sign all requests sent over HTTPS so that the ReadyAPI proxy can intercept and read them. The certificate may cause security warnings in some browsers because it is self-signed by SmartBear. On Windows computers with ReadyAPI, you can install it automatically. On Linux, Mac and Windows computers without ReadyAPI, you need to install the certificate manually. See below for information about installing the certificate manually.

The certificate provides a potential vulnerability for your HTTPS requests. Make sure to remove it after testing. -
Send the requests to your service. ReadyAPI will record all HTTPS requests with the SmartBear certificate sent through it.

ReadyAPI will not record HTTP requests. -
Remove the SmartBear certificate you have installed. Use the Remove Root Certificate button or remove it manually.
-
To view the recorded transactions, switch to the Transactions page.
3. Generate Service Definitions
To generate a service definition for the requests ReadyAPI has recorded:
-
Make sure to select only the requests you need on the Transactions page. Otherwise, ReadyAPI will create API definitions for all available requests.
-
Click Generate services.
-
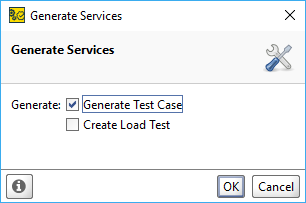
In the Generate Services dialog, select Generate Test Case or Generate Load Test to create a simple Functional or Performance test.
-
Click OK.
ReadyAPI will generate service definitions and, if selected, ask you to name the functional test suite and performance test respectively. Then, it will inform you of the success and offer to close the Recording Overview dialog.
 |
Make sure to deselect the Close REST Discovery option if you want to create more API definitions from requests ReadyAPI has recorded. |

Work With HTTPS Certificate Manually
ReadyAPI can install the SmartBear certificate automatically on Windows computers. You can install the certificate on a Linux, macOS or Windows computer without ReadyAPI manually.
-
Export the certificate. Click Export Root Certificate in the REST Discovery dialog and specify the folder to save the certificate to.
-
Install the certificate:
-
On Windows, use the command-line
certutilprogram:certutil -addstore -f "ROOT" SmartBearCADoNotTrust.cer
-
On Linux, copy the certificate file to the
/**username**/local/share/ca-certificates/folder and update the certificate store:sudo cp SmartBearCADoNotTrust.cer /tester/local/share/ca-certificates/SmartBearCADoNotTrust.cer
sudo update-ca-certificates -
On macOS, use the terminal to install the certificate:
sudo security add-trusted-cert -d -r trustRoot -k /Library/Keychains/System.keychain ~/SmartBearCADoNotTrust.cer
-
-
Run the discovery and record the necessary API.
-
After you record all requests you need, remove the SmartBear certificate.
-
On Windows, use the command-line
certutilprogram:certutil -delstore "ROOT" <serial-number-hex>
-
On Linux, remove the certificate file from the
/**username**/local/share/ca-certificates/folder and update the certificate store:sudo rm /tester/local/share/ca-certificates/SmartBearCADoNotTrust.cer
sudo update-ca-certificates -
On macOS, use the terminal commands to remove the certificate:
sudo security delete-certificate -c "<name of existing certificate>"
-
See Also
Internal Browser Discovery
Filtering Recorded Transactions
Discovery Tutorial
Creating Your First Functional Test
Tutorials and Samples

 Show image