
| Note: | This document covers only the basic uses of the QAComplete Test Automation REST API. See API Reference for full details and for the request and response formats. |
To integrate an automated testing tool with QAComplete, you need to create an agent – an application that will run on test hosts and handle communication between QAComplete and the testing tool.
| Note: | Currently, Test Automation REST API supports integration with –
|
The agent workflow is as follows:
 1. Check for multiple departments
4. Download automation scripts to hosts
1. Check for multiple departments
QAComplete users can belong to one or several departments. If you call the API using an account that belongs only to one department, the API knows which department to use. However, if you use an account that belongs to several departments, you need to specify a department explicitly in API calls.
You can query /depts to get the departments to which a user belongs. To authenticate the request, use the login and password of this user.
curl -u [email protected]:p@ssword -H "Accept: application/json" http://yourserver.com/rest-api/service/automation/v2/depts
Check the number of departments. If it is 1, you do not need to specify the department in other API calls. Otherwise, extract the departments and ask the user which one to use.
{
"metadata": {
"result_set": {
"count": 1,
. . .
},
. . .
},
"results": [
{
"id": 8162,
"name": "department name 1",
"company": "company name 1",
"date_created": "2009-09-21T14:09:15.4200000"
}
]
}
2. Register test hosts
To register the current computer as a test host in QAComplete, your agent needs a user login, password, and (optionally) the department ID. After registering a host, you will get the host ID and security token for authenticating other API calls, so you do not have to store user account information on the host.
Start by checking if this host is already registered (for example, an agent might have been installed on it before). To do this, request the host information by the host name:
curl -u [email protected]:p@ssword -H "Accept: application/json" "http://yourserver.com/rest-api/service/automation/v2/hosts?name=RACK11-W7X64&deptid=8162"
If the host is not there (you got a 404 error), add it:
curl -u [email protected]:p@ssword -X POST -d @host.txt -H "Content-Type: application/json" -H "Accept: application/json" http://yourserver.com/rest-api/service/automation/v2/hosts
Here, the host.txt file (the request body) contains something like this:
{
"host_name": "RACK11-W7X64",
"host_configuration": "x64, net45, firefox, chrome, flash",
"agents": [
"TestComplete/TestExecute",
"JUnit (Selenium)",
"NUnit (Selenium)",
"TestNG (Selenium)",
"ReadyAPI / SoapUI OS"
],
"os": "Windows 7 Ultimate 64-bit SP1",
"is_active": true,
"dept_id": 8162
}
You will get the host ID and security token in the response. Store them somewhere. You will need them to authenticate other API calls.
{
"id": 143,
"host_name": "RACK11-W7X64",
…
"security_token": "d2e1ffd1-3c74-4ccf-738b-10997283e35f"
}
If the host is already registered (you got status 200), check the response:
-
Extract the host
idandsecurity_tokenand store them somewhere. -
Check the
is_activeandagentsproperties. If the host is inactive or does not have your agent specified, PATCH the host information. Authenticate the request using the host ID and security token.curl -u &id-token; -X PATCH -H "Content-Type: application/json" -d "{'agents': ['TestComplete/TestExecute', 'JUnit (Selenium)', 'NUnit (Selenium)', 'TestNG (Selenium)', 'Ready! API / SoapUI'], 'is_active': true}" http://yourserver.com/rest-api/service/automation/v2/hosts/143
From now on, authenticate all API calls using the host ID as a login and security token as a password.
3. Monitor pending tests
QAComplete users can run tests manually, or schedule tests to run regularly. To monitor pending tests (tests with the Awaiting Run status), an agent must poll /currentruns for its host, for example, once a minute.
curl -u &id-token; -H "Accept: application/json" http://yourserver.com/rest-api/service/automation/v2/hosts/143/currentruns
If there are no pending tests, the response looks like this:
{
"metadata": {
"result_set": {
"count": 0,
"offset": 0,
"limit": 25,
"total": 0
},
"__permissions": {
"acl": 7
}
},
"results": []
}
If there are pending tests, the response looks like this:
{
"metadata": {
"result_set": {
"count": 2,
"offset": 0,
"limit": 25,
"total": 2
},
"__permissions": {
"acl": 7
}
},
"results": [
{
"id": 532,
"is_sequential": true,
"status": "Awaiting Run",
"agents": "",
"test_run_items": [
{
"sequence_number": 1,
"stop_on_fail": true,
"status": "Awaiting Run",
"date_started": "0001-01-01T07:00:00.0000000Z",
"date_finished": "0001-01-01T07:00:00.0000000Z",
"run_time": 0,
"automations": [
{
"agent": "TestComplete/TestExecute",
"timeout": 600,
"run_mode": 0,
"params":
{
"entry_point": "OrdersTest\\Script\\Unit1\\Login"
}
}
],
"test_run_results": []
},
{
"sequence_number": 2,
"stop_on_fail": true,
"status": "Awaiting Run",
"date_started": "0001-01-01T07:00:00.0000000Z",
"date_finished": "0001-01-01T07:00:00.0000000Z",
"run_time": 0,
"automations": [
{
"agent": "JUnit (Selenium)",
"timeout": 600,
"run_mode": 1,
"params":
{
"start_class": "com.smartbear.selenium.SeleniumTest.TestCaseClass1",
"use_maven": false
}
}
],
"test_run_results": []
}
]
}
]
}
For each test run in the queue (the results[index] object), do the following:
-
Store the test run
id. You will need it in other API calls. -
If the
test_run_itemsarray contains several tests, check the test run’sis_sequentialproperty to see if the tests need to be run in this specific order. -
For each test in the
test_run_itemsarray:-
Check if
automations[0].agentmatches your agent. If it does not, ignore this test. -
Store the
sequence_numberfor later use. -
Get the test timeout –
automations[0].timeout. -
Check the automation script’s run mode –
automations[0].run_mode. It specifies how the agent should run the script on the test host:0– The automation script is to be copied to a temporary folder on the test host.1– The automation script is in a local folder on the test host and is to be run in that folder. -
Get the test parameters –
automations[0].params. -
If there are several tests in the
test_run_itemsarray, check each test’sstop_on_failproperty. It indicates whether to ignore the other tests of this run if the test fails. -
If needed, download the automation script from QAComplete.
-
Upload the test results to QAComplete.
-
4. Download automation scripts to hosts
Users can store automation scripts in several ways:
-
Attach a zipped script to the Automation tab of a test in the Test Library.
-
Upload a zipped script to a web location.
-
Put a zipped or an unpacked script to a shared network folder.
-
Store a zipped or an unpacked script in a local folder on the host.
The run_mode property specifies where the automation script resides and how the agent should run it:
-
If the run_mode is 0, the automation script is to be copied to a temporary folder on the test host.
-
If the run_mode is 1, the automation script is in a local folder on the test host and is to be run in-place.
Download the automation script by requesting /script for the test. The request URL contains the test’s sequence number, the test run ID (you got them from the /currentruns response), the host ID, and your agent name.
For example, suppose your agent runs on host #143. The agent you use on that host is TestComplete/TestExecute. To download a zipped automation script for the first test within test run #532, you use:
curl -u &id-token; -L -o testscript.zip http://yourserver.com/rest-api/service/automation/v2/hosts/143/runs/532/items/1/script?Agent=TestComplete%2FTestExecute
In the general case, the response can contain a ZIP file or the path to a shared network location. Check the status code to learn how to handle the response:
-
If the status is 200, the response body contains the ZIP file’s binary contents. Save the ZIP file to some folder on the host and unpack it to get the automation script.
-
If the status is 302, follow the
Locationheader to get the ZIP file. Save and unpack this ZIP file to get the automation script.Some tools and libraries automatically follow 302 redirects, so you will get status 200 like in the previous case.
-
If the status is 404, check the
Locationheader:-
If the
Locationheader is present, it points to the automation script in a shared network folder. The path is in the format file:///\\server\folder\file.zip, and can be either a ZIP file name, or the name of the folder that contains an unpacked automation script. Copy the files to the host and unpack them if needed. -
If the response does not have the
Locationheader, it means the automation script was not found (for example, it was on a web site but then it was deleted).
-
5. Run tests
Start the automated testing tool and run the automation script or a specific test in it. Store the script’s start time, end time and run time (in seconds) – you will need them later to change the test status in QAComplete.
If the test is running longer than the user-defined timeout, you need to stop it.
If the test failed and its stop_on_fail property is True, you need to ignore the other tests of this run. QAComplete will automatically block them after you mark the test as Failed.
6. Send test results to QAComplete
After an automated test has finished running on a host, your agent must set the test status in QAComplete and, optionally, upload the test logs so that users can view them. If you decide to upload the test logs, you must do this before changing the test status.
Upload test logs (optional)
Users can access automated test logs from the Test Runner screen. QAComplete supports the following formats of automated test logs:
-
An XML files containing log data.
-
MHT – a web archive file. Users can view these logs in the browser directly from QAComplete.
-
A ZIP archive containing any log type. Users can download and view zipped logs on their computers.
Note: TestComplete’s .tcLogX logs saved from the command line are also ZIP archives.

Click the image to enlarge it.
To upload a test log, you make an API call using the test’s sequence number, test run ID, and host ID. The upload URLs are different for different log types: you POST MHT logs to /report and zipped and XML logs to /logs.
The following call uploads an MHT log:
curl -v -i -u &id-token; -F [email protected] http://yourserver.com/rest-api/service/automation/v2/hosts/143/runs/532/items/1/report
This call uploads TestComplete’s zipped log (.tcLogX):
curl -v -i -u &id-token; -F [email protected] http://yourserver.com/rest-api/service/automation/v2/hosts/143/runs/532/items/1/logs
This call uploads the NUnit test project’s log (.xml):
curl -v -i -u &id-token; -F [email protected] http://yourserver.com/rest-api/service/automation/v2/hosts/143/runs/532/items/1/logs
Specify the test status
You can mark tests in QAComplete as Passed, Failed, Blocked, or Skipped. To set the test status, you send a PATCH request to a URL containing the host ID, test run ID and test’s sequence number.
curl -u &id-token; -X PATCH -d PassedTest.txt -H "Content-Type: application/json" http://yourserver.com/rest-api/service/automation/v2/hosts/143/runs/532/items/1
Here, the PassedTest.txt file (the request body) contains something like this:
{
"status": "Passed",
"date_started": "2014-07-24T08:40:57Z",
"date_finished": "2014-07-24T08:41:57Z",
"run_time": 60,
"test_run_results": [ ]
}
After you change the test status, this test no longer appears in /currentruns for the current host.
If the test’s stop_on_fail property is True and you mark the test as Failed, QAComplete will automatically mark the other tests of the test run as Blocked.
Also, QAComplete automatically sets the test run status (In Progress, Passed, Failed, Blocked, or Incomplete) based on the status of individual tests included in the test run.
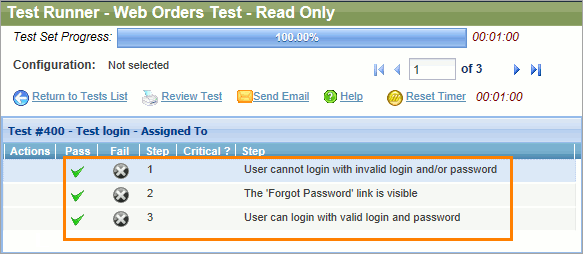
Add the test step results
If the automation script includes several test cases or checkpoints, you can upload their results as test step results in QAComplete. Users can view test step results from the Test Runner screen.
For example –
-
For TestComplete test projects, you can upload the status of top-level test items.
-
For Selenium tests, you can upload the console output of the appropriate unit testing framework as the actual result of a test step.
-
For ReadyAPI projects, you can upload the status of test suites or test cases as test step results.
To add test step results, include them in the test_run_results array in the request body when setting the test status. Test steps can be Passed, Failed, or Blocked.
{
"status": "Passed",
"date_started": "2014-07-24T08:40:57Z",
"date_finished": "2014-07-24T08:41:57Z",
"run_time": 60,
"test_run_results": [
{
"status": "Passed",
"step": "User cannot log in with invalid login and/or password"
},
{
"status": "Passed",
"step": "The 'Forgot Password' link is visible"
},
{
"status": "Passed",
"step": "User can log in with valid login and password"
}
]
}
7. Unregister test hosts
You cannot delete test hosts through the API. Users delete hosts manually from the Test Hosts screen in QAComplete.
However, you can use the API to mark hosts as inactive, so that users cannot run tests on them.
curl -u &id-token; -X PATCH -d '{"is_active": false}' -H "Content-Type: application/json" http://yourserver.com/rest-api/service/automation/v2/hosts/143
See Also
QAComplete Test Automation REST API Overview
QAComplete Test Automation REST API Reference