
The sections of this topic describe importing and exporting data.
| Note: | For information on importing and exporting tests, please see Import and Export Tests. |
Import data
To import data, save it in the comma-separated (CSV) format using any spreadsheet application and use the Import Wizard.
| Note: | In QAComplete, there are no limits on the number of items you import from CSV. Still, it may take some time to import a file containing a very big number of items. |
You can access the Import Wizard either from the specific items list screen (Defects, Requirements, and so on) or from Setup:
-
If you are on the items list screen, click Tools (Actions) > Import Items from CSV file.
-
If you are in > Setup, select Import > Import Wizard.
In the Import Wizard:
-
Click Import Instructions & Common Mistakes to learn about possible issues when importing data and how to deal with them.
-
Select a data type to be imported in the Import Data Type drop-down list.
-
Click Next Page to proceed.

Click the image to enlarge it.
-
Click Choose File to attach the file to be imported.
-
Click Next Page to proceed.
-
Preview your import file in the Top Rows From Your File field and map each field in your import file to the fields in QAComplete to make sure the data is correct. If you find any errors, correct them and re-upload the file.
If the data is correct, map elements in your file with the corresponding QAComplete fields in the Field Name in QAComplete column.
.Note: Fields marked with * are required. If the first row in the CSV file has headers that match field names, they automatically be mapped.

Click the image to enlarge it.
-
Click Import Now.
QAComplete will inform you if your records have been imported successfully or there were any errors. It will also send an email notification. You can find your imported records by filtering them by Import Id.
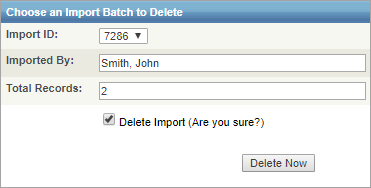
Delete imported data
If you want to delete an imported data batch (for example, in case of an error):
-
Go to > Setup > Import > Delete Imported Batches
-
From the Import Data Type drop-down list, select the area you imported into – for example, Defects.
-
Click Next Page.
-
In the Import ID drop-down list, select your imported records ID.
-
Select the Delete Import check box.
-
Click Delete Now.
Export data
Export generates a comma-separated file of your data. You can export only the columns selected on the listing screen or all available fields on the Edit form plus the latest note.
| Note: | Export does not include attachments, multiple notes, or links. |
To export data:
-
Go to a listing screen.
-
Select Tools (Actions) > Export Items (visible fields only) or Export … (all fields).
-
Open or save the exported data.