In a load-balanced environment, requests that clients send are distributed among several servers to avoid an overload.
In LoadComplete, you can run load tests against your load-balanced servers to check their performance under the load. By default, LoadComplete sends requests of different virtual users from the same IP address (it is the address of the workstation, where these users are simulated). Depending on your load balancer configuration, the balancer may treat such requests as a single session and route them to the same destination server. This leads to the situation when the simulated requests load only one server in a load-balanced system.
To avoid the described issue, configure your load tests to send requests from various IP addresses so that your load balancer distinguishes them as different clients.
Assigning IPs to Virtual Users
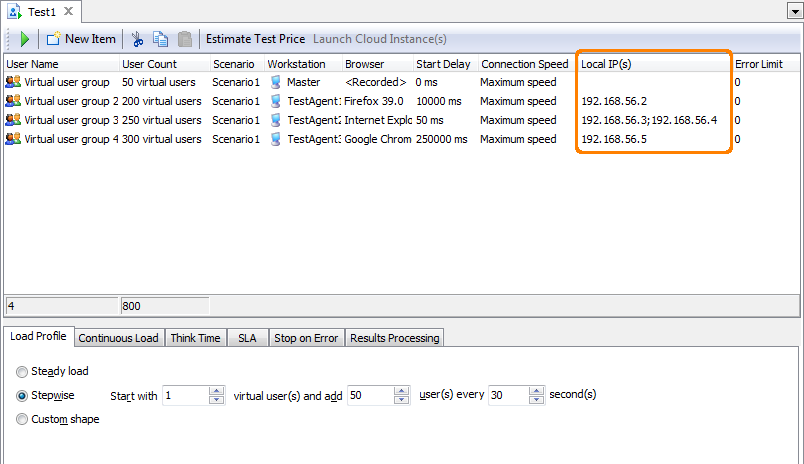
You assign IP addresses to virtual users, who will simulate requests from those addresses, in the Local IP(s) column of the Load Test editor:
-
Open the Load Test editor.
-
Select the virtual user or a group of virtual users that you will simulate in a load-balanced environment and enter the needed IP address in the Local IP(s) column. To enter a list of IP addresses, separate them with semicolons.
When you run the test, LoadComplete will simulate requests from specified IP addresses.
Your load balancer will treat virtual users simulated from different IP addresses as different clients and will route them to separate destination servers.
Notes:
-
If a group of virtual users has several IP addresses assigned to them, LoadComplete will simulate the first user in the group from the first IP on the list, the second user - from the second IP on the list, and so on, until it reaches the end of the IP list. Then, it will recycle the IPs on the list starting from the first one.
-
If an IP address assigned to a user or group is invalid, LoadComplete will exclude this IP address and use other IP addresses from the list. If only one IP address is specified and it is invalid, LoadComplete will simulate the user or user group using the localhost’s IP address.
How to Get More IP Addresses?
If your computer has two or more network adapters, you can use their IP addresses for simulating virtual users.
If you have only one network adapter or want to use more IP addresses than the number of network adapters you have, follow these steps:
1. Get the DNS Address, Subnet Mask, and Default Gateway
To specify IP addresses for your network adapter, you will need to know the subnet mask and default gateway. If you do not know them, ask your system administrator.
You can also try finding them yourself:
-
Log in to a workstation where you are going to simulate virtual users.
-
Go to Control Panel > Network and Sharing Center.
Click Change adapter settings on the left.
-
On the subsequent page, right-click your network adapter (connection) and select Status from the context menu.
-
In the subsequent Status dialog, click Details. You will see a dialog listing various network settings.
Write down the DNS addresses and gateway:
2. Configure Your Network Adapter’s Settings
-
On the workstation, where you are going to simulate virtual users, go to Control Panel > Network and Sharing Center.
Click Change adapter settings on the left.
-
On the subsequent page, right-click the needed Internet adapter (connection) and then click Properties.
-
On the Networking page of the subsequent Properties dialog, select Internet Protocol Version 4 (TCP/IPv4) and click Properties.
Note: IPv6 addresses are not supported. -
In the subsequent dialog:
-
Select the Use the following IP address option.
-
Enter the IP address, subnet mask, and default gateway.

Enter the IP addresses that are not allocated by other computers in your network.
Ask your system administrator which addresses are free and which are not. -
Under Use the following DNS server addresses, enter the DNS server addresses for your computer.
-
-
To assign more IP addresses to your network adapter:
-
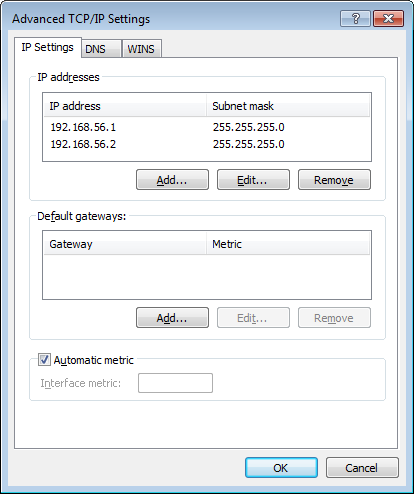
Click Advanced.
-
The IP addresses list in the Advanced TCP/IP Settings dialog lists all IP addresses assigned to the adapter. Click Add to add a needed IP address:

Enter the IP addresses that are not allocated by other computers in your network.
Ask your system administrator which addresses are free. -
Click OK.
-
-
Save the changes and close the dialogs.
After you set IP addresses for your network adapter, you can specify these addresses for virtual users in your load test. See above.
See Also
Creating and Configuring Load Tests
About Load Test Editor
Load Testing With LoadComplete

 Assigning IPs to Virtual Users

