 |
Document review is only supported on 64-bit Collaborator servers. On 32-bit platforms, Collaborator may fail to process the documents due to insufficient memory. |
 |
The Collaborator Visual Studio Extension and Eclipse Plug-in do not support reviewing spreadsheets. Use the Web Client instead. |
Collaborator adds native support for Microsoft Excel (.xls, .xlsx, .xlsb, .xlsm, .xltm, .xltx) and OpenDocument (.ods) spreadsheets. This is useful particularly for users who want to compare files such as QA test plans. Every effort is made to keep the Excel format, so a review shows the entire spreadsheet, which can consist of multiple worksheets.
| Note: | When a file is uploaded for review, hidden rows are shown. Also, fill color and font color are stripped from the spreadsheet. If the use of color is essential to your spreadsheet, for example, if you are using charts, then consider converting the spreadsheet to PDF format. Review is recommended. Some formatting options are ignored. You may need to save your file with word wrap enabled to more easily see the content during reviews. |
Worksheet is often abbreviated as "sheet". As in Excel, the UI displays a list of tabs at the bottom of the workbook for switching between worksheets. Only one worksheet is displayed at a time. Worksheets can be added, deleted, renamed, and re-ordered.
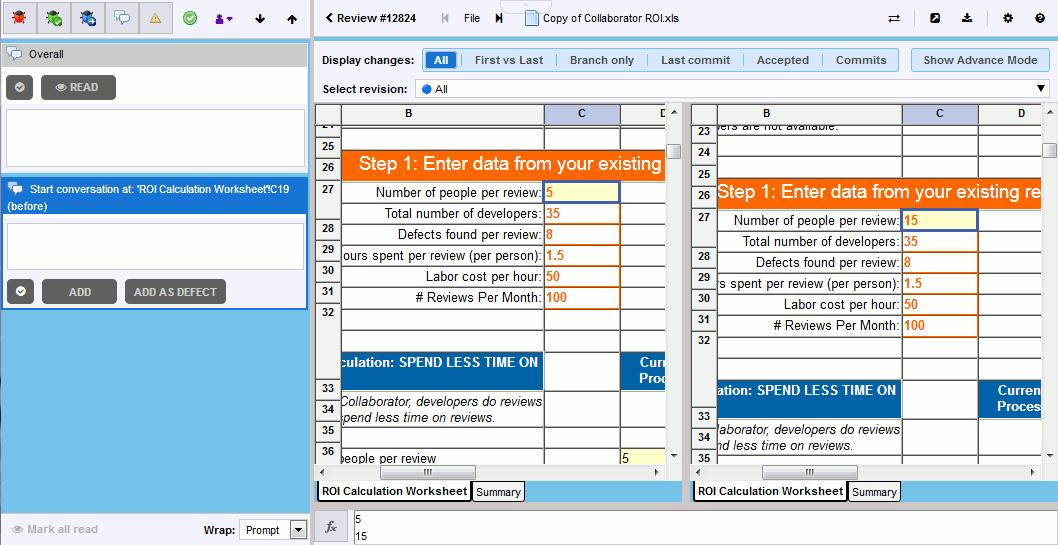
When you click in a cell, the value is displayed in the cell detail pane (equivalent to the formula bar in Excel). The values for the selected cell appear in the cell detail pane with the value for the "after" version on top:

Display
The Display button has specific options for spreadsheet review. When you select Evaluate Formulas, only the evaluated result of the formula is shown, not the formula itself. You can toggle this through the Display button or the Evaluate Formulas button at the bottom of the Diff Viewer.
You can also toggle Display Empty Cells, which provides shading for empty cells.
View Differences
Since it is difficult to compare spreadsheet revisions to meet all use cases, some changes may not be highlighted in diffs in the way that people would expect. We will continue to work on the Excel diff feature to meet the broadest set of needs.
As part of the review, you can do diffs of the files that show the contents of a cell (either formula or result). You can navigate around the spreadsheet by selecting the cell location.
The UI displays a diff of two versions of a spreadsheet side-by-side. There is a panel at the bottom that shows the contents of the selected cell in both versions of the spreadsheet on top of one another for easy visual comparison.
The use of color allows you to quickly identify changes in diffs so that you can address just what has been modified, added or deleted between versions of the Excel file under review.
Added cells have a green background.
Deleted cells have a red background.
Modified cells have a yellow background.
All other cells (empty or not) display with a white background.
*No* empty cells are highlighted, even if they are different (added or deleted)
| Note: | The specific document format used by Collaborator makes it impossible to display diffs in complex Excel objects, such as diagrams, charts and embedded images. |
Review Formulas
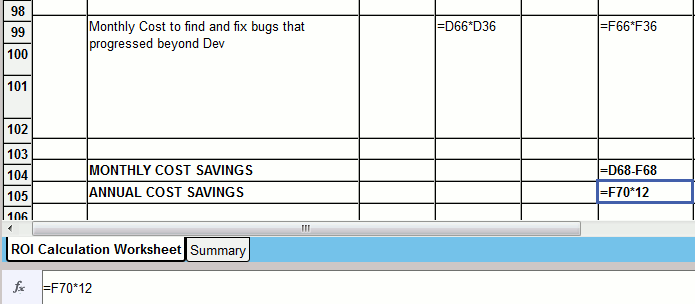
Formulas are not displayed by default. Depending on the Evaluate Formulas option, the cell content is the formula (for example, "=1+1") or the value of the formula (for example, "2"). You can also toggle formulas by the button in the cell detail pane. When you click in a cell, the value is displayed at the bottom in the formula space.

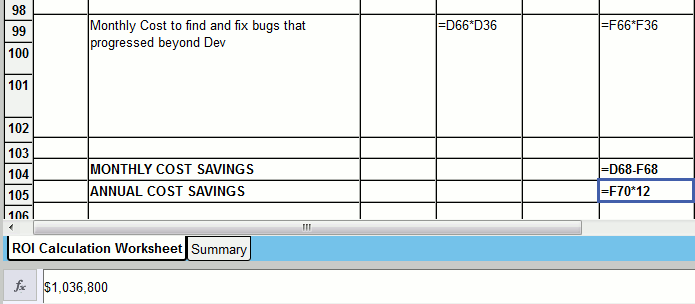
If you click the Evaluate Formulas button, the value displays in the cell detail pane:

Make Comments and Mark Defects
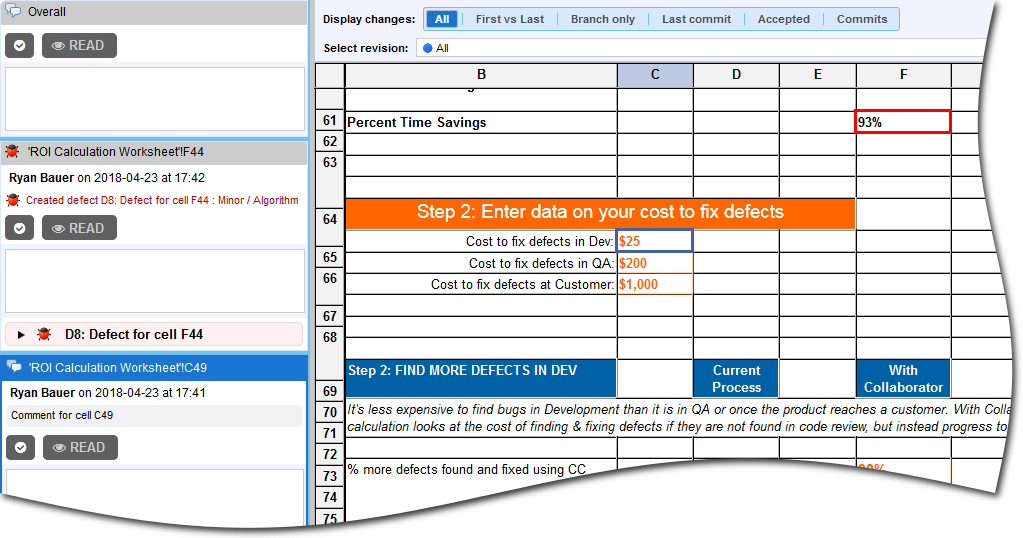
On the left of the main Diff Viewer page, there is a pane for chat threads, where you can view and make comments and mark defects that should be fixed. When reviewing Excel files, you can create global, annotation, overall for file revision and cell comments and defects.
To comment on a specific cell within an Excel spreadsheet, click the desired cell in the content view, type your comment in the text box and click Add. To add defects, click the desired cell in the content view, type the defect description, click Add as defect and fill-in the required fields.
Conversations on cells are displayed in alphabetical order by sheet name, not in the sheet order found in the version content. In the example above, conversations for "ROI Calculation Worksheet" would come before "Summary" work sheet. The name of the chat includes the name of the sheet followed by the location of the cell being discussed. For example, Summary!C10.

To learn more about communicating during the reviews, see Types of Review Comments and Defects and Review Chats, Comments, and Defects topics.
