
The way you customize AQTime’s toolbars and menus depend on whether you use the standalone AQTime version or the integrated one.
AQTime integrated into Microsoft Visual Studio adds several elements to Visual Studio’s menu and toolbars:
- The AQTime item to Visual Studio’s main menu.
- Several items to the Project menu of Visual Studio’s main menu.
- The AQTime Standard and AQTime Profiling toolbars.
AQTime integrated into Embarcadero RAD Studio also adds several elements to Embarcadero RAD Studio’s menu and toolbars:
- The AQTime item to Embarcadero RAD Studio’s main menu.
- The AQTime Profile Windows submenu to the View menu of Embarcadero RAD Studio’s main menu.
- The Setup, Event View, Report, PE Reader, Explorer and Profiler toolbars.
- The Allocation Profiler.AQTime, BDE SQL Profiler.AQTime, Coverage Profiler.AQTime, Disassembler.AQTime, Edit.AQTime, Event View.AQTime, Explorer.AQTime, Export.AQTime, File.AQTime, Function Trace Profiler.AQTime, Help.AQTime, Monitor.AQTime, Options.AQTime, PE Reader.AQTime, Performance Profiler.AQTime, Project.AQTime, Report.AQTime, Resource Profiler.AQTime, Run.AQTime, Setup.AQTime, Standard.AQTime, Static Analysis.AQTime and View.AQTime command categories providing various commands that can be added to any toolbar via the Toolbar Customization dialog.
You can customize these toolbars and menus in the same manner as you customize other menus and toolbars in Visual Studio or Embarcadero RAD Studio (however, it is not possible to configure menus in Embarcadero RAD Studio). In addition to the mentioned toolbars, there are also toolbars located within AQTime panels that are integrated into Visual Studio. These toolbars hold items that are specific to the panel to which the toolbar belongs. You can show or hide items on these toolbars and dock these toolbars to any side of a panel (see below). However, moving items among these toolbars and creating new toolbars of this type is currently not supported.
The standalone version of AQTime also have panel-specific toolbars. However, there are also toolbars (for instance, the Standard toolbar) that are located within AQTime’s main window. Despite of the toolbars location (panel or main window), you can customize that toolbars like you customize toolbars and menus in Microsoft Visual Studio or in other Microsoft products, such as Word or Excel. For instance, like in Visual Studio, AQTime toolbars can be docked to any side of AQTime’s window. A panel-specific toolbar can be docked to any side of its panel or it can be undocked from its panel and docked to any side of AQTime’s main window.
To place a toolbar in a desired location in the standalone AQTime version, simply drag the toolbar by its title bar to that location. The two figures below illustrate how the Setup toolbar can be docked:
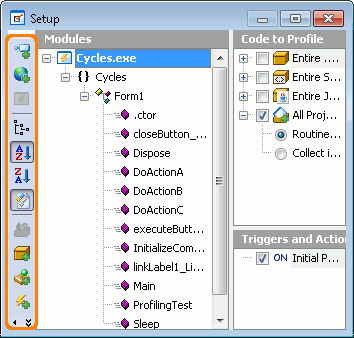 The Setup toolbar is docked to the left side of the Setup panel (by default, this toolbar is docked to the top side of the panel). |
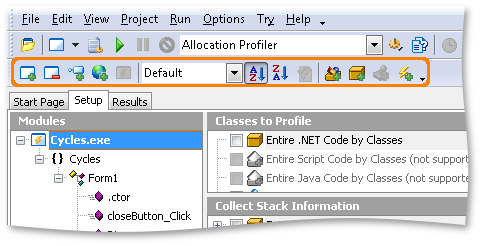 The toolbar is docked to the top edge of AQTime’s main window under the Standard toolbar. |
| Note: | If you use AQTime integrated into Visual Studio, you can move panel-specific toolbars within their panels only. |
Toolbars in the standalone AQTime version can be organized into several rows. You can place more than one toolbar in the same row. If the toolbar is not wide enough to show all of its items, it displays the >> button at the end. Clicking this button opens a list with the toolbar items that are currently invisible:
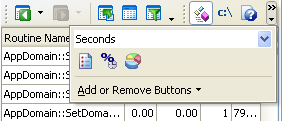
To hide or display buttons on a toolbar in the standalone AQTime version or in AQTime integrated into Visual Studio, click the down arrow on the right of the desired toolbar and then click the Add or Remove Buttons item. This will call a menu similar to the following one:
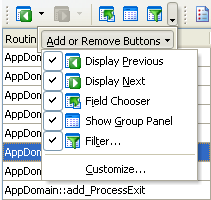
Simply uncheck the buttons you want to hide and check the items you want to be visible on the toolbar.
| Note: | In the same manner you can hide or show items on the toolbars that are located within panels of AQTime integrated into Visual Studio. |
To add a button to the toolbar or to the main menu in the standalone AQTime version:
-
Right-click any toolbar and select Customize from the context menu or select View > Desktop > Customize Toolbars from AQTime’s main menu. This will bring up the Toolbar Customization dialog:
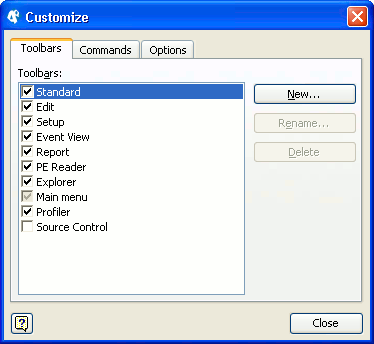
- Switch to the Commands tabbed page.
- Select the desired item on the Commands page and then drag it to the desired toolbar or menu.
To remove an item from the toolbar or menu, simply drag it and drop it somewhere outside the toolbar or menu area when the Toolbar Customization dialog is displayed on screen.
| Note: | The Toolbar Customization dialog is not available if you use the integrated version of AQTime. Instead, you should use native toolbar customization facilities that are available in Visual Studio or Embarcadero RAD Studio. |
When the Toolbar Customization dialog is visible, you can modify properties of a toolbar or menu item. To do this, simply right-click the desired item and use the subsequent context menu:
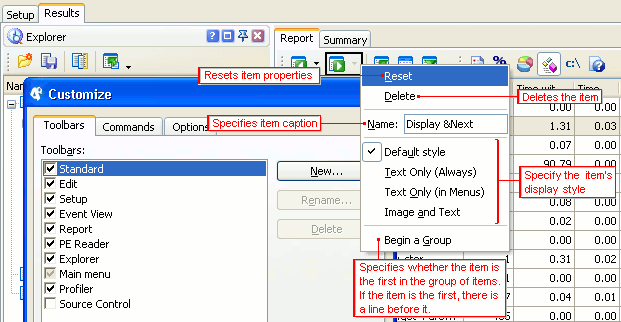
A unique mechanism, used for toolbar and menu functioning, provides a powerful feature that allows menus to behave like a Recently Used Files list. In other words, frequently used menu items are visible, and rarely used items are hidden. To enable this feature, just check the Menus show recently used command first option in the Toolbar Customization dialog:
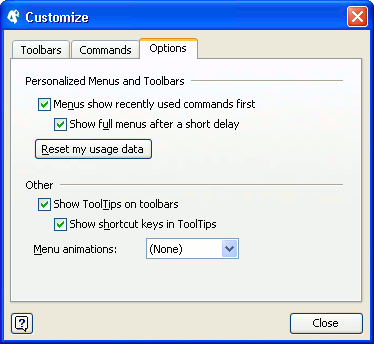
If the Show full menus after a short delay option is checked, menus display all their items (including rarely used items that are hidden) after a short pause.
In the standalone AQTime version, you can save the current toolbar settings to an .aqtlb file by selecting View > Desktop > Save Toolbar to File from AQTime’s main menu. To load the toolbar settings from a file, use View > Desktop > Load Toolbar from File. To restore the default toolbar settings, select View > Desktop > Restore Default Toolbar. To save or load toolbar settings along with the panel layout, use the View > Desktop > Save Desktop As and View > Desktop > Load Desktop menu items.