To start using single sign-on (SSO), you need to prepare an identity management service and configure AlertSite.
Requirements
To configure AlertSite for using single sign-on, you need to import the metadata file (usually named metadata.xml) generated by your SSO provider. The metadata file contains the following required information:
-
Entity ID
-
Single Sign-On Service URL
-
X.509 Certificate
Single Sign-On Settings
To configure SSO settings, follow these steps:
 |
Only Admin (not Co-Admin) users can control these settings. |
AlertSite UXM
-
Navigate to > Settings.
-
Switch to the Single Sign-On tab.
Specify the following settings:
-
AlertSite SAML Settings – This section displays read-only options needed to configure an SSO provider to use AlertSite.
-
Entity ID – A unique IdP identifier which describes the entity that is expected to receive the SAML message.
-
Assertion Customer Service URL – A location where the SAML assertion will be sent.
Application URL – A page URL to use to log in via SSO. Add this page to your browser bookmarks for further easier access. Alternatively, you can log in to AlertSite via your SSO provider by selecting AlertSite in its application list.
-
-
AlertSite Single Sign-On Settings – This section has options which determine the way you log in to AlertSite.
-
Use Single Sign-On – If selected, use Application URL instead of the https://www.alertsite.com/login login page or begin the login procedure in an SSO provider by clicking AlertSite in the application list.
Allow login without Single Sign-On – Select to allow logging in to AlertSite without SSO. You may want to use this option for a number of reasons:
-
During initial testing of SSO configuration - so that you can still log in even if SSO was misconfigured.
-
When a user's SSO provider or service is down.
-
If you need to use a DéjàClick browser plugin or AlertSite API – these features do not support single sign-on and require a standard login with an email and password.
-
-
-
Identity Provider SAML Settings – This section contains metadata that ensures secure transaction between an identity provider and AlertSite.
In this section, you need to upload a metadata file generated by your SSO provider. To do that, Choose File in the Metadata File section and browse for the file needed. If metadata is uploaded successfully, the following setting fields will be populated automatically:
-
Entity ID – The URL of the entity that is expected to receive the SAML message.
-
Single Sign-On Service URL – The location where the SAML assertion will be sent.
-
X.509 Certificate – The contents of the X.509 certificate that establishes trust between your SSO provider and AlertSite.
-
-
-
Click Save.
AlertSite 1.0
-
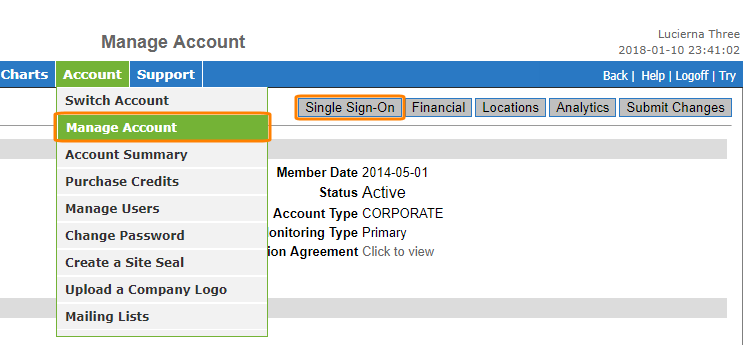
Navigate to Account > Manage Account.
-
Click Single Sign-On in the top right corner.
-
Specify the following settings:
-
AlertSite SAML Settings – This section displays read-only options needed to configure an SSO provider to use AlertSite.
-
Entity ID – A unique IdP identifier which describes the entity that is expected to receive the SAML message.
-
Assertion Customer Service URL – A location where the SAML assertion will be sent.
Application URL – A page URL to use to log in via SSO. Add this page to your browser bookmarks for further easier access. Alternatively, you can log in to AlertSite via your SSO provider by selecting AlertSite in its application list.
-
-
AlertSite Single Sign-On Settings – This section has options which determine the way you log in to AlertSite.
-
Use Single Sign-On – If selected, use Application URL instead of the https://www.alertsite.com/login login page or begin the login procedure in an SSO provider by clicking AlertSite in the application list.
Allow login without Single Sign-On from https://www.alertsite.com/login – Select to allow logging in to AlertSite without SSO. You may want to use this option for a number of reasons:
-
During initial testing of SSO configuration - so that you can still log in even if SSO was misconfigured.
-
When a user's SSO provider or service is down.
-
If you need to use a DéjàClick browser plugin or AlertSite API – these features do not support single sign-on and require a standard login with an email and password.
-
-
-
Identity Provider SAML Settings – This section contains metadata that ensures secure transaction between an identity provider and AlertSite.
In this section, you need to upload a metadata file generated by your SSO provider. To do that, Choose File in the Metadata File section and browse for the file needed. If metadata is uploaded successfully, the following setting fields will be populated automatically:
-
Entity ID – The URL of the entity that is expected to receive the SAML message.
-
Single Sign-On Service URL – The location where the SAML assertion will be sent.
-
X.509 Certificate – The contents of the X.509 certificate that establishes trust between your SSO provider and AlertSite.
-
-
-
Click Submit.

