
Compatibility
The VirtServer version should match the version of ReadyAPI. We recommend using the same version of both, VirtServer and ReadyAPI.
 |
To connect to VirtServer 3.1 and later using ReadyAPI, you need ReadyAPI 1.6 or later. Older versions won't connect because they use a now-deprecated authorization method. |
|
You cannot connect to VirtServer 3.0 and later by using ReadyAPI 2.8 or earlier if VirtServer’s compatibility mode is turned off. Update your ReadyAPI installation or turn the mode on. |
Default approach
You work with VirtServers and virtual services from ReadyAPI. By default, ReadyAPI automatically searches for VirtServers available in your local network.
To view VirtServers it found, simply click the down button in the header of the ReadyAPI VirtServer panel. To connect to a VirtServer, simply select it in the drop-down list:
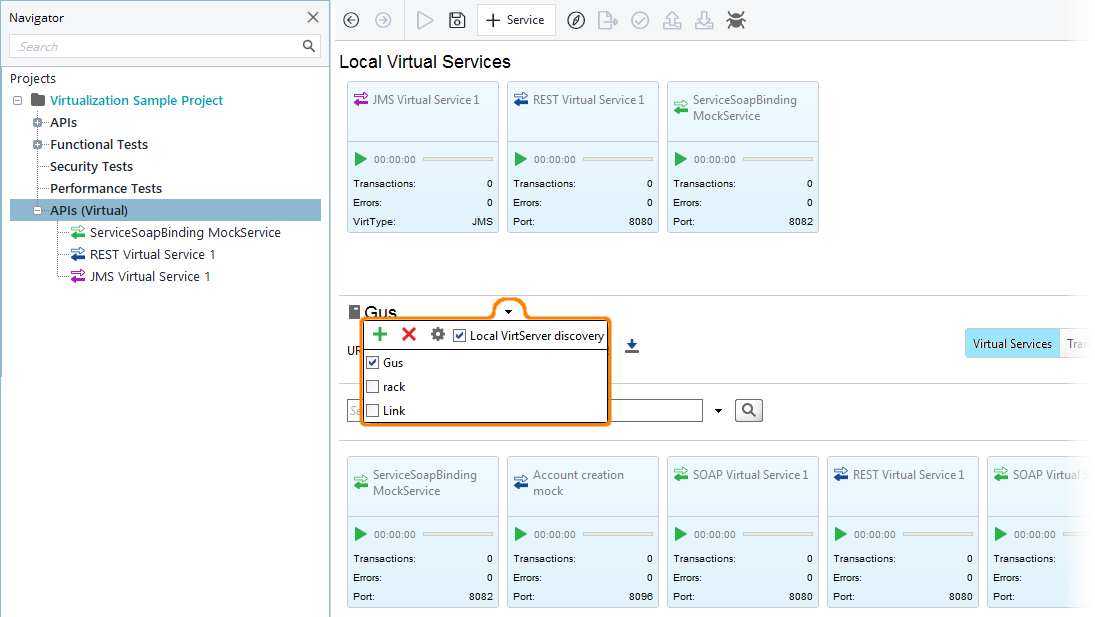
The default search works if the Use VirtServer discovery check box is selected.
Notes:
-
The search procedure finds only VirtServers that reside in your local network and that use the default port number (
9090). -
The VirtServer should be running when a search is being performed.
-
ReadyAPI prior to 3.0 does not find VirtServer 3.0 if the compatibility mode of the latter is turned off. Update the ReadyAPI installation or turn the mode on.
Specify connection properties manually
If the Use VirtServer discovery check box is clear, or if your VirtServer uses a non-default port, you have to add VirtServers to the list manually. To do this:
-
Click the
 button.
 -
Specify the VirtServer parameters in the subsequent dialog:
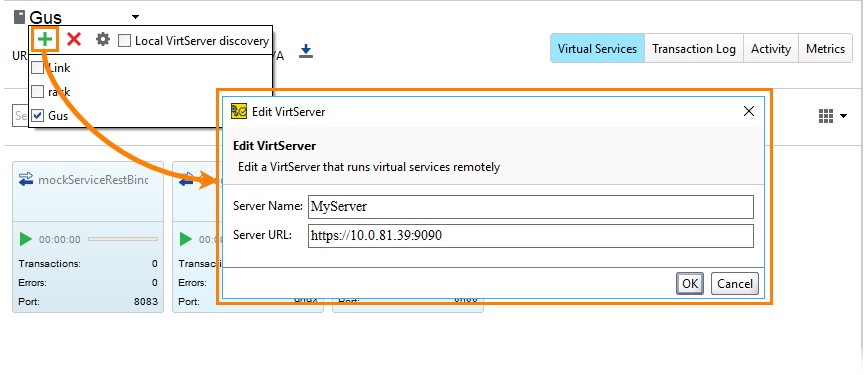
Parameter Value Server Name
The name of the VirtServer in the list.
Server URL
The protocol, IP address and port of the computer where the desired VirtServer is installed.
To connect to VirtServer 3.1 and later using ReadyAPI, you need ReadyAPI 1.6 or later. Older versions won't connect because they use a now-deprecated authorization method. You cannot connect to VirtServer 3.0 and later by using ReadyAPI 2.8 or earlier if VirtServer’s compatibility mode is turned off. Update your ReadyAPI installation or turn the mode on.
Change VirtServer parameters
To change the name, address or port of a VirtServer:
-
Select the VirtServer in the list.
-
Click
 in the drop-down window and change the VirtServer's name, address and port in the subsequent dialog.
This works only for those VirtServers that you added manually. Auto-detected VirtServers cannot be modified.
Delete a VirtServer from the list
To delete a VirtServer from the list:
-
Select the VirtServer in the list.
-
Click
 in the drop-down window.
This works only for those VirtServers that you added manually. Auto-detected VirtServers cannot be deleted.
Specify a username and password
When you connect to the selected VirtServer, ReadyAPI asks you to specify the username and password:
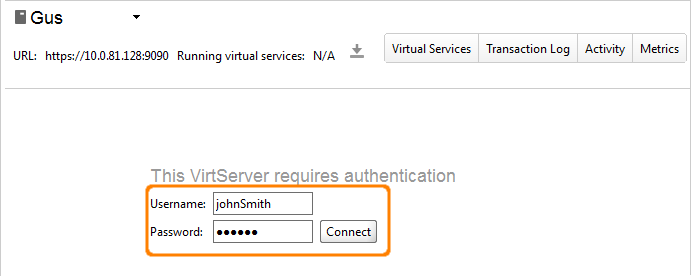
Use the name and password of the user your admin has created (registered) for you on VirtServer.
| Tip: | All the users have the same permissions on VirtServer when connecting from ReadyAPI: they can connect to VirtServer and control virtual services. |
ReadyAPI will remember the credentials you have specified and will not ask you to enter them again to connect to this VirtServer later unless your admin has enabled session timeouts. In this case, you will have to re-enter your credentials when your session expires.
Login with OIDC Credentials
Once you have configured VirtServer for OIDC, ReadyAPI will detect this configuration and prompt you to authenticate into VirtServer panel through a PKCE login flow.
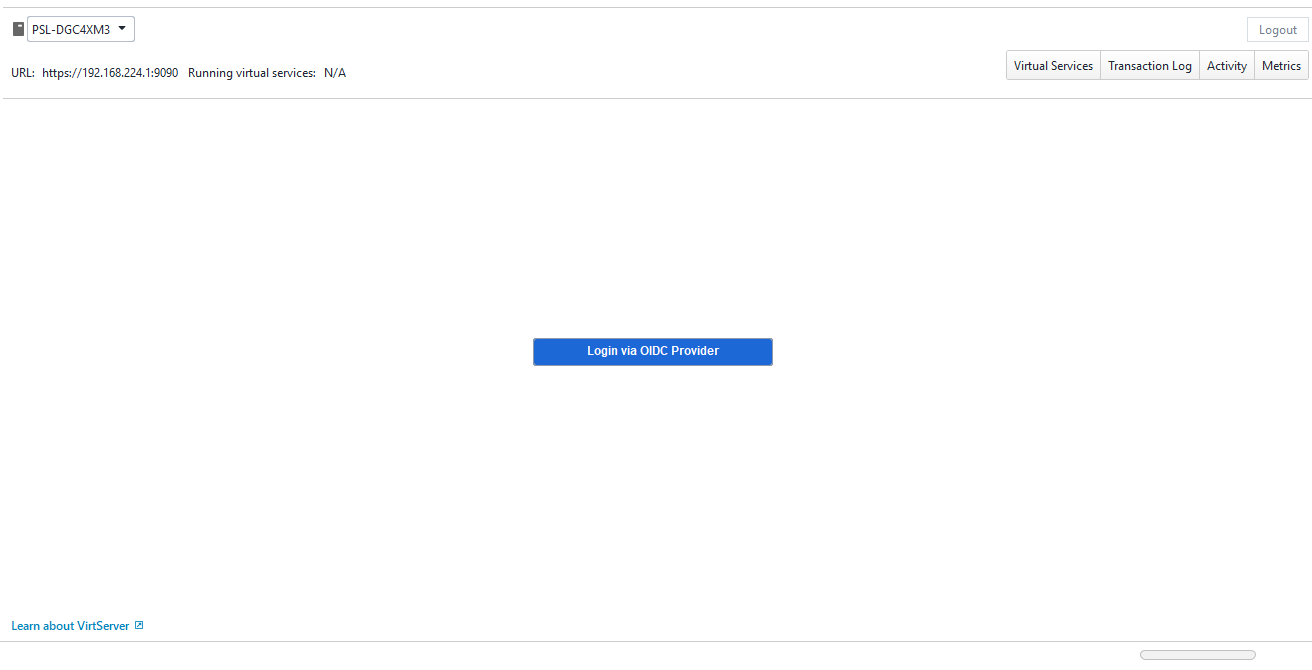
Click Login via OIDC provider to open your default browser and login if required. Once you successfully log in, you will be redirected back to ReadyAPI
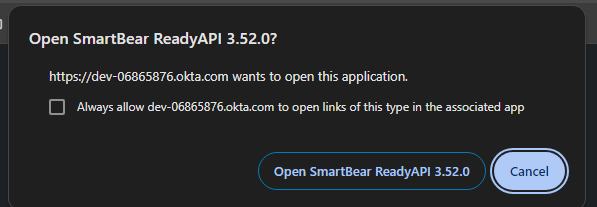
When you navigate back to ReadyAPI, your browser may prompt you to confirm. Click on Open Smartbear ReadyAPI to proceed.
|
|
ReadyAPI stores access credentials based on tokens, and if a token expires, you may need to log in again to refresh it. Virtserver has disabled session timeouts; instead, OIDC tokens take precedence in managing your sessions.
| Note: | ReadyAPI needs to be restarted to apply the change.ReadyAPI needs to be restarted to pick up the authentication/login change. |
Related topics
 VirtServer Web Interface – Manage your VirtServer from the browser using the web interface.
Command-Line Interface Utility – Work with VirtServer using the command-line utility.