

 Description
The Connection operation corresponds to an HTTP or HTTPS connection that the client web application establishes with the tested server (for WebSocket connections, LoadComplete uses another operation – the WebSocket Connection operation, which is typically a child of the Connection operation).
The Connection operation groups requests sent through the same HTTP or HTTPS connection to the server. These operations are visible in the scenario editor only when the Connections button is clicked on the editor’s toolbar.
Connection operations are recorded. They cannot be created manually in the scenario editor. However, you can move the Connection operations between pages in the recorded scenario.
New or Existing Connection
Each Connection operation has a unique name in the scenario. However, a Connection operation can correspond to a new or existing connection that the browser establishes with the server. That is, the Connection operation that you have as a child for some page can correspond to an existing connection that the browser created earlier, not when downloading the page, to which the Connection operation belongs. The operation’s icon indicates this –
| Icon | Description |
|---|---|
|
|
The Connection operation corresponds to a new connection that the browser established with the tested web server when opening a web page. The operation properties specifies the target host and port, and whether the created connection is secure or not (HTTPS or HTTP). |
|
|
The Connection operation corresponds to an existing connection that browser established earlier, before it started downloading the files for the page, to which the Connection operation belongs. In this case, the operation properties do not specify the host and port, but contain a link to the Connection operation that corresponds to the created connection. |
For more information on connections in scenarios, see Connections in the Recorded Traffic.
Position
| Number of occurrences: | Unlimited. |
| Parent operations: | Page operations. |
| Child operations: | Any other operations, except for Page, Connection, and Scenario. If the Connection operation does not have any requests, LoadComplete will report a warning. |
Operation Think Time
The Think Time edit box at the top of the editor specifies the number of milliseconds the operation will wait before it starts executing.
Operation SLA
The SLA edit box at the top of the editor specifies the maximum acceptable duration of the operation, in milliseconds.
Operation Properties
Properties Page
The Connection operation can correspond to a new or existing connection (see above). This defines the properties the operation editor displays.
New Connection
Host
Specifies the URL of the tested web server, with which the connection was established.
Port
Specifies the port used to connect to the tested web server. In most cases, HTTP connections use port 80 and HTTPS connections use port 443.
SSL
Specifies whether the connection is secured or not.
Existing Connection
Link to another connection
Specifies the Connection operation whose Host, Port and SSL properties the given connection uses.
 When you change this value, select a connection that was created earlier than the connection you are editing.
Summary Page
This page provides summary information on the operation and its child operations like the number of found errors, the list of variables used, and so on. Information on the page is read-only.
Timeline Page
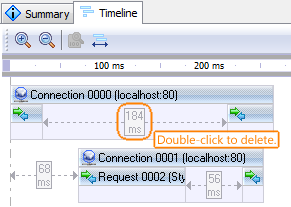
This page of the Connection operation shows requests sent through the connection:

Click the image to enlarge it.
The connection is shown as a horizontal strip. Requests are boxes within the strip. For each request, you can see the name of the resource it loads.
Usually, web browsers send consequent requests with a short delay between them. You can see these delays on the Timeline page.
The size of request and delay boxes is proportional to the request and delay lengths. At the top of the editor, there is a ruler that helps you estimate the request and delay lengths.
To open a request
-
Right-click a needed request and then click Show in Scenario Explorer.
LoadComplete will select the request in the Scenario Explorer and show its contents.
To change the delay between requests
-
Simply drag the request’s box header to the desired position.
To delete the think time of a request
-
Simply double-click the time box between requests:
To change the time scale
Do any of the following:
-
Use the
 Zoom In and
  Zoom Out buttons on the Timeline page toolbar to increase or decrease the time scale. You can also change the time scale by rotating the mouse wheel.
 -
Click
 Zoom Default on the toolbar to restore the original time scale.
 -
Click
 Zoom Fit to change the time scale so that it fits the page’s bounds.
| Note: | You cannot reorder requests on the Timeline page.
You reorder requests by dragging them in the Scenario Explorer. See Adding, Removing and Arranging Operations in Scenarios. |
To delete a request
-
Right-click a request and then click
 Delete.
Information on Errors and Warnings
You can find information on issues in operation properties in the Summary page. Also, information about the erroneous settings is displayed in the editor’s header area.
See Also
Operation Reference
WebSocket Connection Operation
Recording User Scenarios
Editing Scenarios