By default, the Microsoft Windows operating system includes the Remote Desktop component that allows connecting to a remote computer and work with it as you work with your local computer.
You can use Remote Desktop to run tests on remote computers.
While running GUI tests via the Remote Desktop, keep the Remote Desktop window visible on the screen.
In addition, the screen resolution on the remote computer must be the same as on your local computer. Sometimes, it may be inconvenient. To work around this problem, you can specify the settings of the Remote Desktop connection, save them in an external .rdp file, and then use this file to start a Remote Desktop Connection session with the needed settings. Below is a step-by-step instruction on how to do this.
-
Open Remote Desktop Connection. The way you do this depends on the operating system you use.
-
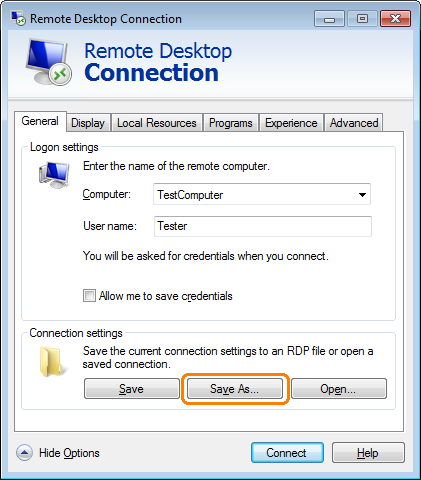
Expand the displayed dialog by clicking Show Options.
-
In the Connection settings group of settings, click Save As to create an .rdp file that will store the Remote Desktop Connection settings.
-
In the resulting Save As dialog, specify the desired name and path for the created file and click Save.
-
Close the Remote Desktop Connection window.
-
Open the created .rdp file in an editor, for example, in Notepad, and add the following string at the end of the file:
smart sizing:i:1Make sure that the parameters desktopwidth:i:1280 and desktopheight:i:1024 match the remote desktop’s resolution.
-
Double-click the .rdp file to start a remote session.
Now you can resize the Remote Desktop window as you need. The window will show the entire remote desktop.
See Also
Running TestLeft Tests via Remote Desktop
Running TestLeft Tests on Remote Computers