Search Patterns
To search for objects in WPF applications, you use search patterns of the WPFPattern type.
.NET: The pattern belongs to the SmartBear.TestLeft.TestObjects.WPF namespace.
Java: The pattern belongs to the com.smartbear.testleft.testobjects package.
This pattern uses the following standard properties:
| Property | Type | Description |
|---|---|---|
ClrFullClassName |
String | The object’s full class name including the namespace name. For example, System.Windows.Controls.ToolBar. |
Enabled |
Boolean | Specifies whether the object is enabled or disabled. Disabled objects are usually shown grayed out. |
Visible |
Boolean | Specifies whether the object is visible in the application. Objects that are out of screen bounds or overlapped by other objects are still considered visible. |
WPFControlAutomationId |
String | The value of the WPF control’s AutomationIdProperty property as it is set in the tested application’s source code. |
WPFControlOrdinalNo |
Integer | The object’s index (1-based) among sibling objects with the same class and text. You can see this index in the TestLeft UI Spy. |
WPFControlName |
String | The object name specified by the application developers. This is usually the object’s Name attribute in the application’s XAML code. |
WPFControlText |
String | The object text. For example, the value of the Text property of TextBlock objects, the Content property of ContentControl objects, or the Title property of Window objects.
|
You can use any combination of these properties in your WPF search patterns.
Example
C#
IButton button = Driver.Find<IProcess>(new ProcessPattern()
{
ProcessName = "Orders"
}).Find<IControl>(new WPFPattern()
{
ClrFullClassName = "Orders.AppWindow"
}, 2).Find<IControl>(new WPFPattern()
{
WPFControlName = "rootGrid"
}).Find<IControl>(new WPFPattern()
{
ClrFullClassName = "System.Windows.Controls.Button",
WPFControlText = "Save As"
}, 6);
Visual Basic .NET
Dim button as IButton = Driver.Find(Of IProcess)(New ProcessPattern() With {
.ProcessName = "Orders"
}).Find(Of IControl)(New WPFPattern() With {
.ClrFullClassName = "Orders.AppWindow"
}, 2).Find(Of IControl)(New WPFPattern() With {
.WPFControlName = "rootGrid"
}).Find(Of IButton)(New WPFPattern() With {
.ClrFullClassName = "System.Windows.Controls.Button",
.WPFControlText = "Save As"
}, 6)
Java
Button button = driver.find(TestProcess.class, new ProcessPattern() {{
ProcessName = "Orders";
}}).find(Control.class, new WPFPattern() {{
ClrFullClassName = "Orders.AppWindow";
}}, 2).find(Control.class, new WPFPattern() {{
WPFControlName = "rootGrid";
}}).find(Button.class, new WPFPattern() {{
ClrFullClassName = "System.Windows.Controls.Button";
WPFControlText = "Save As";
}}, 6);
Custom Properties
You can also specify custom properties by using the .add("propertyname", value) method of the pattern object. See Using Custom Properties in Search Patterns.
WPF Control Templates
WPF controls have a template that defines their visual appearance. Application developers can redefine control templates to change the look and feel: add borders and colors, change an element’s shape and so on. Using templates, they can also customize a control’s UI structure, for example, insert additional UI elements such as buttons and check boxes.
By default, TestLeft does not analyze custom WPF control templates, nor does it include template-generated UI elements in the object hierarchy.
| Note: | To learn whether your tested WPF application uses templates, ask the application developers. |
Exposing Elements of WPF Control Templates
Suppose, you have a WPF application that includes a control generated by a control template. For example, the following XAML code describes a list box that includes the Delete button generated by the template:
XAML
<ListBox Name="listBox">
<ListBox.Template>
<ControlTemplate TargetType="ListBox">
<Grid>
<Grid.RowDefinitions>
<RowDefinition Height="Auto"/>
<RowDefinition Height="*"/>
<RowDefinition Height="Auto"/>
</Grid.RowDefinitions>
<ItemsPresenter Grid.Row="0"/>
<Button Name="btnDeleteAll" Content="Delete All Items" Click="btnDeleteAll_Click" Grid.Row="2"/>
</Grid>
</ControlTemplate>
</ListBox.Template>
<ListBoxItem Content="Item1"/>
<ListBoxItem Content="Item2"/>
<ListBoxItem Content="Item3"/>
</ListBox>
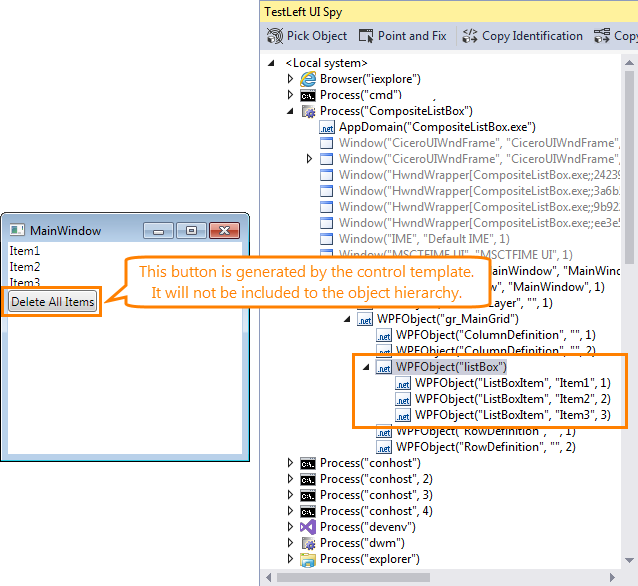
By default, TestLeft does not recognize control elements added indirectly (through a control template), nor does it include them in the object hierarchy:
In order for TestLeft to be able to identify such controls, add them to the list of WPF controls with template-generated elements that TestLeft should recognize:
C#
using System.Collections.Generic;
using SmartBear.TestLeft.Options;
…
[TestMethod]
public void Test()
{
…
// Adds the ListBox control to the list of composite WPF controls
// TestLeft will expose template-generated internal elements of this control
IList<WPFSettings.CompositeControlDescription> controlList;
controlList = new List<WPFSettings.CompositeControlDescription>();
controlList.Add(new WPFSettings.CompositeControlDescription()
{ ClassName = "System.Windows.Controls.ListBox" });
Driver.Options.WPF.SetCompositeControls(controlList);
…
}
Visual Basic .NET
Imports SmartBear.TestLeft.Options
…
<TestMethod()>
Public Sub Test()
…
' Adds the ListBox control to the list of composite WPF controls
' TestLeft will expose template-generated internal elements of this control
Dim controlList As IList(Of WPFSettings.CompositeControlDescription)
controlList = New List(Of WPFSettings.CompositeControlDescription)
controlList.Add(New WPFSettings.CompositeControlDescription() With {
.ClassName = "System.Windows.Controls.ListBox"})
Driver.Options.WPF.SetCompositeControls(controlList)
…
End Sub
Java
import com.smartbear.testleft.*;
import com.smartbear.options.OptionsManager.WPFSettings;
…
@Test
public void Test() throws Exception{
…
// Adds the ListBox control to the list of composite WPF controls
// TestLeft will expose template-generated internal elements of this control
List<WPFSettings.CompositeControlDescription> controlList;
controlList = new ArrayList<WPFSettings.CompositeControlDescription>();
controlList.add(new WPFSettings.CompositeControlDescription() {{
setClassName("System.Windows.Controls.ListBox");
}});
driver.getOptions().getWPF().setCompositeControls(controlList);
…
}
You specify controls by their fully-qualified class name (you can see it in the ClrFullClassName property in UI Spy) or by the control name as it is defined in the application source code (you can see it in the WPFControlName property in UI Spy).
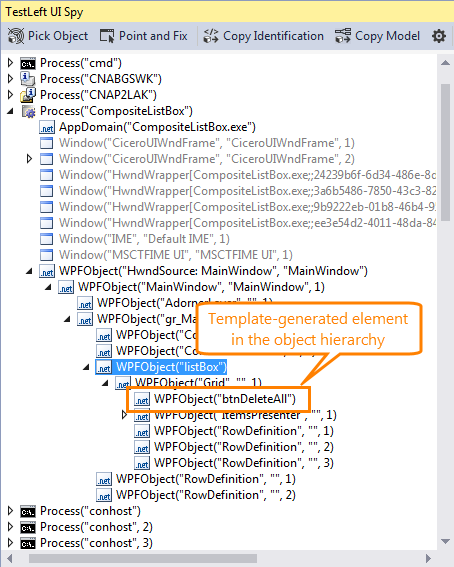
TestLeft will analyze the template and include the template-generated controls in the object hierarchy:
Exposing Elements of WPF Control Item Templates
Suppose, you have a WPF application with a control whose items are generated by a template. For example, the following XAML code includes a list box whose items have the Delete button generated by the control item template:
XAML
<ListBox Name="listBox">
<ListBox.ItemContainerStyle>
<Style TargetType="ListBoxItem">
<Setter Property="Template">
<Setter.Value>
<ControlTemplate TargetType="ListBoxItem">
<Grid>
<Grid.ColumnDefinitions>
<ColumnDefinition Width="Auto"/>
<ColumnDefinition Width="*"/>
<ColumnDefinition Width="Auto"/>
</Grid.ColumnDefinitions>
<ContentPresenter Grid.Column="0"/>
<Button Grid.Column="2" Click="Button_Click">Delete</Button>
</Grid>
</ControlTemplate>
</Setter.Value>
</Setter>
</Style>
</ListBox.ItemContainerStyle>
<ListBoxItem Content="Item1"/>
<ListBoxItem Content="Item2"/>
<ListBoxItem Content="Item3"/>
</ListBox>
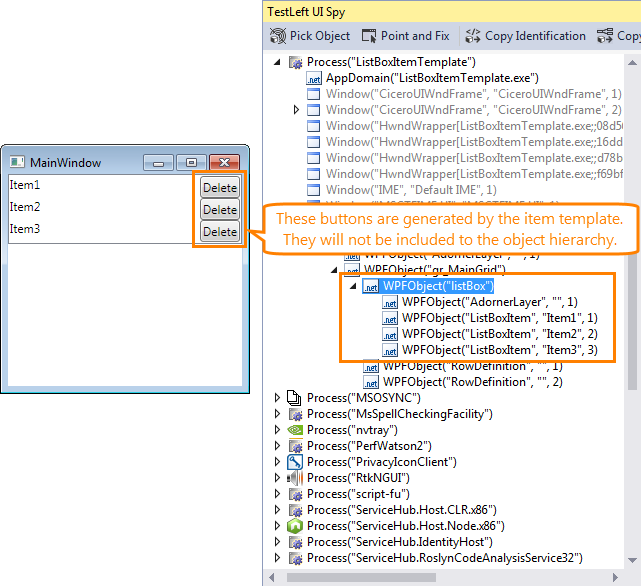
By default, TestLeft does not recognize control item elements added to the control indirectly (through item templates), nor does it include them in the object hierarchy:
In order for TestLeft to be able to identify such elements, add the control that contains those items to the list of WPF controls with template-generated items that TestLeft will recognize:
C#
using System.Collections.Generic;
using SmartBear.TestLeft.Options;
…
[TestMethod]
public void Test()
{
…
// Adds the ListBox control to the list of WPF controls with composite items
// TestLeft will expose template-generated internal elements of the control's items
IList<WPFSettings.CompositeControlDescription> controlList;
controlList = new List<WPFSettings.CompositeControlDescription>();
controlList.Add(new WPFSettings.CompositeControlDescription()
{ ClassName = "System.Windows.Controls.ListBox" });
Driver.Options.WPF.SetCompositeItemsControls(controlList);
…
}
Visual Basic .NET
Imports SmartBear.TestLeft.Options
…
<TestMethod()>
Public Sub Test()
…
' Adds the ListBox control to the list of WPF controls with composite items
' TestLeft will expose template-generated internal elements of the control's items
Dim controlList As IList(Of WPFSettings.CompositeControlDescription)
controlList = New List(Of WPFSettings.CompositeControlDescription)
controlList.Add(New WPFSettings.CompositeControlDescription() With {
.ClassName = "System.Windows.Controls.ListBox"})
Driver.Options.WPF.SetCompositeItemsControls(controlList)
…
End Sub
Java
import com.smartbear.testleft.*;
import com.smartbear.options.OptionsManager.WPFSettings;
…
@Test
public void Test() throws Exception{
…
// Adds the ListBox control to the list of WPF controls with composite items
// TestLeft will expose template-generated internal elements of the control's items
List<WPFSettings.CompositeControlDescription> controlList;
controlList = new ArrayList<WPFSettings.CompositeControlDescription>();
controlList.add(new WPFSettings.CompositeControlDescription() {{
setClassName("System.Windows.Controls.ListBox");
}});
driver.getOptions().getWPF().setCompositeItemsControls(controlList);
…
}
You specify controls by their fully-qualified class name (you can see it in the ClrFullClassName value in UI Spy) or by the control name as it is defined in the application source code (you can see it in the WPFControlName property in UI Spy).
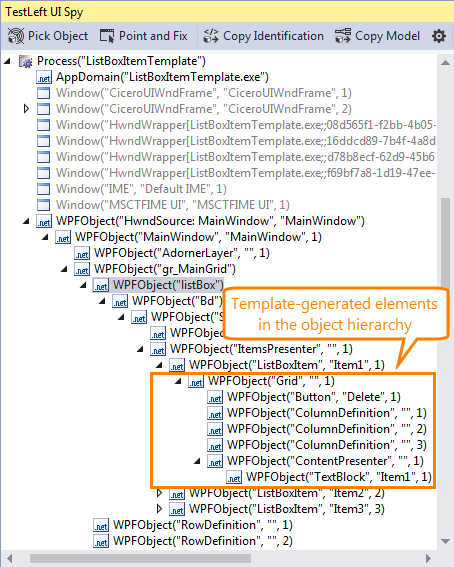
TestLeft will analyze the item template and include the template-generated item elements in the object hierarchy:
Containers in the Object Hierarchy
WPF applications often include containers that organize content but do not affect the way the user interacts with the application. For example, panels, grids or borders.
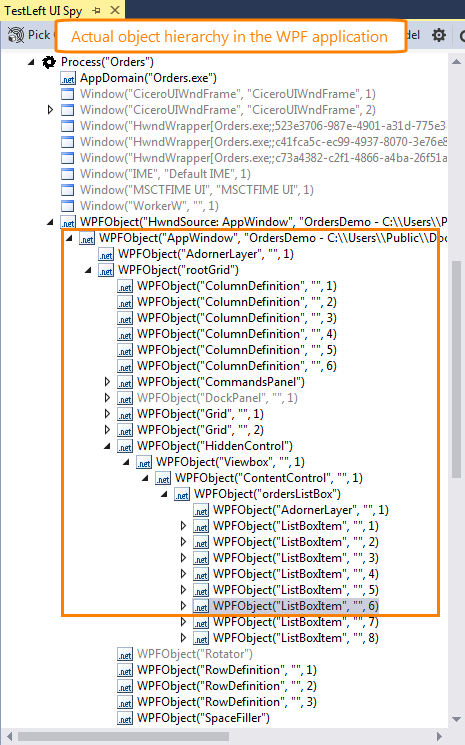
By default, the object hierarchy you see in UI Spy reflects the actual object hierarchy in the application and includes all the objects, including non-interactive containers.
However, if your tested WPF application has a complex UI with many containers, its object hierarchy can be deeply nested, which makes exploring the application hierarchy complicated.
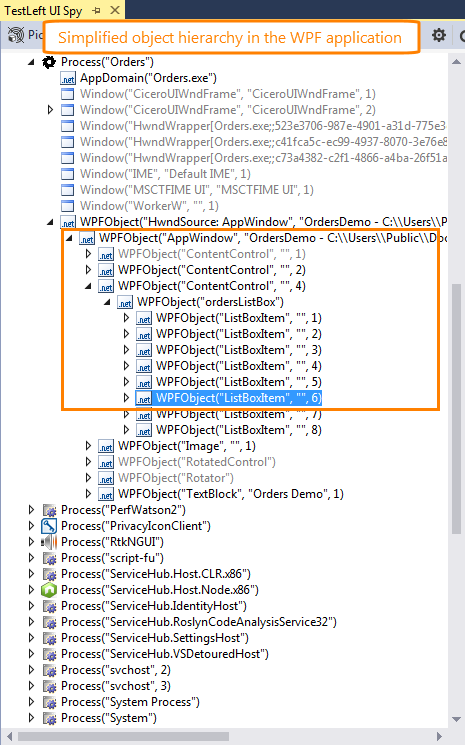
You can configure TestLeft to omit the following layout containers in the application hierarchy:
-
AdornerLevel -
ContentPresenter -
Decorator -
FrameworkContentElement -
GridViewRowPresenterBase -
Panel -
Descendant classes of the above-mentioned base classes, except for
Hyperlink
This will reduce the number of nesting levels in the object hierarchy:
|
The actual object hierarchy in a WPF application |
The simplified object hierarchy in a WPF application |
Typically, TestLeft does not use non-interactive containers in the object identification code anyway. However, using the simplified object hierarchy can affect the hierarchy level that the object identification code should reach to get the needed object:
|
Identification code generated for a control when the actual hierarchy is used C# IWPFPopupMenuOwner textBlock = driver.Find<IProcess>(new ProcessPattern() Visual Basic .NET Dim textBlock As IWPFPopupMenuOwner = Driver.Find(Of IProcess)(new ProcessPattern() With { Java
WPFPopupMenuOwner textBlock = driver.find(TestProcess.class, new ProcessPattern() {{ |
Identification code generated for a control when the simplified object hierarchy is used C# IWPFPopupMenuOwner textBlock = driver.Find<IProcess>(new ProcessPattern() Visual Basic .NET Dim textBlock As IWPFPopupMenuOwner = Driver.Find(Of IProcess)(new ProcessPattern() With { Java WPFPopupMenuOwner textBlock = driver.find(TestProcess.class, new ProcessPattern() {{ |
To configure TestLeft to omit containers in the object hierarchy, use –
.NET: The Driver.Options.WPF.SimplifiedObjectTree property.
Java: The driver.getOptions().getWPF().setSimplifiedObjectTree() method.
Controlling the WPF Object Hierarchy at Design Time
Currently, there is no direct way to control options that affect which WPF objects are to be included in the object hierarchy at design time. However, you can use the following workaround:
-
Create a dummy test that will set the needed options. For example:
C#
[TestMethod]
public void Test()
{
// Enables the simplified object hiearchy
Driver.Options.WPF.SimplifiedObjectTree = true;
// Adds the control to the list of complex controls
// whose template-generated elements TestLeft will expose
Driver.Options.WPF.SetCompositeControls(
new List<WPFSettings.CompositeControlDescription>
{
new WPFSettings.CompositeControlDescription()
{
ClassName = "System.Windows.Controls.ListBox" }
});
}Visual Basic .NET
<TestMethod()>
Public Sub Test()
' Enables the simplified object hiearchy
Driver.Options.WPF.SimplifiedObjectTree = True
' Adds the control to the list of complex controls
' whose template-generated elements TestLeft will expose
Driver.Options.WPF.SetCompositeControls(
New List(Of WPFSettings.CompositeControlDescription) From {
New WPFSettings.CompositeControlDescription() With {
.ClassName = "System.Windows.Controls.ListBox"
}
})
End SubJava
@Test
public void Test() throws Exception{
// Enables the simplified object hiearchy
driver.getOptions().getWPF().setSimplifiedObjectTree(true);
// Adds the control to the list of complex controls
// whose template-generated elements TestLeft will expose
driver.getOptions().getWPF().setCompositeControls(
new ArrayList<WPFSettings.CompositeControlDescription>()
{{
add(new WpfSettings.CompositeControlDescription()
{{
setClassName("System.Windows.Controls.ListBox");
}}
);
}}
);
} -
Run the test.
-
Changes in options will be effective throughout the test run.
-
After the test run is over, open UI Spy and examine the object tree (refresh the object tree, if needed).
-
UI Spy will apply the new setting. You will be able to explore your custom objects and generate identification code for them.
Changes in options will remain effective until you start another test.
 |
Make sure you use the same object identification settings when writing test code and during the actual test runs. Otherwise, the object identification code will become invalid and your tests will fail. |
See Also
Understanding Object Identification
Preparing WPF Applications for Testing
 Search Pattern