
Like TestComplete, TestExecute is built on an open, COM based architecture, using which you can write external plugins for it or install plugins from any source. TestExecute also uses the same plugins as TestComplete.
| Note: | TestExecute cannot use plugins related to the TestComplete interface, because they add specific editors to TestComplete and are useless in TestExecute. |
By default, TestExecute installs plugins to the <TestExecute>\Bin\Extensions folder. However, you can place custom and third-party plugins in any other folder.
The Extensions dialog displays the list of TestComplete plugins registered in TestExecute. The list includes both plugins installed by the TestExecute installation program and third-party plugins.
In the dialog, you can temporary disable or enable the plugins and check whether a plugin conflicts with another plugin (TestExecute automatically disables conflicting plugins). In the dialog, you can also install third-party plugins.
To display the dialog, right-click the TestExecute icon (![]() ) in the notification area (tray) and select Install Extensions from the context menu.
) in the notification area (tray) and select Install Extensions from the context menu.
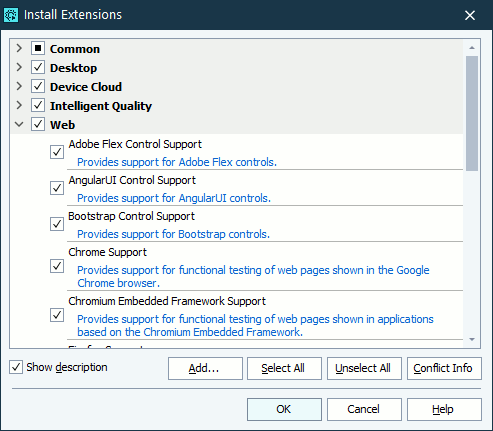
Plugins are grouped by modules and add-ons, to which they belong in TestComplete.
-
Common - This group includes plugins that are always available.
-
Desktop - This group includes the Desktop module’s plugins.
-
Web - This group includes the Web module’s plugins.
-
Mobile - This group includes the Mobile module’s plugins.
-
Intellectual Quality - This group includes the plugins of the Intellectual Quality add-on.
The check box next to the plugin name indicates whether the plugin is enabled. If the check box is not checked, the plugin is registered, but not loaded. When the plugin is deactivated, it releases all of its occupied memory. You can deactivate unnecessary plugins to get more memory resources for your system.
 To enable a plugin
To enable a plugin
-
Right-click the TestExecute icon (
 ) in the notification area (tray) and select Install Extensions from the menu. This will call the Extensions dialog.
 -
In the dialog, select the check box next to the plugin you want to enable.
 When you enable the Optical Character Recognition plugin for the first time, TestExecute shows a confirmation dialog. In the dialog, click the link to read a third-party license agreement. If you agree to the license conditions, click Enable OCR. Otherwise, click Cancel.
 -
Click OK.
To install a third-party plugin
-
Open the Extensions dialog (to do this, right-click the TestExecute icon (
) in the notification area (tray) and select Install Extensions from the context menu). -
Click Add in the dialog.
-
In the resulting Open File dialog, select the plugin file and click Open. TestExecute will install the plugin and add it to the plugin list.
-
TestExecute will check whether the added plugin conflicts with other plugins and whether a newer version of the same plugin is already installed. If any of these checks fails, TestExecute will disable the plugin.
-
To complete the installation, click OK in the Install Extensions dialog.
If you do not need a third-party plugin, you can disable it as described below.
To disable a plugin
-
Right-click the TestExecute icon (
) in the notification area (tray) and select Install Extensions from the menu. This will call the Extensions dialog. -
In the dialog, clear the check box next to the plugins you want to disable and click OK.
To install and uninstall plugins via the command line
You can install and uninstall TestExecute plugins by using the appropriate command line arguments.
To install a plugin, run TestExecute with the /install:plugin_file_name argument. Specify the fully-qualified name of the plugin file (.pls) to install. For example:
TestExecute will install and enable the plugin.
To uninstall a plugin, run TestExecute with the /uninstall:plugin_file_name argument. Specify the fully-qualified name of the plugin file (.pls) to uninstall. For example:
TestExecute will remove the plugin from the list of installed extensions. It will not delete the specified plugin file from your computer.
The 32-bit executable of TestExecute is located in the <TestExecute>\Bin\ folder.
The 64-bit executable of TestExecute is located in the <TestExecute>\x64\Bin\ folder.
The 32-bit executable of TestExecute is located in the <TestExecute>\Bin\ folder.
The 64-bit executable of TestExecute is located in the <TestExecute>\x64\Bin\ folder.