Use the Choose Storage Type and Location dialog to export the test results, which TestExecute generates, to external files.
To call the dialog
-
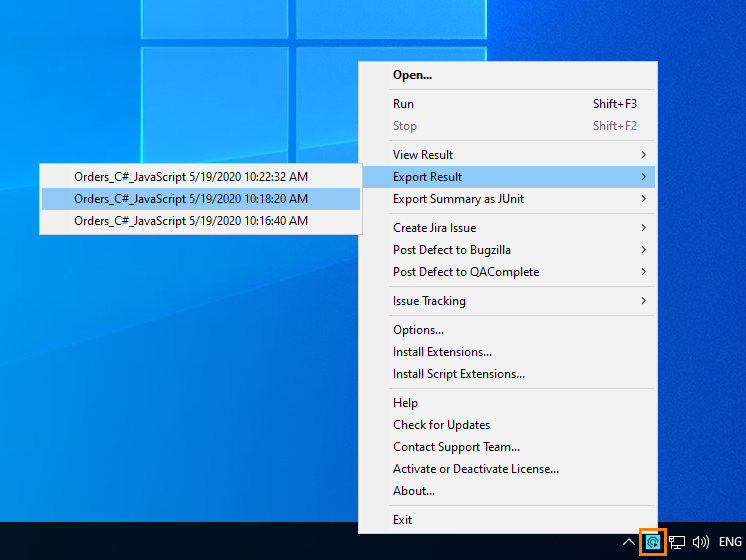
Right-click the TestExecute icon
 in the notification area to call the TestExecute context menu.
 -
In the TestExecute context menu, select Export Result and then select the needed test result.
If no project is open or no test results were generated, the dialog will not be available.
Dialog contents
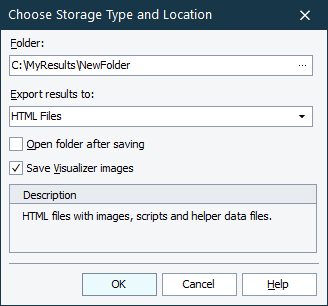
The dialog content depends on the value selected in the Export results in XML format to drop-down list. For instance, the following figure shows the dialog when the storage type is set to HTML Files:

The Export results in XML format to box specifies the data type in which results will be stored. You can select one of the following formats:
- HTML Files - This format is selected by default. In this case, results will be stored in a number of files on your hard disk (XML, CSS, HTML, image files and so on). The “main” file is index.htm. The files will be stored to the folder, specified in the Folder edit box. This edit box appears only if you select HTML Files. You can either type the folder name, or press the ellipsis button and select the desired folder from the ensuing dialog.
Note: If you select the HTML Files format, the export procedure will create several files with results. To store these files it is recommended to specify the folder that does not contain any other files (for example, a new folder). In this case you can manage the files easier than if they would be mixed with other files. - Multipart Hypertext Storage - If you select this format, results will be exported to one .mht file specified in the File name edit box (it is only visible if you are exporting to Multipart Hypertext Storage). When you select this format, the Choose Location dialog will appear. In this dialog, type the file name and its location or select the desired file where results will be exported and click Save. The file name will appear in the File name edit box.
| Note: | The results are always exported in XML format. If you select Unpacked Storage, TestExecute creates a number of helper files that are used for displaying the exported results in an Internet browser window. In case of Multipart Hypertext Storage, all the files are packed into a single .mht file. |
To view the folder (or file) containing the exported results, select the Open folder after saving (or Open file after saving) check box (the check box’s caption is changed according to the export type).
To save the images shown in the Test Visualizer panel along with the exported results, enable the Save visualizer images check box. Note that these images take additional space on your computer, so if you do not need these images to be saved or you want to reduce the overall size of the exported results, clear the Save visualizer images check box.
To export results to the specified storage, click OK. Cancel will close the dialog without any changes.

