The AI-powered Data Generator uses artificial intelligence to generate a dataset for your tests. This topic describes the steps how to make it work.
1. Open the Wizard
You can either:
-
Click
 Open Data Generator Wizard on the Tools toolbar.
 -
Select Test > Generate Data from the TestComplete main menu.
Make sure AI Data Generation is selected.
 |
The AI-powered Data Generator has been introduced in TestComplete in version 15.64.
Note that:
You can add this command to the toolbar or menu manually. |
2. Specify the Type of Data Storage
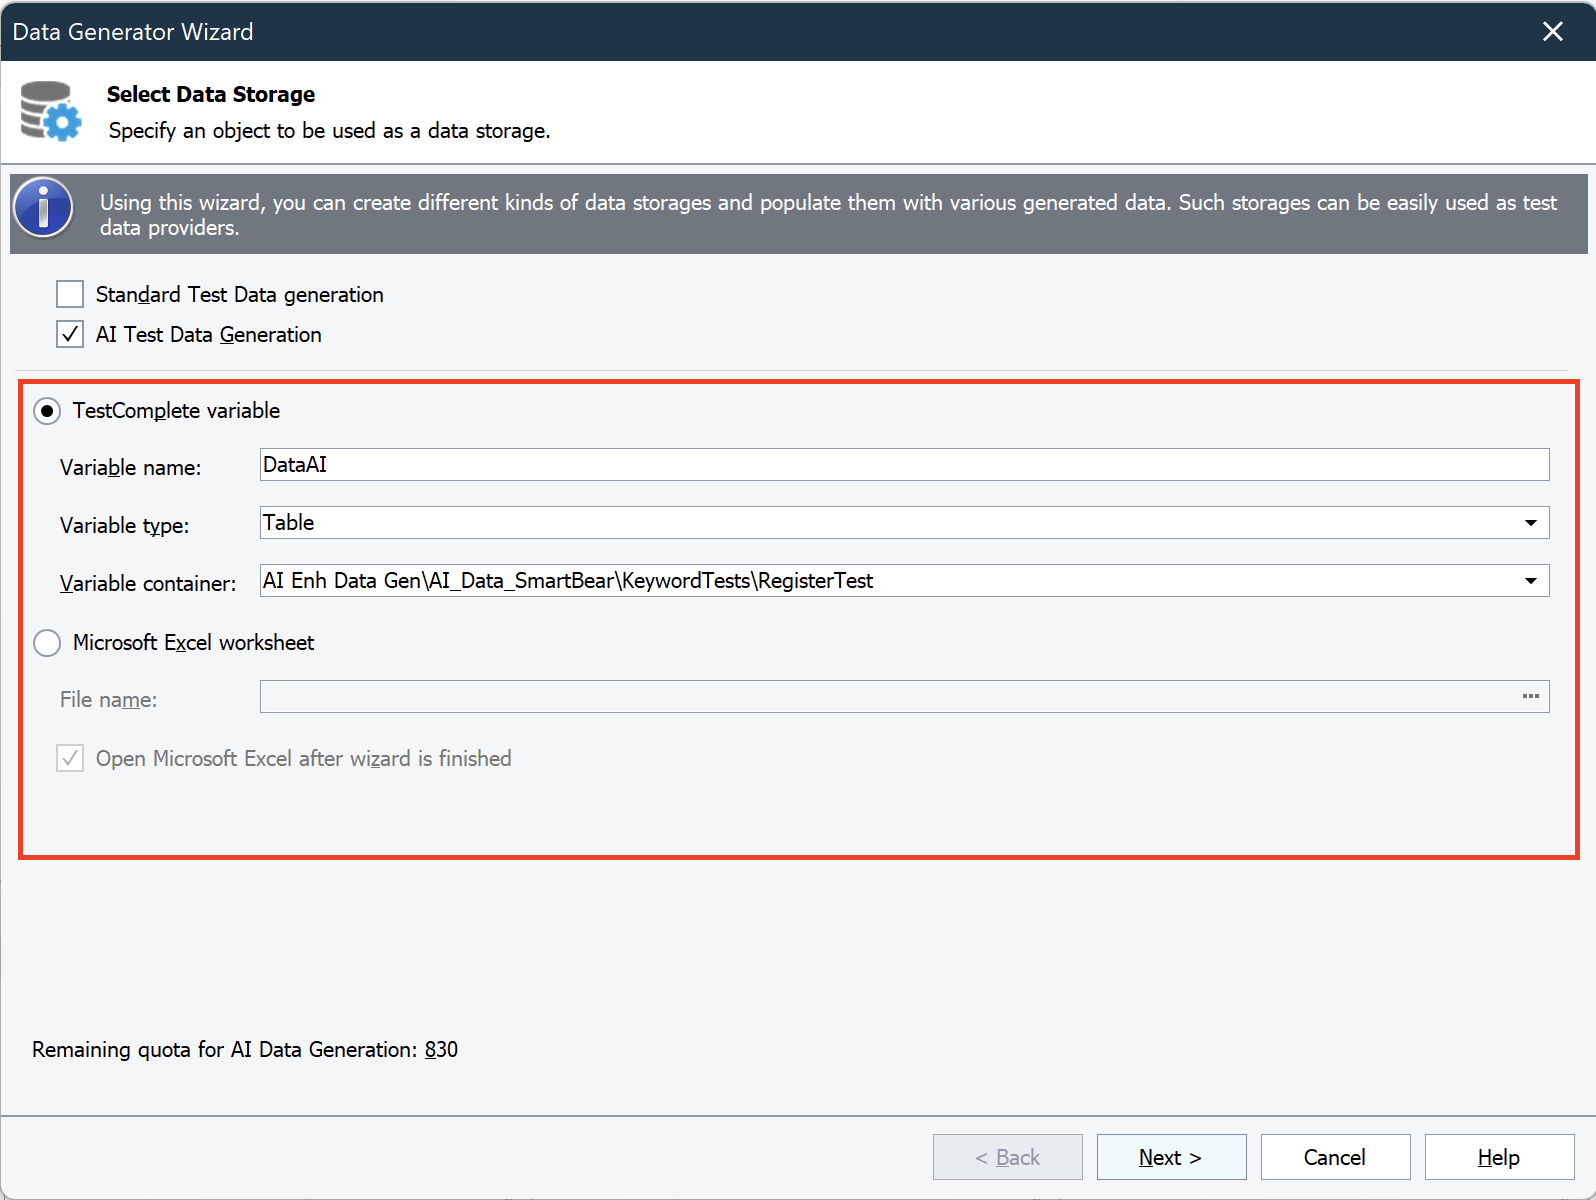
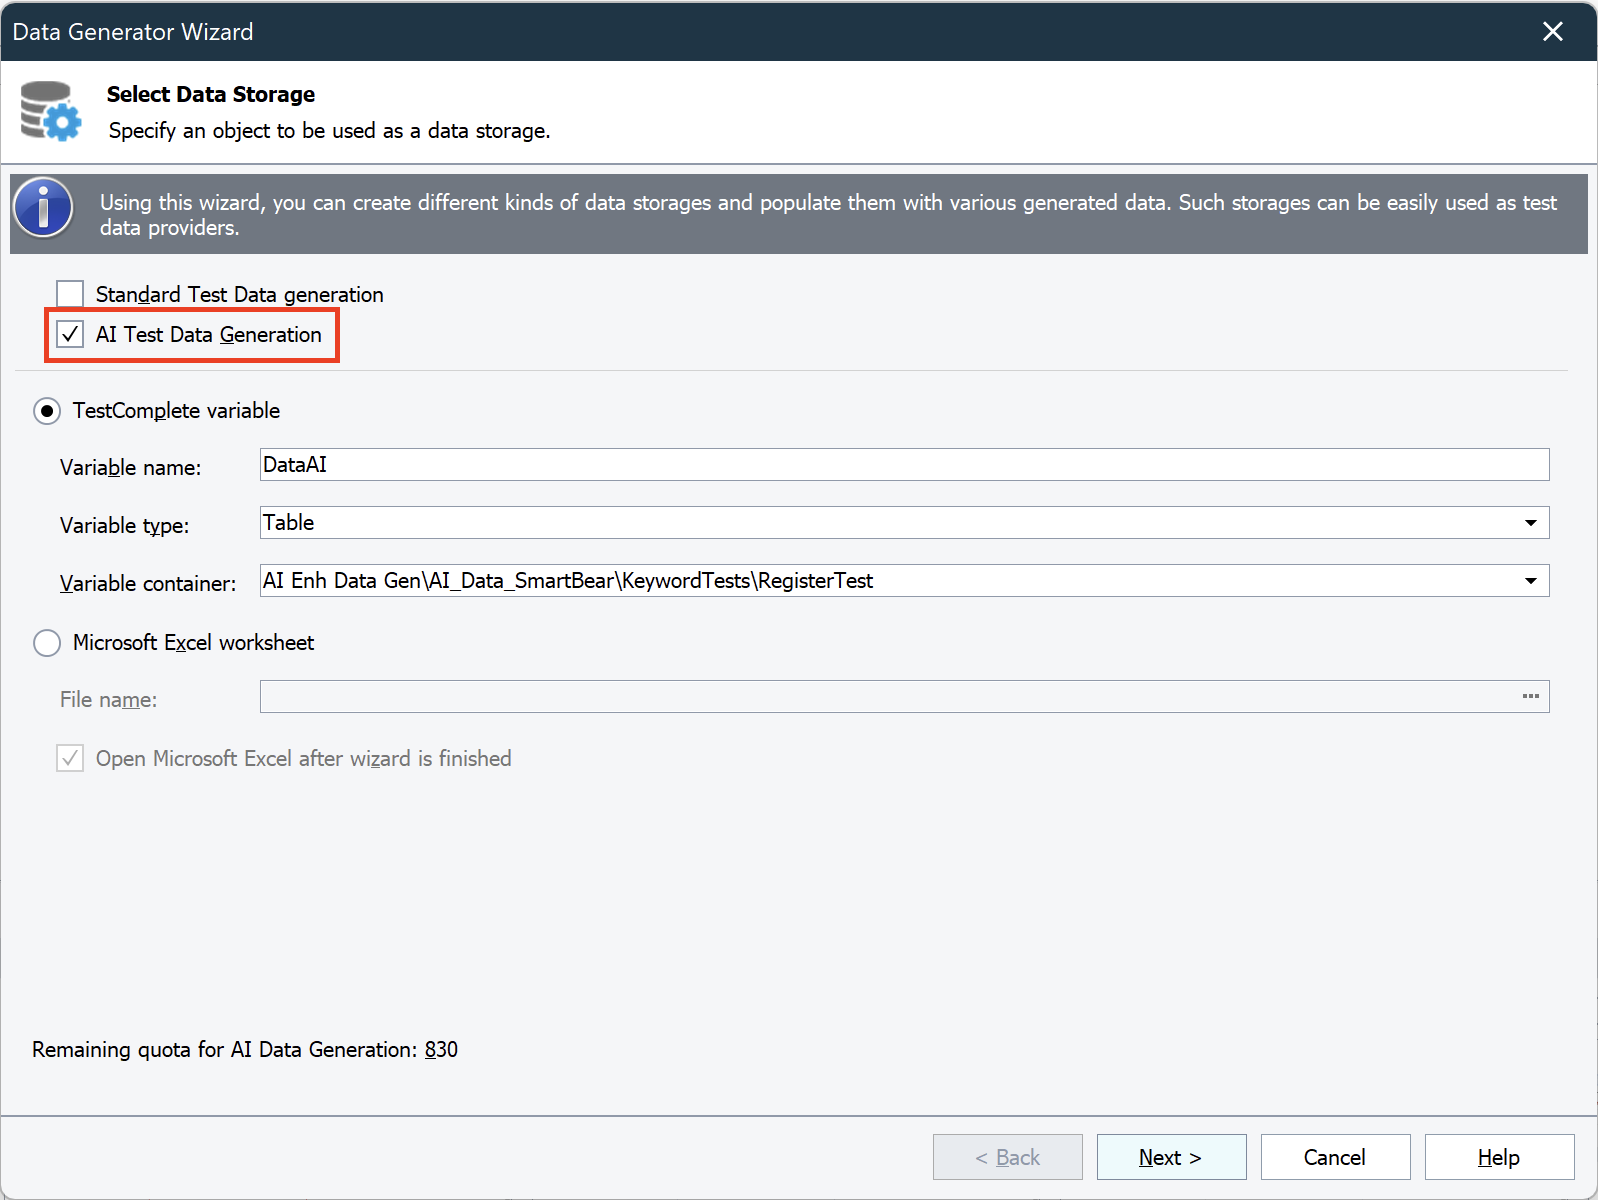
You can do this on the first page of the wizard. The following variants are available:
-
TestComplete variable - select this item to generate test data and store it in the specified project suite, project, or keyword test variable. You can also specify:
-
Variable name - which is a name for the created variable. The name can only start with a letter or an underscore. It can only contain letters, digits, and underscores. An error will occur if you type an invalid value.
-
Variable type - which is the type of a new variable: One value or Table.
-
If you select One value, TestComplete will create a single-value variable. The type will be set automatically based on your choice on the next page.
-
If you select Table, TestComplete will create a variable with the specified number of columns and rows.
-
-
Variable container - to choose where to save the variable. For example, selecting MyProjectSuite_Name\MyProject_Name\KeywordTests\MyTest_Name will add the variable to the list of MyTest_Name keyword test’s variables. You can also create project suite and project variables.
Note: If no project suite is open in TestComplete, you can't save the generated data to a variable. In this case, you can only save the data to an Excel file.
-
-
Microsoft Excel worksheet - choose to create an .xls file with the desired number of rows and columns. You can also choose where to save the file. To do this, either type the full file name in the File Name box or click the ellipsis button and select the file using the Save To dialog box.
Open Microsoft Excel after wizard is finished - Select this check box to automatically activate the Excel editor with the created storage open in it after the data generation is finished. Otherwise, clear this check box.

Ensure Microsoft Excel is installed on your computer before using Excel worksheets for data storage. If Excel is not installed, an error message will appear when you try to use a worksheet. If you use an existing Excel file, TestComplete will add a new worksheet with the generated values. If the file doesn't exist, TestComplete will create it, add a worksheet, and populate it with the values.
After you have selected the desired data storage type and specified all the needed parameters, click Next.
3. Specify Options for AI-Generated Data
On the second page of the wizard, you can specify more options for the generated data.
The way the second page looks depends on your choices from the first page of the wizard.
For TestComplete variable (Table type) and Microsoft Excel worksheet, do the following:
-
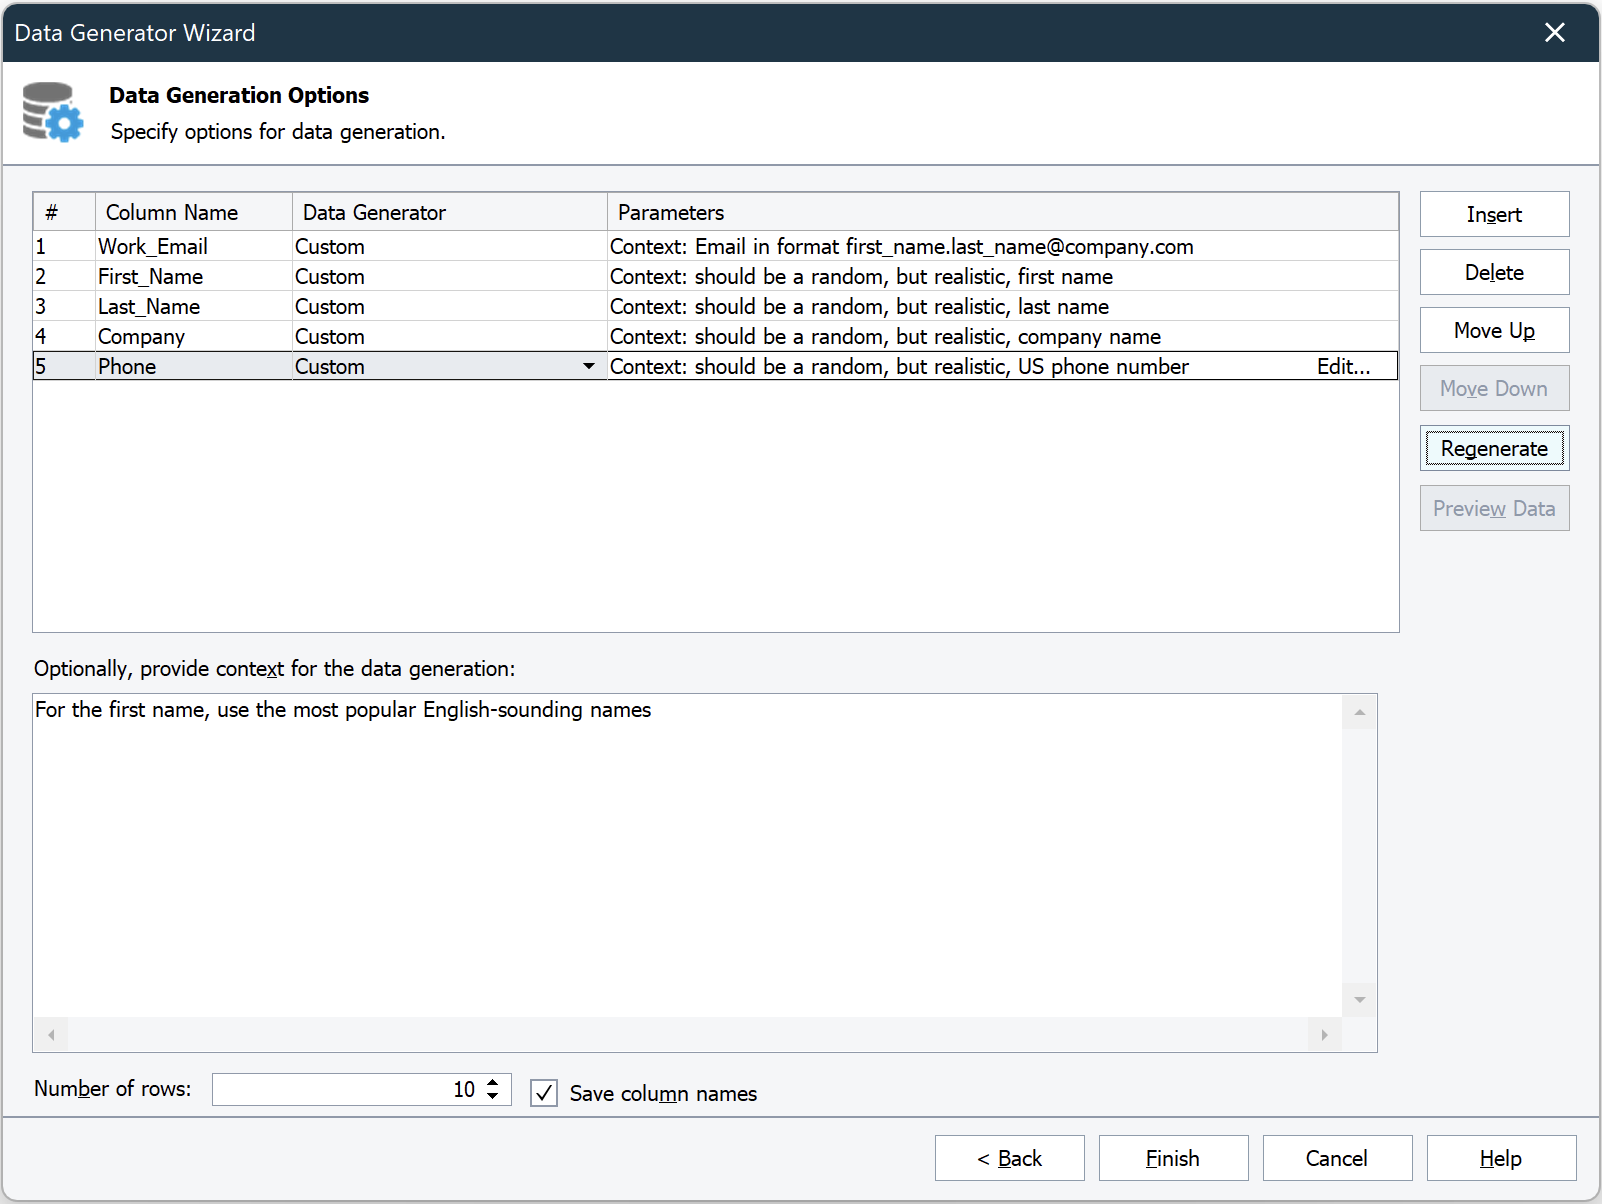
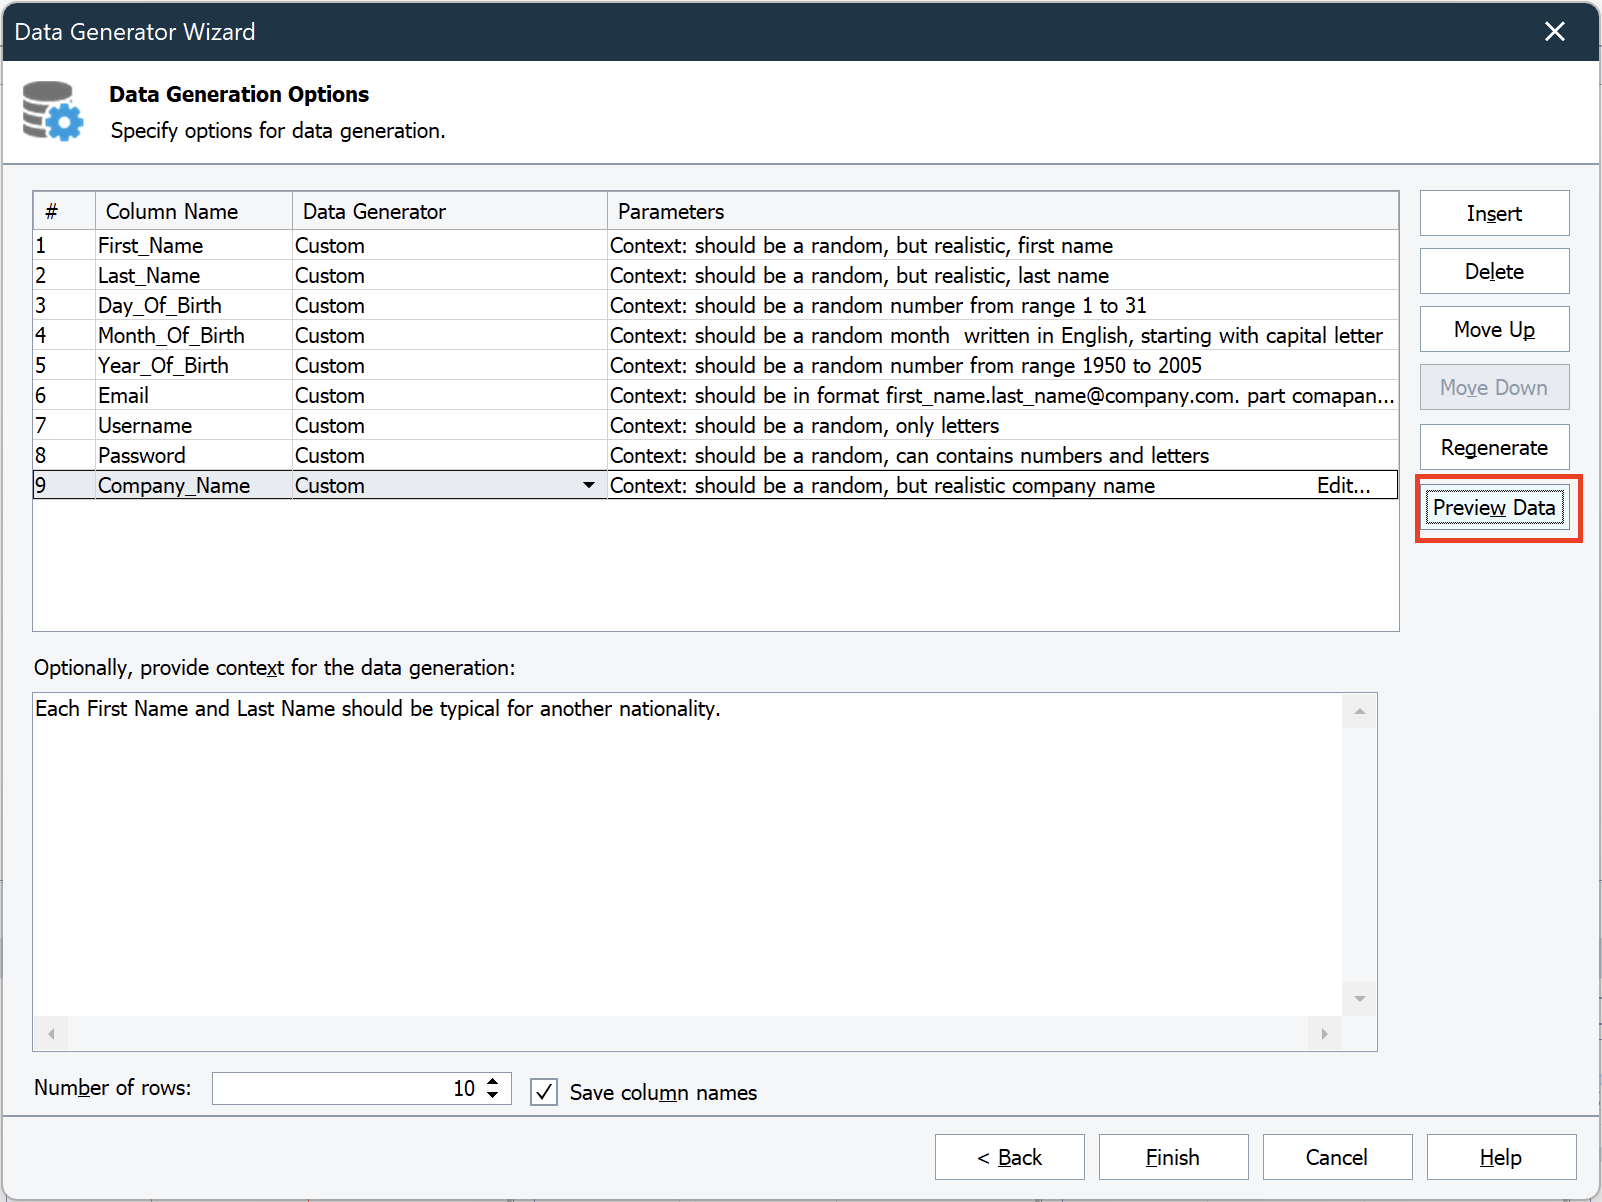
Fill the table that holds the descriptions of the columns that will be stored in the generated table or file. Each line in this table corresponds to one column of the data storage. The table contains the following columns:
-
# - the ordinal number of the column that will be stored in the table or file.
-
Column name - the title of the created column. You can modify the contents of the column as you wish. To specify another column name, click within the corresponding Column name cell and enter a new name. Press Enter to confirm the new name.
-
Data Generator - In the case of AI-powered data generator, there is only one Custom type available (set by default), so you don’t need to change this field.
-
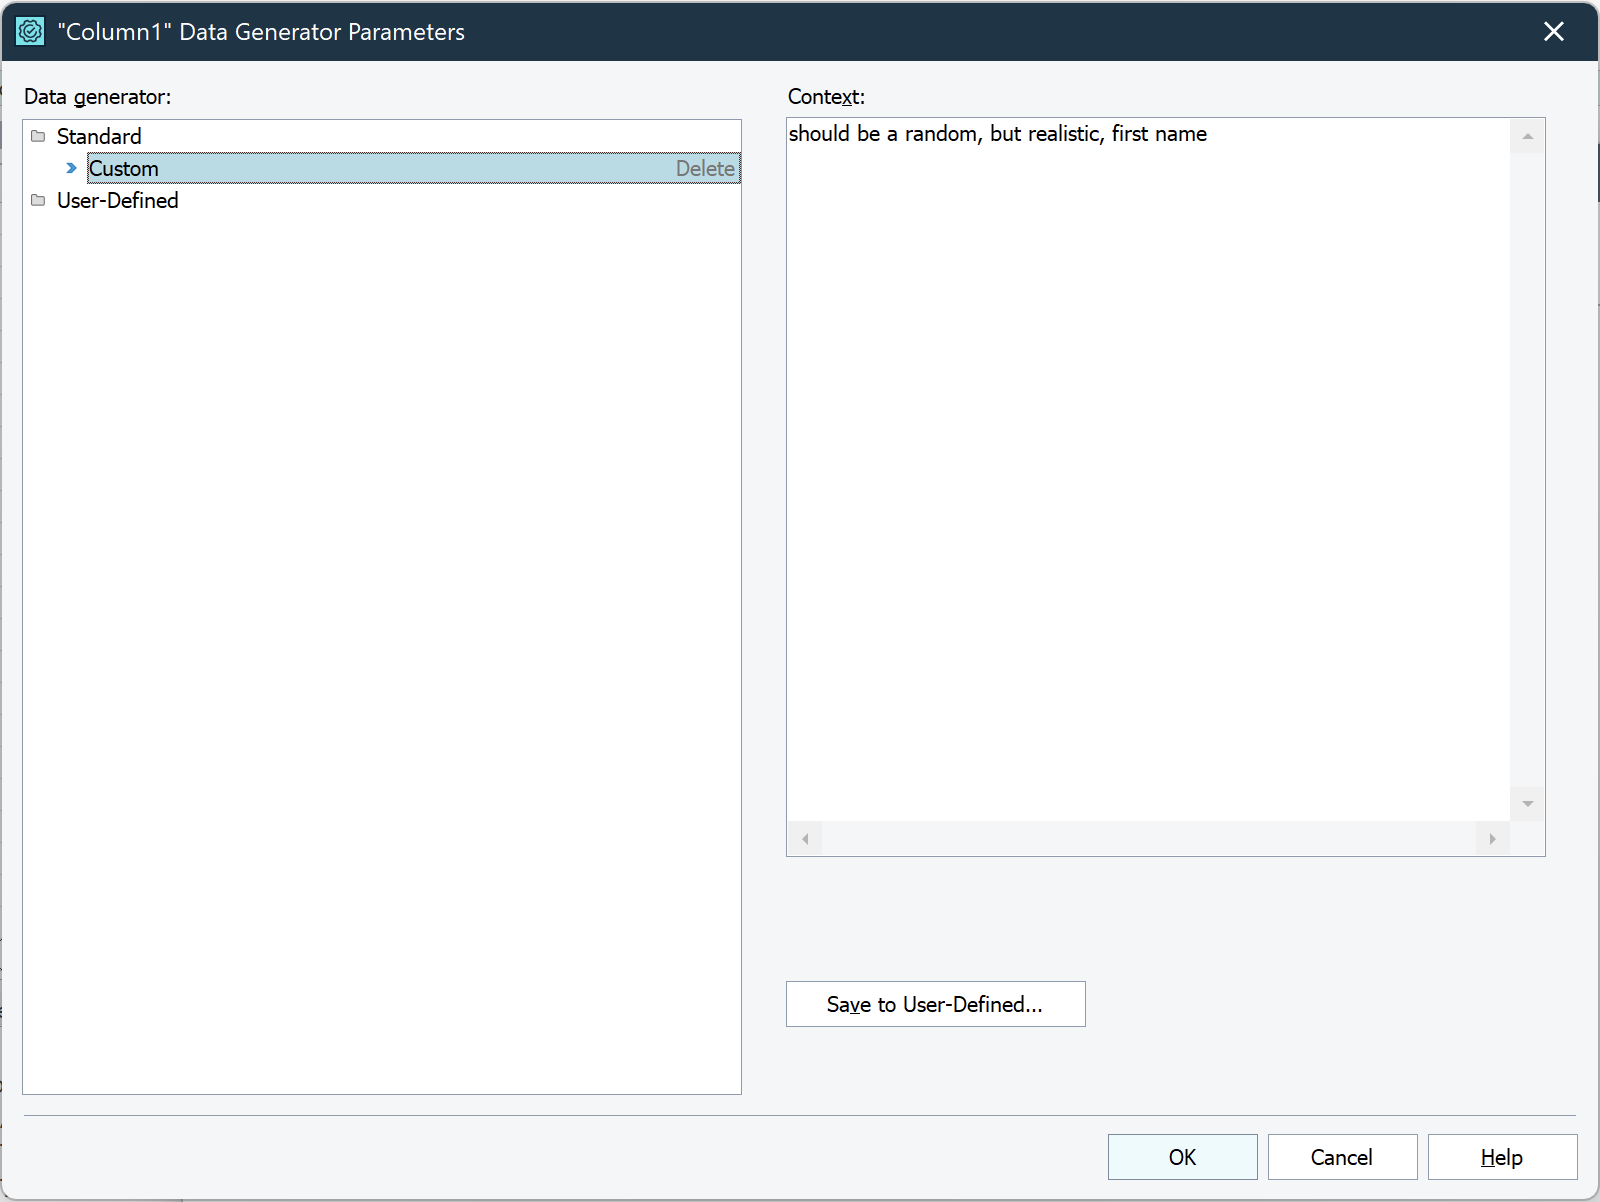
Parameters - Specifies additional context for the selected data generator. To modify context for each field, click within the Parameters cell to activate the in-place editor, and press the Edit button. Once you’ve done it, a window will open with a Context field. You can use natural language to describe what the data in a given column should look like.
You can modify the table in the following ways:
-
To add a column, click the Insert button.
-
To delete a column, select the desired column in the table and click the Delete button.
-
To change the order of the column, use the Move Up and Move Down buttons.
-
-
Specify the number of rows in the created data storage. For this purpose, use the Number of rows setting. To save column names with the generated data, click Save column names.
-
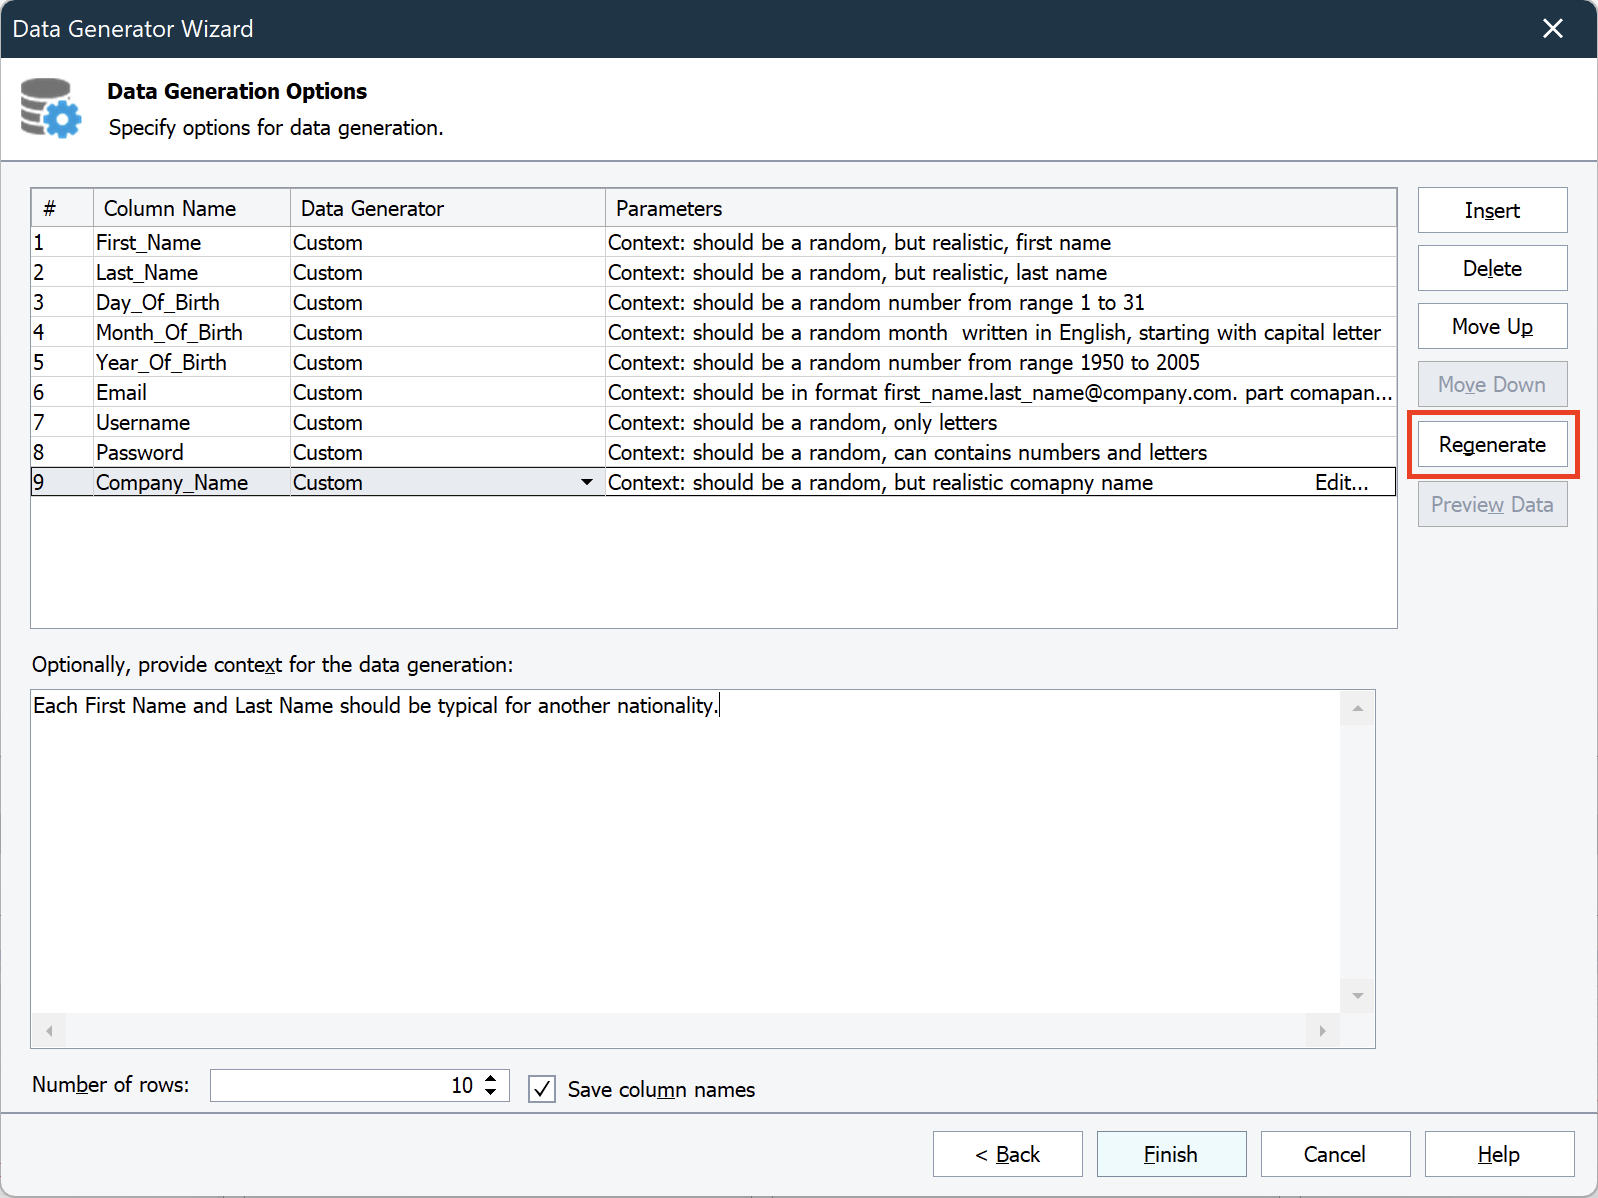
Click Regenerate to start the data generation process.
-
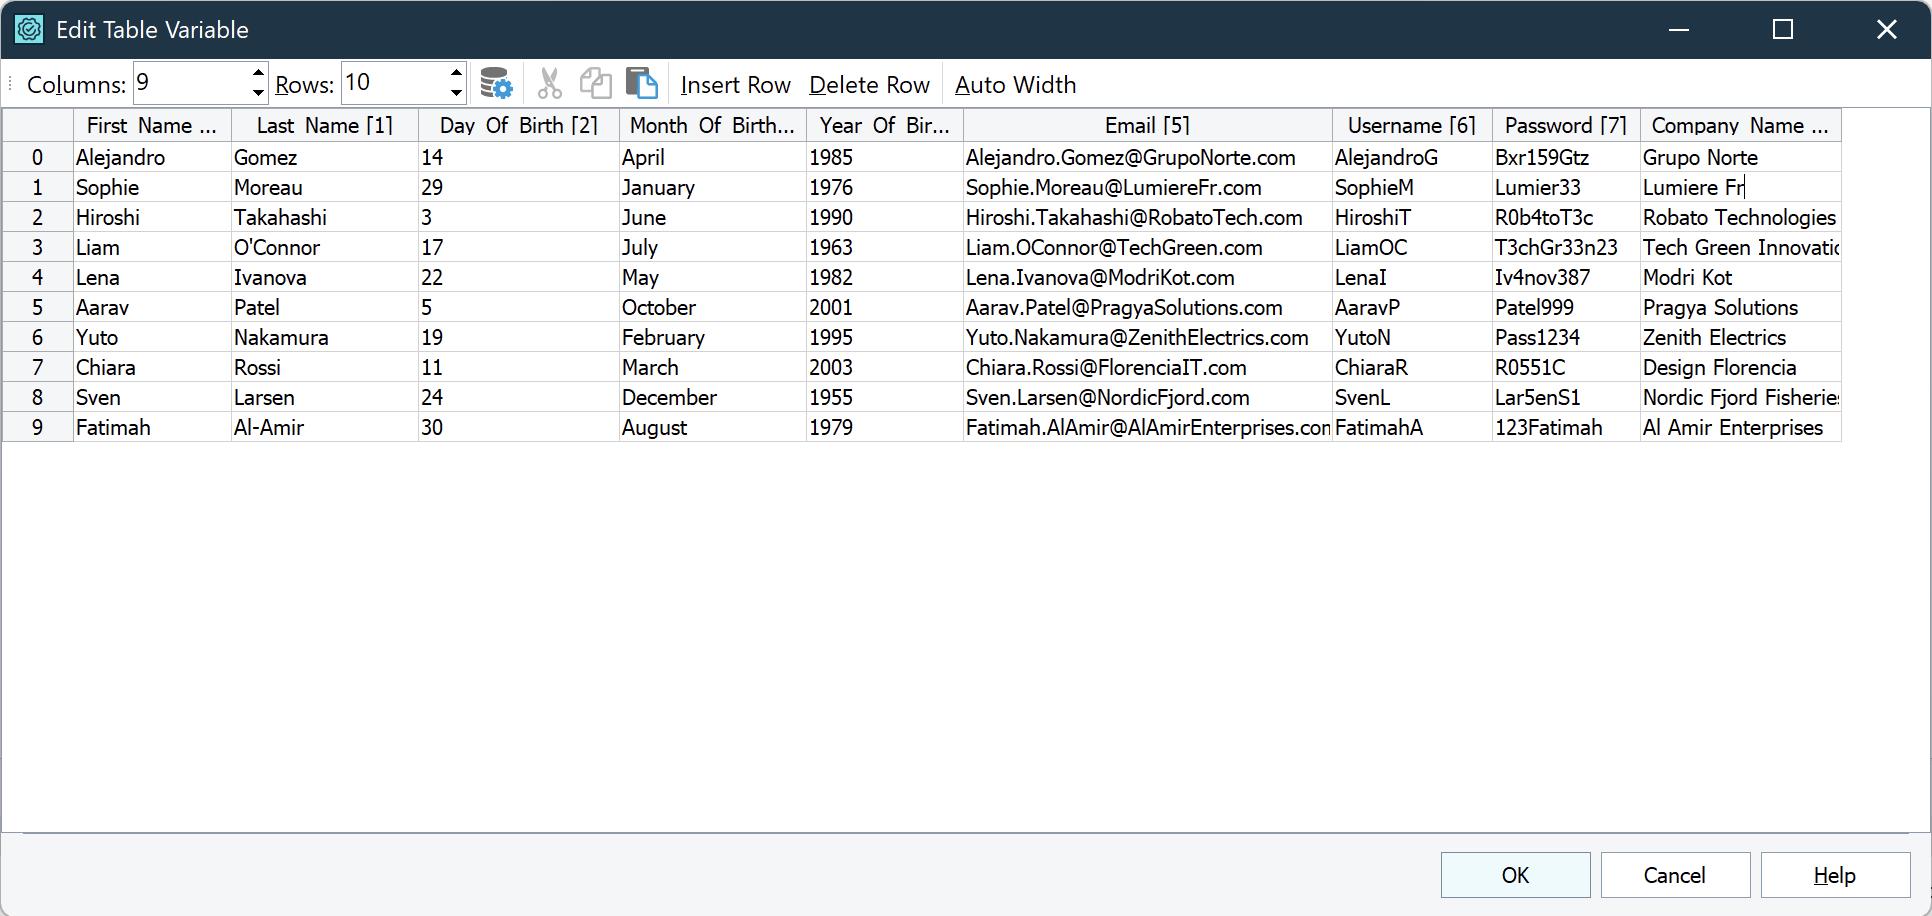
As soon as the data is generated, you can use the Preview Data option to see what the generated data looks like. If you’re not satisfied with the generated data, edit the fields and click Regenerate again.
-
When you are satisfied with the generated data, click Finish. TestComplete will generate it and save it to the data storage.
-
The expected result could be either a TestComplete variable or an Excel file. Let's assume that in our case it was a TestComplete variable and this is the result. The dataset here was prepared to create a Data Driven test on our sample website: Shop.
See Also
Data-Driven Testing
Working With Databases
Working with Microsoft Excel Files
Data-Driven Loop Operation
Tips on Generating Typical Values

 1. Open the Wizard
 See instructions