 |
Mobile checkpoints are deprecated. We do not recommend using them when creating new tests. |
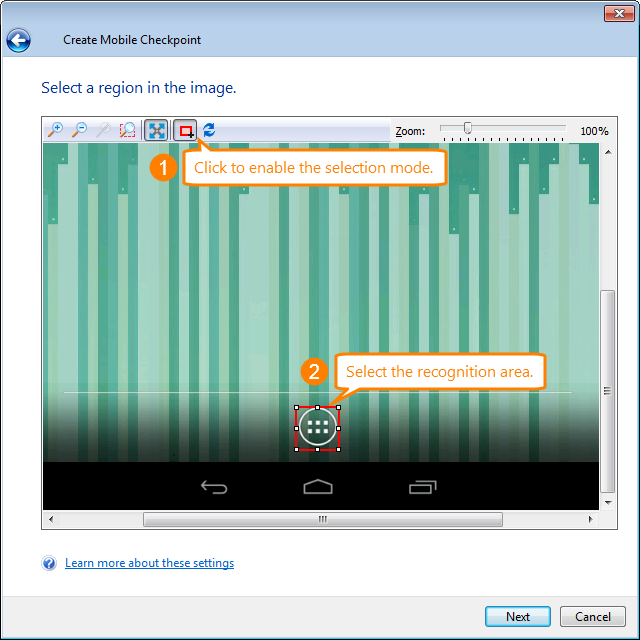
The Create Mobile Checkpoint wizard displays the Select a Region in the Image page if you choose to capture a new image for your checkpoint.
The page shows the screen of your connected mobile device:
| Note: | In order for TestComplete to be able to access an iOS device’s screen, your application running on the device must be prepared for testing. For information on how to prepare iOS applications for testing, see Preparing iOS Applications. |
The red frame indicates the recognition area of the image you are going to capture. TestComplete will search for the recognition area on screen when you address the image in tests.
To capture an image that corresponds to a control
-
Enable
 on the toolbar to switch the wizard to the selection mode.
 -
Click the needed object on the captured screen image.
-
If the click coordinates correspond to an accessibility element that TestComplete can recognize, the wizard will highlight the element with a red frame.
If you want to select an image on an iOS device’s screen or if TestComplete cannot highlight the needed image area on screen automatically, specify the needed area manually (see below).
To capture an arbitrary rectangular screen area
-
Enable
 on the toolbar to switch the wizard to the selection mode.
 -
Select the desired area by dragging the mouse. Release the mouse when the red frame highlights the needed area.
— or —
Select the needed area by moving the recognition area’s borders.
To scroll the screen image
-
Disable
 on the toolbar to switch the wizard to the scrolling mode.
 -
Navigate around the screen image by dragging the mouse.
You also can use the scrollbars to scroll the image.
To zoom in the recognition area
-
Click
 on the toolbar.
 -
The wizard will zoom in the screen area highlighted with the red frame.
To zoom in or zoom out the screen image
Use the zoom slider or the  Zoom In and
  Zoom Out commands to change the scale of the image.
Click  Zoom Default to set the screen image scale to 100%.
Click  Best Fit to change the screen image scale so that it fits the bounds.
To refresh the screen image
Click  Refresh Image.
Click Next to confirm the selection and proceed with the checkpoint creation.
See Also
Create Mobile Checkpoint Wizard
Mobile Checkpoints
Image-Based Testing

