 The object-driven testing (ODT) functionality is deprecated. Do not use it to create new tests. It will be removed from the product in one of the future releases. As an alternative, you can create custom classes in your scripts. For more information, see Alternatives to the ODT functionality.
Once we have created the classes in the previous step, we can create objects based on these classes. To create an object, we will need to create a variable that will hold a reference to the object. Variables are organized into several groups. You can either add a variable to the default group or create a new group.
We will start creating the object hierarchy with the topmost object that is based on the ClsNotepadTest class and then we will create other objects down the hierarchy.
To create a new object:
-
Add the ODT project item to your test. For this purpose, use the Create Project Item dialog.
-
Create a new group or choose an existing one. To create a group, right-click the ODT | Data item ODT editor or the Data item in the Data editor.
-
Change the group name to
TestSample. To do this, either right-click the group name in the ODT or Data editor and select Rename from the context menu, or choose the group name and press F2. Then you will be able to type the new name. -
Right-click the created group name in the tree view in the ODT or Data editor and select New Item from the context menu. TestComplete will create a new variable and call it NewVariable. Change the name to ReleaseTest.
-
From the drop-down list of the Value column, select (ClsNotepadTest). This means that the variable will hold a reference to the object based on the
ClsNotepadTestclass. -
The properties of the
ClsNotepadTestclass will appear as child nodes of theReleaseTestobject’s node: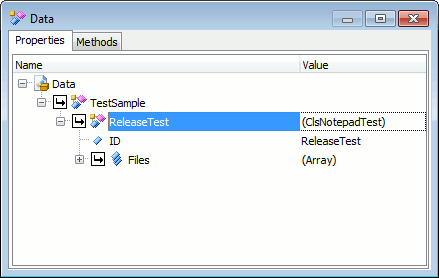
Now we can configure the object properties even further:
-
Use the
IDproperty to specify the name of the test. To modify the property value, simply right-click the property, select Edit from the context menu and enter the desired value into the Value column. Enter ReleaseTest as the value of this property. -
The
Filesproperty of theReleaseTestobject holds an array of testing objects for each file to be used in our test. Let’s add one item to the array:-
Right-click the
Filesnode and select New Item from the context menu. TestComplete will create a new array item. -
Select (ClsFile) from the drop-down list of the Value column for the new array item. The properties of the
ClsFileclass will appear as child nodes of theItem0object’s node.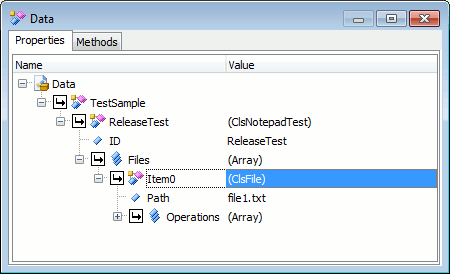
-
In the
Pathproperty ofItem0, specify file1.txt. This means that the file will be located in the folder of the current TestComplete project, that is why we do not specify the full path to the file, only its name. -
The
Operationsproperty ofItem0holds the array of testing objects for each operation that will be performed with the file1.txt file. Let’s add three items to the array as we are going to use three operations for this file.-
Right-click the
Operationsnode and select New Item from the context menu. This will create a new array item. -
Select (ClsOperation) from the drop-down list of the Value column for the new array item. The properties of the
ClsOperationclass will appear as child nodes of theItem0object’s node.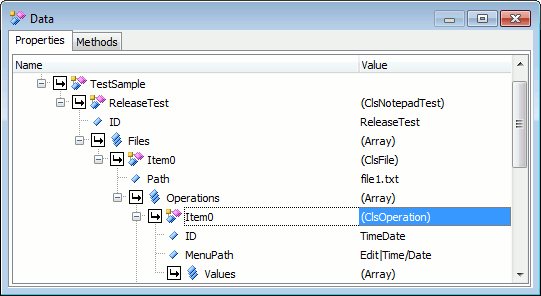
-
In the
IDproperty ofItem0, specify TimeDate. -
In the
MenuPathproperty ofItem0, specify Edit|Time/Date. This is how the desired operation (insertion of date and time) can be accessed via Notepad’s menu. -
We will leave the array of the
Valuesproperty empty, because the chosen operation does not use any parameters. -
Select the
Item0object variable and switch to the Methods page. It will list theExecutemethod the object got from its class,ClsOperation. -
Right-click somewhere on this page and select New Item from the context menu. This will create a new method and call it
NewObjectMethod. This method belongs exclusively to the particular object; it will not be inherited by the other instances of the same class. -
Rename the method to
Checkand specify MainUnit.ClsOperationTimeDate_Check as its script routine. -
Return to the Properties page, right-click the
Operationsnode again and select New Item from the context menu. This will create the second array item,Item1. -
Like the first array item, specify (ClsOperation) as the type of the second array item. The properties of the
ClsOperationclass will appear as child nodes of theItem1object’s node. -
In the
IDproperty ofItem1, specify Find. -
In the
MenuPathproperty ofItem1, specify Edit|Find...; this is how the desired operation (searching for text) can be accessed via Notepad’s menu. -
The
Valuesproperty holds an array of objects that represent different sets of values for the given operation. We will create one value set (one array item).-
Right-click the
Valuesproperty ofItem1and select New Item from the context menu. This will create an array item. -
Select (ClsFindData) from the drop-down list of the Value column for the new array item. The only property of the
ClsFindDataclass will appear as a child node of theItem0object’s node.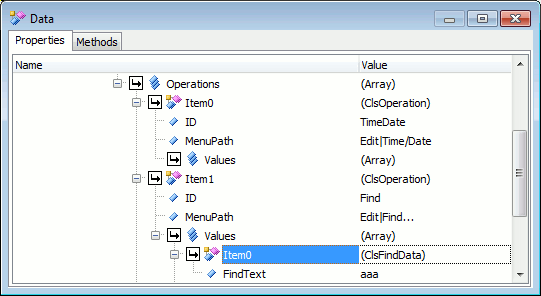
-
In the
FindTextproperty, specify aaa. This is the string we will look for in the file 1.txt file. -
Using the same method, we will add the second and the third items to the
Valuesarray property and specify the bbb and ccc strings in theirFindTextproperties correspondingly. These will be the additional variants of the string we will look for in file1.txt.
-
-
Now, we will create the third item (
Item2) in the array of theOperationsproperty. This item will represent the find-and-replace-text operation (IDwill be set to FindReplace,MenuPathwill be set to Edit|Replace...). TheValuesproperty will hold three array items of theClsReplaceDatatype. The properties that each object of this class holds,FindTextandReplaceWithText, will be correspondingly set to aaa and bbb in the first item, bbb and ccc in the second item, and ccc and ddd in the third one.FindTextis the string we will look for in the file andReplaceWithTextis the string that will replace the found string.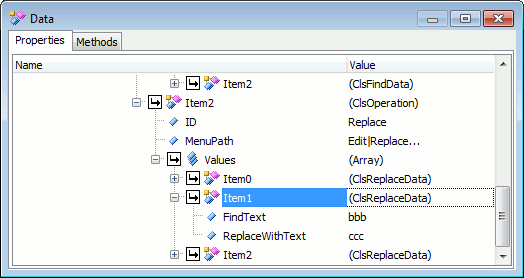
-
-
So far, in the object hierarchy of our test we have created a branch for one test file only. As much as object-driven testing is intended to operate with different sets of input data, which helps you diversify your tests, one file is not enough. To better illustrate the ODT practice, we will create several new file branches (array items in the Files array property). They will use different combinations of Notepad-related operations that are similar to those we have already mentioned. We are not going to cover the details on how to do this since it is similar to what you have just done.
 |
TestComplete automatically creates new objects when you go down the object hierarchy on the Properties page of the ODT or Data editor. If you need to refer to an existing object that was created earlier, you should use a method that returns a reference to this object. |

 Prev
Prev