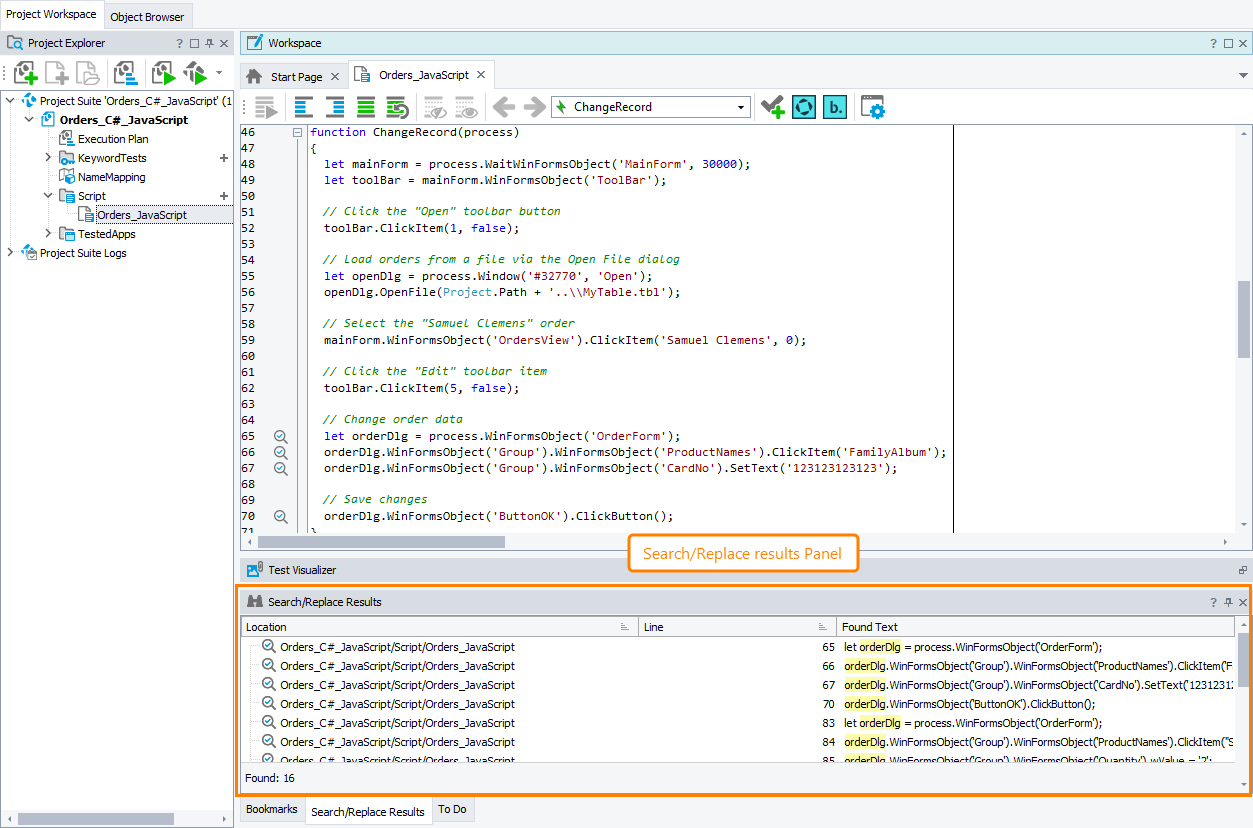
The Search/Replace Results panel shows the result of the search or replacement in script units in your TestComplete project or project suite:
By default, the panel resides at the bottom on the TestComplete main window below the Workspace panel.
To show the panel
– or –
-
Select View > Select Panel from the main menu of TestComplete and choose Search/Replace Results from the ensuing Select Panel dialog.
– or –
-
Specify a new name for the variable or function in the Rename dialog and click OK.
– or –
-
Right-click the variable or declared function in the Code Editor and then click Find Usages.
The panel contents depend on the operation that was performed (search or replacement):
Search Results
The panel lists all occurrences of the sought-for string:
| Column | Description |
|---|---|
| Location | Name of the script unit, project item or child element of a project item that contains the sought-for string. This name includes the names of parent elements (project name, project item name, etc.) |
| Line | Line number in the unit that holds the sought-for string. |
| Found Text | Text of the source code line that holds the sought-for string. The sought-for string is highlighted. |
| Found | The number of found string occurrences. If you use the Finding Usages feature for searching, this value does not include the variable or function declaration. |
Replacement Results
The panel lists all replacements that were made:
| Column | Description |
|---|---|
| Location | Name of the script unit, project item or child element of a project item that contains the replaced text. This name includes the names of parent elements (project name, project item name, etc.) |
| Line | Line number in the unit that holds the replaced text. |
| Found Text | Text of the source line before the replacement was made. The initial text is highlighted. |
| After Replacement | Text of the source line after the replacement was made. The final text is highlighted. |
| Replaced | The number of replacements. |
TestComplete marks the found or replaced lines with the  icon on the Code editor gutter. If the line has been modified, it marks it with the
  icon.
icon.
TestComplete allows you to customize the layout of any of its panels to suit your needs better. For example, you can change the Search/Replace Results panel’s size, position and docking, hide the panel or make it visible. To learn how to customize the TestComplete interface, see Customizing TestComplete.
Working With Panel
Jump to Source Code
To jump to the test line that includes the sought-for string or the replaced text, do any of the following:
-
Double-click the row that corresponds to this line.
-
Right-click the row that corresponds to this line in the Search/Replace Results table and then select
 Show Source from the context menu.
 -
Press Enter on the row that corresponds to this line.
TestComplete will open the underlying test in the Workspace panel and select the appropriate line in the test.
Delete One or Several Items
To delete one or several items:
-
Choose the desired row(s). You can use Ctrl- and Shift-click for multiselection.
-
Press Del or right-click the selected row (or any of the selected rows) and choose
 Delete from the context menu.
To delete all the items:
-
Right-click somewhere within the panel and choose Select All from the context menu.
-
Press Del or choose
 Delete from the context menu.
| Note: | When you delete a source line containing the search or replacement result from your test, TestComplete automatically deletes the appropriate item from the Search/Replace Results list. |
See Also
Docking
Arranging Columns, Lines and Panels
Find Dialog
Finding and Replacing
Finding and Replacing Text in Code Editor


 Jump to Source Code