The Data Generator wizard assists you in creating data storages that contain test data. This topic describes how to work with this wizard to generate different types of data values and save them to data storages in TestComplete.
1. Open the Wizard
The wizard is called when you do any of the following:
-
Click
 Open Data Generator Wizard on the Tools toolbar.
 -
Select Test > Generate Data from the TestComplete main menu.
 |
The Data Generator wizard is included in TestComplete since version 8.10. If you have installed this TestComplete version or later over an earlier version in update mode, the Generate Data button may be unavailable on the Tools toolbar or in the Test menu as installing TestComplete in update mode does not update custom interface layouts.
You can add this command to the toolbar or menu manually. |
2. Specify a Type of the Data Storage
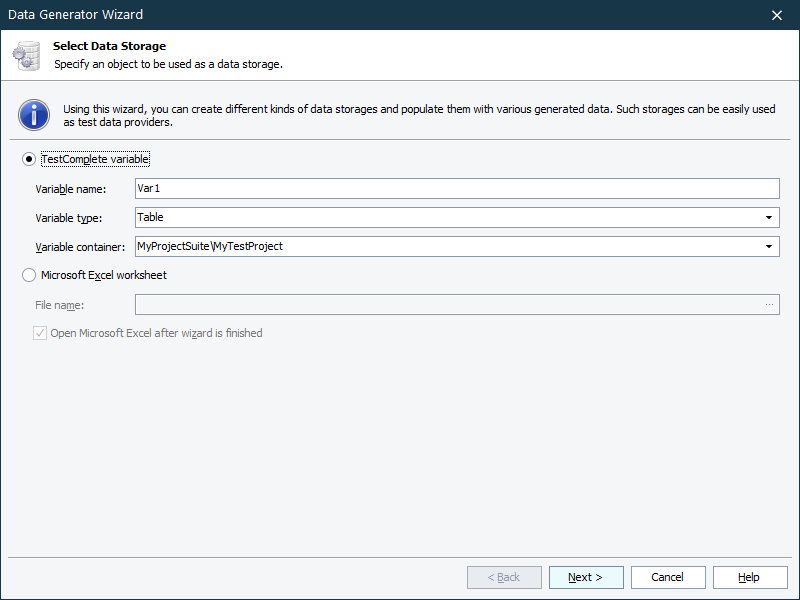
You can do this on the first page of the wizard. The following variants are available:
-
TestComplete variable - select this item to generate test data and store it to the specified project suite, project or keyword test variable. You can also specify the name, type and container for the new variable.
-
Variable name - Specifies a name for the created variable. Note that the name can start only with a letter or underscore. The name can contain only letters, digits and underscores. If you specify an invalid variable name, an error will occur.
-
Variable type - Specifies the type of a new variable. There are two available types: One value and Table. If you select the One value type, TestComplete will create a variable with one value only. The type of the variable value will be defined automatically after you choose the desired generator on the second page of the wizard. If you select the Table type, TestComplete will create a table variable with the specified number of columns and rows.
-
Variable container - Specifies the storage the variable will be saved to. For example, if you select the MyProjectSuite_Name\MyProject_Name\KeywordTests\MyTest_Name item, the variable will be added to the list of the MyTest_Name keyword test’s variables. You can also create project suite and project variables.
Note: If you call the Data Generator wizard while no project suite is open in TestComplete, you will not be able to specify a variable that will store the generated data. In this case, you can store the generated data to an Excel file only (see below).
-
-
Microsoft Excel worksheet - select this item to generate an .xls file with the specified number of rows and columns. You can also specify a location for the specified file. For this purpose, either enter the fully-qualified file name in the File Name edit box or click the ellipsis button and select the file via the standard Save To dialog.
Open Microsoft Excel after wizard is finished - Select this check box to automatically activate the Excel editor with the created storage open in it after the data generation is finished. Otherwise, clear this check box.

Before using Excel worksheets as a data storage, make sure Microsoft Excel is installed on your computer. If it is not installed on the computer and you try to choose a worksheet as a data storage, an error message is displayed. If you specify the name of an existing Excel workbook, TestComplete will add a new worksheet to this file and populate the created worksheet with the generated values. Otherwise, TestComplete creates the specified file, adds one worksheet to it and then populates this worksheet with the generated values.
After you have selected the desired data storage type and specified all the needed parameters, click Next.
3. Specify Options for Generated Data
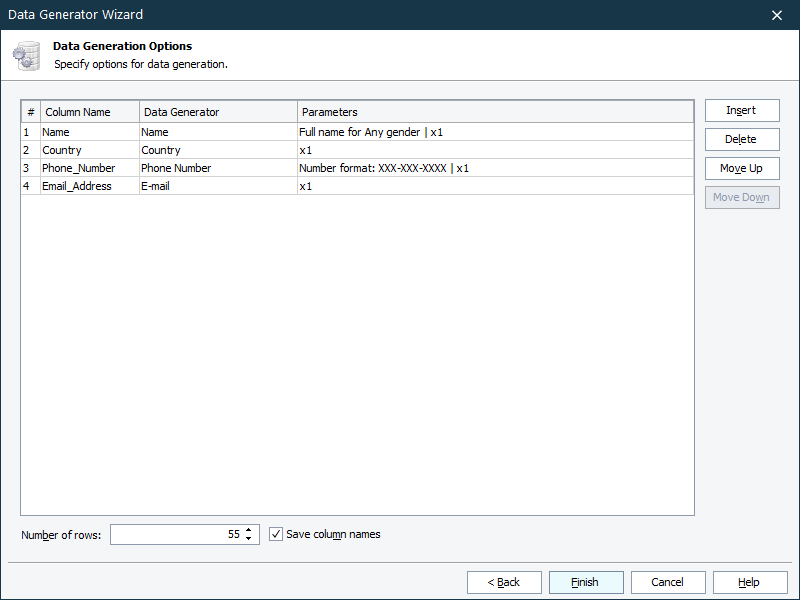
On the second page of the wizard, you can specify additional options for the generated data. The page appearance depends on the values selected on the first page of the wizard.
-
For TestComplete variable (Table type) and Microsoft Excel worksheet, do the following:
-
Fill the table that holds the descriptions of the columns that will be stored in the generated table or file. Each line in this table corresponds to one column of the data storage. The table contains the following columns:
-
# - Specifies the ordinal number of the column that will be stored to the table or file.
-
Column name - Specifies the title of the created column. You can modify the column’s content as you wish. To specify another column name, click within the corresponding Column name cell and enter a new name. To enter the specified name, press Enter.
-
Data Generator - Specifies the data generator that will be used to populate the created column with values. To change the value of this field, click within the corresponding cell in the Data Generator column, click the down arrow in the top right corner of the cell and then select the desired data generator from the ensuing drop-down list. For a complete list of data generators, see below.
-
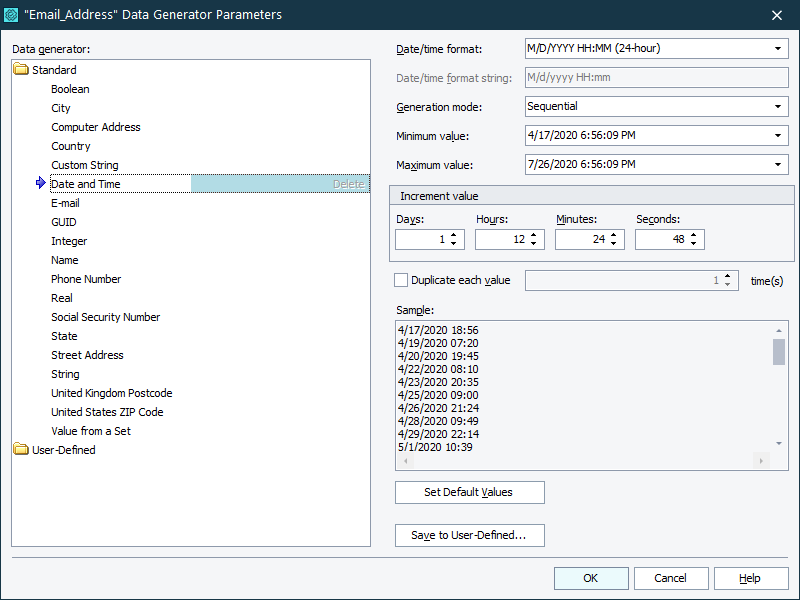
Parameters - Specifies additional parameters for the selected data generator. To modify these parameters, click within the Parameters cell to activate the in-place editor and press the Edit button. For more information on the parameters that are available for each generator, see the description of the desired generator (the Data Generators section below).
You can modify the table in the following ways:
-
To add a column, click the Insert button.
-
To delete a column, select the desired column in the table and click the Delete button.
-
To change the order of the column, use the Move Up and Move Down buttons.
-
-
Specify the number of rows in the created data storage. For this purpose, use the Number of rows setting. To save column names with the generated data, click Save column names.
-
Click Finish. TestComplete will generate the desired data and save it to the data storage.
-
-
For TestComplete variable (One value type) set options for the desired data generator.
In case of the 'One value' variable type, the second page assists you in selecting the desired generator and configuring its settings. The page appearance depends on the generator type selected in the Data Generator field. For more information on the parameters available for the selected generator, see the generator’s description below.
After you have specified options for the data to be generated, click Finish. TestComplete will generate the desired data and save it to the data storage.
Available Data Generators
To generate different kinds of data values, TestComplete provides several data generators:
Also, TestComplete allows creating your own generators and adding them to the list of available generators (see Working With User-Defined Data Generators).
For more information on generating various data with the TestComplete data generator, see Tips on Generating Typical Values.
For more information on preparing test data, see Preparing Data for Data-Driven Testing.
See Also
Data-Driven Testing
Working With Databases
Working with Microsoft Excel Files
Data-Driven Loop Operation
Tips on Generating Typical Values

 1. Open the Wizard
 See instructions

