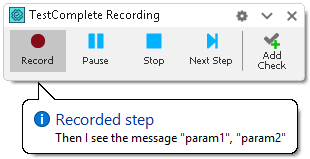
TestComplete shows the Recording toolbar when recording a test. The toolbar disappears when the recording is stopped.

By default, the Recording toolbar contains only a few items when the recording starts. They are (from the left to the right):
 Record
Blinks to signal that TestComplete is recording.
This button is enabled only if you pause the recording. Use it to resume the recording after the pause.
 Pause
Pause
Pauses the recording. To resume, click Record.
 Stop
Stop
Stops the recording.
 Next Step
Visible only if you are recording BDD test steps. Stops recording script code for the current test step and continues recording code for the next step that has no test commands yet. See also Create Test Step Scripts for details.
When you are recording script code for BDD test steps, the Recording toolbar displays the name of the recorded step:

 Add Check
Pauses the recording to add a checkpoint.
TestComplete includes several built-in checkpoint types. TestComplete will show the wizard where you can specify the checkpoint properties. After you close the wizard, TestComplete will automatically insert the generated keyword test operations or script statements into the recorded test or script.
To see all commands available during the recording, click  Expand at the top of the toolbar:

 Run App
Specifies a type of application to launch:
Tested Application
Launches one or all tested applications. Select the application from the drop-down list or select Run All to run all the tested applications.
TestComplete will record this action as the Run TestedApp keyword test operation, or as the TestedApps.AppName.Run or TestedApps.RunAll scripting method.
| Note: | This command is disabled if the project does not contain any tested applications, or if the tested applications are not found on the computer. |
To learn more, see Running Applications During Test Recording.
Virtual Browser
Launches the mobile browser emulator. Select the needed browser from the drop-down list.
TestComplete will record this action as the Run Virtual Browser keyword test operation or as the VirtualBrowsers.Item(browser_name).Run scripting method.
| Note: | To use the mobile browser emulator, install Google Chrome on your computer. For more information, see Requirements for Mobile Web Testing Using Emulator. |
To learn more, see Launching Mobile Browser Emulator - During Test Recording.
 Add Comment
Calls the Add Comment to Test dialog to insert comments into the recorded test.
Test Type
Specifies the type of the test that TestComplete is recording:
 Keyword Test
Records a keyword test.
 Record Script
Records a script routine.
 Record Low-Level Procedure (screen coordinates)
Records a low-level procedure based on screen coordinates.
 Record Low-Level Procedure (window coordinates)
Records a low-level procedure based on window coordinates.
For more information on low-level recording, see Creating and Recording Low-Level Procedures.
 Custom Action
Pauses the recording and executes a custom action. These actions are provided by script extensions. Click the button to see the list of available custom actions and choose the desired one. By default, the list of available custom actions include the Clipboard Checkpoint and Manual Checkpoint items.
Parent and Object
Shows information on the object that is currently under the mouse pointer and on the object’s parent.
To access recording settings, click  at the top of the toolbar:

Click Enable Quick Checkpoints to enable or disable the quick checkpoints creation during the test recording.
Click Other Options to call the Recording Options dialog where you can configure all the options that affect the recording. To learn more about those options, see the dialog description.
