You use the Image Set editor to view and manage images that you use in your image-based tests.
| Note: | The Image Repository does not store images for region checkpoints. Data for the latter is stored in the Stores | Regions collection. |
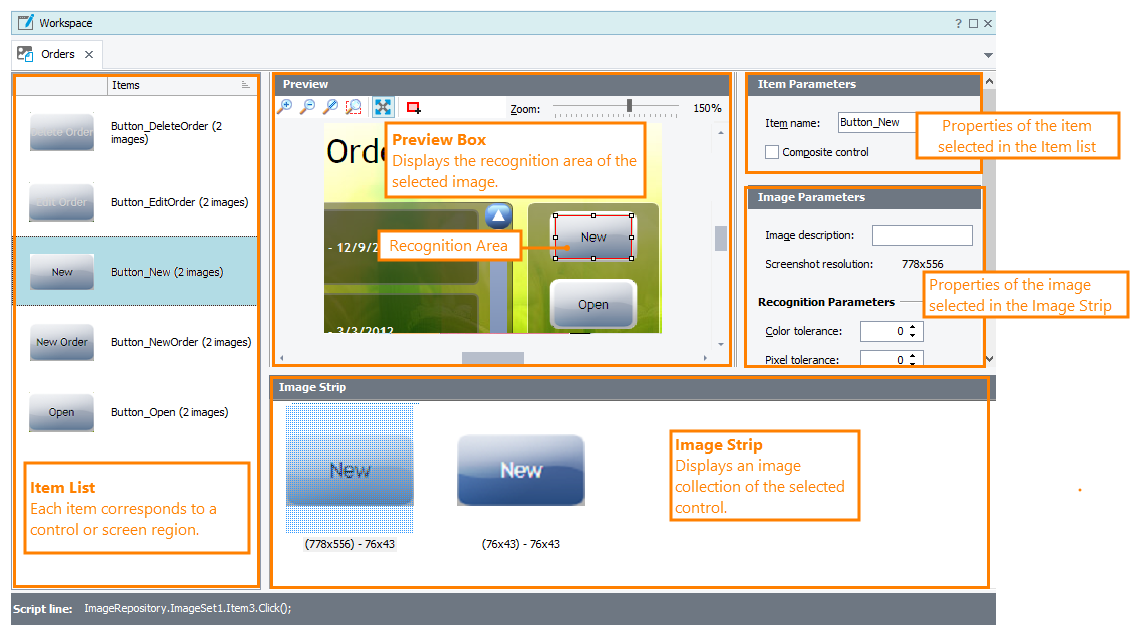
Here is a sample view of the editor:
Opening the Editor
To open the editor:
-
Right-click the desired Image Set node in the Project Explorer and choose Edit from the context menu.
– or –
-
Double-click the desired Image Set in the Project Explorer.
Information on the Editor
Items List
The Items list on the left of the editor lists items (images) in the selected image set. Typically, these items correspond to tested controls or screen areas in your application. The item name identifies the item in tests.
| Note: | If you change the item name, TestComplete will suggest updating the Image Touch and Image Based Action operations in your keyword tests automatically. If you have other operations that use the item, or if you use the item in script tests, update them manually. |
Image Strip
The way the controls and areas in tested applications look like depends on various factors like a color scheme, application UI style, screen resolution, and so on. To allow your test to find the needed control or screen area regardless of those factors, you can associate several images with an item.
The Image Strip shows all the images associated with the selected item.
In your image-based tests, to simulate an action over an item, TestComplete will check all the images associated with the item until it finds the one that matches.
Preview
The Preview area shows the image currently selected in the Image Strip.
It shows the PC or mobile device screen and the recognition area on it. The recognition area indicates the region used for image-based recognition of your tested control. When in your test you address the control, TestComplete will search for the area on the screen.
The recognition area is highlighted with a red frame.
You can adjust the bounds of the area to improve the control recognition. For example, sometimes, a control’s image may include minor elements that make it difficult to recognize the control on the screen, like a caret in edit boxes. You can exclude these problematic details from the recognition area by moving the area borders.
Item Properties
To adjust the control recognition in tests, you can also use a number of properties the editor shows on the right.
To learn more about the properties and the ways they affect the recognition, see —
Working in the Editor
For detailed information on changing data in the editor, see —
More Information on Image-Based Testing
| For information on how to … | See these topics … |
|---|---|
| Basic concepts of image-based testing of mobile applications | About Image-Based Testing |
| Dealing with image variations of tested controls | Controlling Image Variations |
| Checking if the screen shows the expected image | Checking Object State and Data in Image-Based Tests |


 Items List