 |
Information in this topic applies to desktop and web applications. |
Low-level procedures are the TestComplete facility, where every single mouse or keyboard event is tracked and recorded individually in screen coordinates. Each low-level procedure is shown in the Project Explorer panel as a child item of a Low-Level Procedures Collection project item.
To view or modify a specific low-level procedure, do any of the following:
-
Double-click the low-level procedure in the Project Explorer panel.
-
Right-click the low-level procedure in the Project Explorer panel and select Edit from the context menu.
This opens the Low-Level Procedure editor in the Workspace panel.

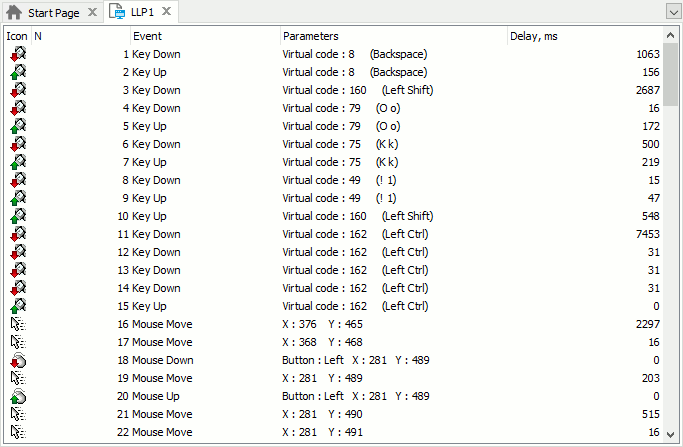
The editor displays the sequence of mouse and keyboard events recorded in the low-level procedure selected in the Project Explorer panel. For each event it shows the following information:
| Column | Description |
|---|---|
| Icon | The icon representing the event type. |
| N | The ordinal number of event. |
| Event | Event type: KeyUp, KeyDown, MouseMove, MouseUp, MouseDown or MouseWheel. |
| Parameters | Event parameters (for example, mouse coordinates for mouse events). |
| Delay, ms | Milliseconds since previous event (or since the start of recording, for the first event). |
You can show, hide and resize columns in the usual way. See Arranging Columns, Lines and Panels for more information on this. You can also sort events by clicking the header of the desired column. For instance, to sort the event sequence by delays, click over the Delay, ms column header. To restore the initial event order, click on the N column header.
To append a new event to the end of the list
-
Right-click somewhere in the editor and select
 Add Event from the context menu.
 -
Use the subsequent Add Event dialog to specify the type and parameters of the new event.
To insert a new event at the current position
-
Select the event after which you wish to insert a new one.
-
Right-click the event and select Insert Event from the context menu.
-- or --
Press Insert.
-
Use the subsequent Insert Event dialog to specify the type and parameters of the new event.
To change the event order
-
Select the desired event.
-
Drag the selected event to the desired spot in the sequence.
To change event parameters
-
Double-click the event in the list.
-- or --
Right-click the event and choose Edit from the context menu.
-
Use the subsequent Edit Event dialog to modify the parameters of the selected event.
Note that the Delay parameter can be modified directly in the editor. To do this:
-
Click the event’s Delay cell twice (not a double click).
-- or --
Select the Delay cell and press F2.
-
Enter the desired value and press Enter to apply the changes.
To change the event type
-
Double-click the event in the list.
-- or --
Right-click the event and choose Edit from the context menu.
-
Use the subsequent Edit Event dialog to specify the new type of the event and its parameters.
To change coordinates for multiple events
-
Select the desired events in the list (use Shift-click or Ctrl-click for multiselection).
-
Choose Shift Coordinates for Selected Events from the context menu and use the ensuing Shift Coordinates dialog.
Note that event coordinate values depend on whether you recorded a window-relative or screen-relative procedure. See Window- and Screen-Relative Low-Level Procedures.
To expand or shrink the delay time for multiple events
-
Select the desired events in the list (you can use Shift-click or Ctrl-click for multi-selection).
-
Choose Expand/Shrink Time for Selected Events from the context menu and use the ensuing Expand/Shrink Time dialog to change the total elapsed time for the selected events and spread the change either proportionally or equally among the selected events.
To delete an event
-
Select the desired event (you can use Shift-click or Ctrl-click for multi-selection).
-
Press the Del key or choose Delete from the context menu.
See Also
Testing Applications in Low-Level Mode
Parameterizing Low-Level Procedures
