 |
Web Accessibility checkpoints are deprecated. We do not recommend using them. Use Web Audits checkpoints instead. |
Web accessibility checkpoints verify that a web page under test conforms to the Web Content Accessibility Guidelines and Section 508 standards.
 |
Creating web accessibility checkpoints is available only if you have a license for the TestComplete Web module. Also, note that you can create web accessibility checkpoints only for web pages that are displayed in web browsers supported by TestComplete. |
The rest of the topic provides step-by-step instructions on using the wizard to create checkpoints:
1. Launching the Wizard
-
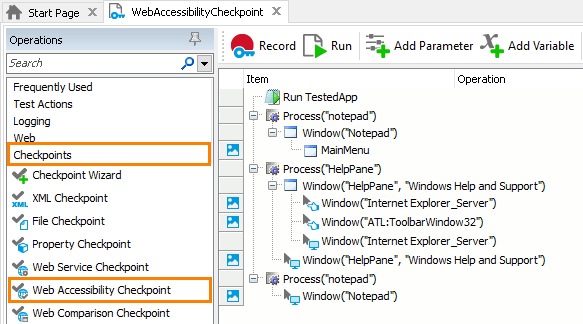
Select the Checkpoints category in the Operations panel of the Keyword Test editor.
-
Find the Web Accessibility Checkpoint operation in the list and drag it to your test.

2. Specifying the Web Page to Be Verified
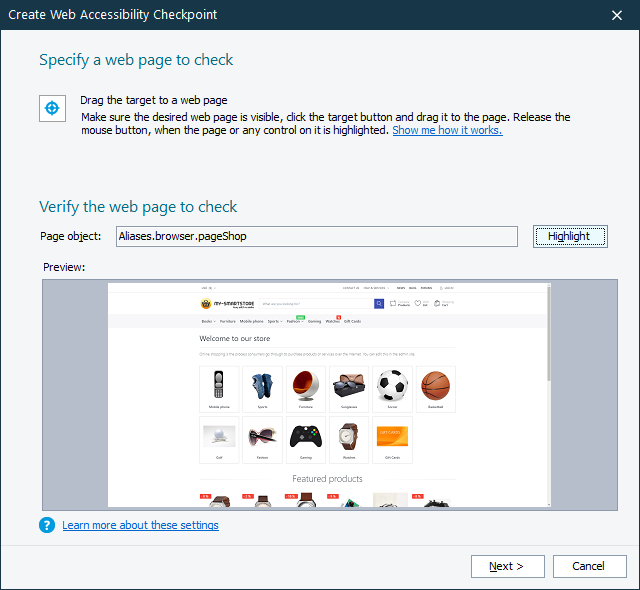
On the first page of the wizard, you specify the web page you want to verify:
-
Click the
 icon in the wizard and keep the mouse button pressed.
After you start dragging, the main window of TestComplete will automatically minimize. While you are dragging, a red frame indicates the element of the web page or frame that is currently under the mouse pointer.
-
Release the mouse button when the red frame highlights any element on the desired web page or frame.
-
Regardless of whether you select the page or an element on the page or frame, TestComplete will retrieve the full name of the
Pageobject that corresponds to the web page and display the object name in the Page object edit box.If you release the mouse button over an element other than a web page element, TestComplete will display an error message notifying you that the selected object is not supported by this checkpoint.
3. Specifying the Web Accessibility Element
On the next page of the wizard, specify the accessibility parameters that will be checked.
To create a set of verification parameters
-
Click Select and save check settings.
-
Enter the name of the new WebAccessibility element in the Save as a new item to Stores edit box.
Note: The name is used to address the element from scripts, so it must be a valid script identifier. To specify the name that will match the naming rules adopted by all supported scripting languages, enter a string that starts with a letter and that contains only letters, digits, and underscore symbols. -
Specify the verification settings in the Options box:
-
Check "alt" attribute - The checkpoint will verify that all IMG, APPLET, AREA, and INPUT web page elements have a non-empty ALT attribute. If at least one of these elements does not have the ALT attribute or this attribute is empty, the verification will fail.
-
Check "mailto:" - The checkpoint will verify that the tested web page contains at least one A element, whose HREF attribute starts with mailto:. If the tested web page does not contain these elements, the verification will fail.
-
Check image sizes - The checkpoint will verify that all IMG elements of the tested web page have the WIDTH and HEIGHT attributes specified. If there is one or more images that do not have these attributes, the verification will fail.
-
Check "title" tag - Specifies that TestComplete should verify that the web page contains a non-empty TITLE element. If this element is absent or if it is empty, the verification will fail.
-
Check tab indexes - Specifies that TestComplete will verify that all A, AREA, BUTTON, INPUT, OBJECT, SELECT, and TEXTAREA elements have the TABINDEX attribute specified. If the page contains at least one element, whose TABINDEX attribute is absent, the verification will fail.
-
Check link accessibility - This is a check for broken links. TestComplete verifies that the pages or resources to which the A elements on the tested web page refer are available, that is, that the server response code is less than 400. If at least one A element points to an unavailable page or resource, the verification will fail.
Notes:
-
If a checked link is redirected to another URL, the checkpoint will follow the redirect and will verify that the resulting page (or resource) is available, that is, that the response code for it is less than 400.
-
The checkpoint only verifies links that use HTTP or HTTPS protocols and that do not use parameters (the parameters are separated from the page’s address by the question mark). In other words, the checkpoint does not check those A elements, whose HREF attributes:
- Contain question marks (
?). - Start with some other prefixes than HTTP or HTTPS. For instance, it does not check the links that start with FTP, NEWS, or MAILTO or with the scripting language name (JavaScript, JScript, Python, or VBScript).
- Contain question marks (
-
- Check ActiveX objects - Verifies that the tested web page does not contain ActiveX objects. The verification fails if the page contains at least one ActiveX object.
- Check Applet objects - Verifies that the tested web page does not contain APPLET elements. The verification fails if the page contains at least one APPLET.
- Check multimedia links - Checks if the page contains links to multimedia content in the form of AVI or SWF files. The check will fail if the page contains links to such files.
Note: The checkpoint checks links to multimedia content only (for example, links contained by A elements). It does not check multimedia embedded into web pages by OBJECT or EMBED elements. - Check server-side images - Verifies that the page does not contain IMG elements, whose SRC attribute contains parameters. That is, TestComplete checks whether the image URL contains the question mark (?). If it does, the verification fails.
-
To use an existing set of verification parameters
-
Click Use stored settings.
-
Select the needed element from the drop-down Stores item list.
4. Closing the Wizard
After specifying the web page and verification settings, click Finish to close the Web Accessibility Checkpoint wizard. TestComplete will insert the Web Accessibility Checkpoint operation into the test.
See Also
Web Accessibility Checkpoints
About Web Accessibility Checkpoints
Checkpoint Wizard

 1. Launching the Wizard
