Use the TestedApps editor to view and manage the list of tested applications in the current test project and configure tested application launch parameters.
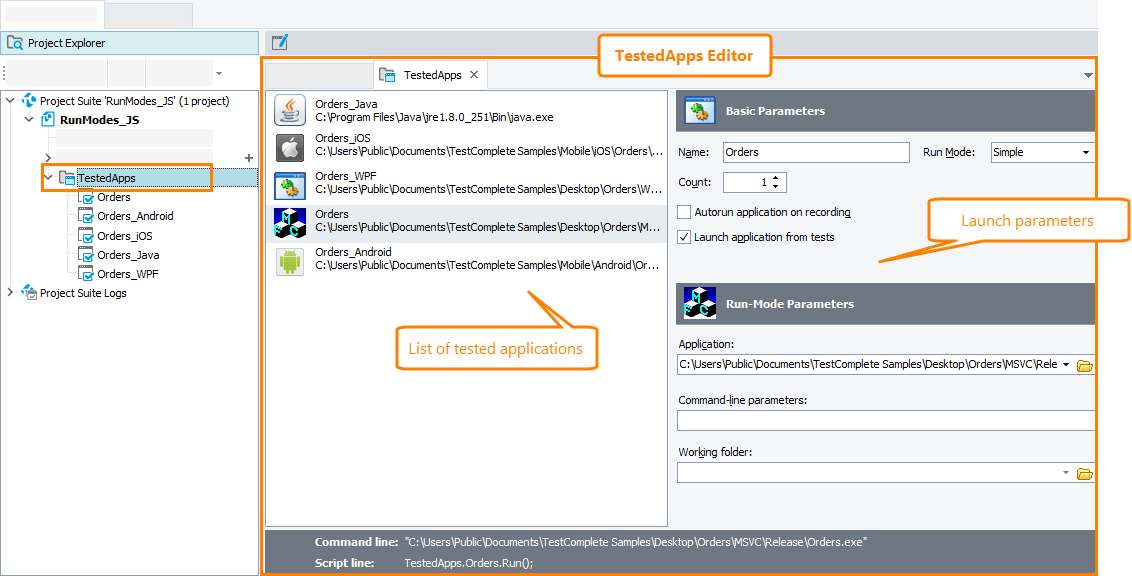
Here is a sample view of the editor:
To open the editor
-
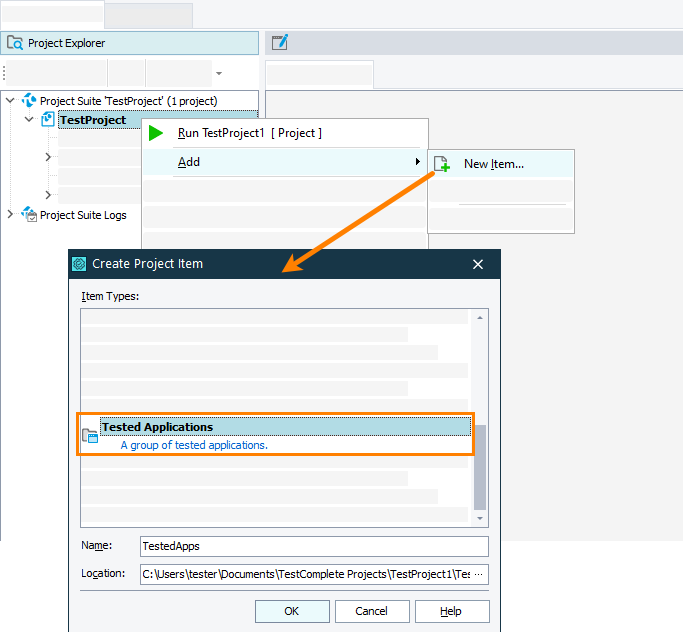
If your project does not have the TestedApps collection, add it:
-
In the Project Explorer, double-click the TestedApps project item or any of the tested applications under the TestedApps node.
– or –
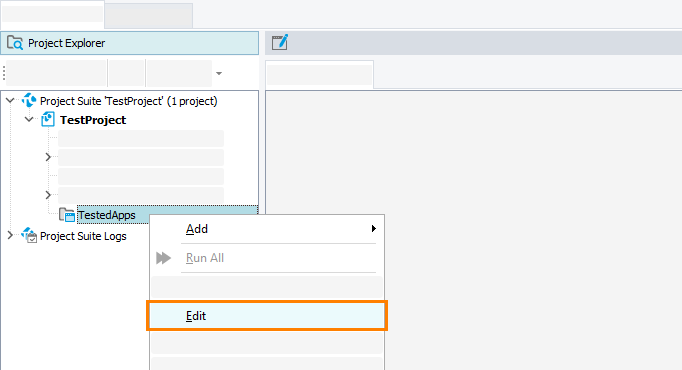
Right-click the TestedApps project item in the Project Explorer and select Edit from the context menu.
-
TestComplete will open the TestedApps editor.
Information on the editor
Tested applications list
The left part of the editor contains the list of tested applications defined in your project. Each tested application in the list has its unique name. Each application in the list also displays the full name of the corresponding executable and the application’s icon (if the item refers to a non-existing executable file, it has the  icon).
For information on adding different types of applications to this list, see the table below.
Launch parameters
The right part of the editor displays launch parameters of an application selected in the tested applications list. Launch parameters are divided into two groups: Basic Parameters and Run-Mode Parameters. The basic parameters are the same for all applications. The run-mode parameters depend on the application type and run mode.
Parameters by application type
Properties
The footer area of the editor displays some properties of the tested application selected in the list:
-
Command line - The command-line that will be used to launch the application.
-
Script line - The script code which you can use to launch the application from your scripts. To launch the application from keyword tests, use the Run TestedApp operation.
Adding applications
-
Right-click anywhere within the TestedApps editor and choose Add Application from the context menu.
-
In the resulting Add Tested Application wizard, choose the type of your tested application and specify its launch parameters.
For detailed information on adding items to the tested applications list, see:
Working with the editor
Editing tested application parameters
-
Select the desired application in the list.
-
In the Basic Parameters section of the editor, modify basic parameters of the application.
-
In the Run-Mode Parameters section of the editor, modify parameters of the application applied to the selected application run mode.
-
Save the changes.
Renaming tested applications
-
Select the desired application in the list.
-
In the Name edit box of the Basic Parameters section of the editor, type the new application’s name.
-
Save the changes.
| Note: | The name of a tested application item is used to address the item in scripts and keyword tests. If you rename an application in the TestedApps editor, TestComplete automatically updates the Run TestedApp operations that launch the renamed application in your keyword tests. If you have script code or other keyword test operations that use the renamed item, you need to update them manually. |
Specifying the application run mode (for desktop Windows applications only)
TestComplete can launch Windows-based applications in several run modes: Simple, RunAs, Debug, and Profile:
-
Select the desired application in the list.
-
In the Basic Parameters section of the editor, select the needed run mode from the Run-Mode list.
-
In the Run-Mode Parameters section of the editor, specify parameters for the selected run mode.
-
Save the changes.
For more information about tested application types and run modes, see Run Modes and Parameters. For a description of tested application parameters, see Run Modes and Parameters.
Specifying the application command line and working folder (for desktop Windows applications only)
-
Select the desired application in the list.
-
Make sure that its run mode is set to Simple, RunAs, or Debug.
-
In the Run-Mode Parameters section of the editor, specify the desired command line or working folder settings in the appropriate edit boxes.
-
Save the changes.
The command line arguments are displayed in the footer area of the editor.
Running applications under other user accounts (for desktop Windows applications only)
-
Select the desired application in the tested applications list.
-
In the Basic Parameters section of the editor, select RunAs from the Run-Mode list.
-
In the Run-Mode Parameters section of the editor, specify the user name, domain, password and working folder settings for the run.
-
Save the changes.
-
Make sure the Launch application from tests check box in the Basic Parameters section of the editor is selected.
Now, when you launch an application from TestComplete, the application will be launched under the specified user account. See Testing Applications Running Under Another User Account for more information on this.
Profiling applications with AQtime (for desktop Windows applications only)
You can run a tested application in Profile mode to trace its performance during the test run, by using AQtime, a profiling tool by SmartBear.
-
Select the desired application in the tested applications list.
-
In the Basic Parameters section of the editor, select Profile from the Run-Mode list.
-
In the Run-Mode Parameters section of the editor, specify parameters for the run, for example, the profiler you want to use, the name of the AQtime project and so on. For detailed information on parameters you can configure, see Profile Mode Parameters.
-
Save the changes.
Now, when you launch an application from TestComplete (from the TestedApps editor, from script code or from your keyword test), TestComplete will run AQtime and launch the application from it. For more information, see Integration With AQtime.
Launching a tested application
 Not applicable to BitBar applications. To learn how to upload mobile applications to the BitBar device cloud and start a testing session for them, see Connecting to Mobile Devices and Opening Testing Sessions.
-
Right-click the desired application in the tested applications list.
-
Select Run Selected from the context menu.
The application will be launched in the mode specified by its Run-Mode parameter. TestComplete will launch as many instances of the tested application as specified by its Count parameter (the Count parameter is ignored if an application is run in the Debug or Profile run mode or if the application is launched on a mobile device).
For information on how to launch the tested application from scripts, see Working With Tested Applications in Tests.
To launch a tested application from a keyword test, use the Run TestedApp operation.
Launching all tested applications
Select Run All from the TestedApps editor context menu.
The tested applications will be launched in the mode specified by their Run-Mode parameter. If the run mode is set to Simple or RunAs, TestComplete will launch as many instances of each tested application as specified by its Count parameter. If the run mode is Debug, TestComplete ignores the Count value and always launches one new application instance. If the run mode is Profile, TestComplete also ignores the Count value and launches the application under AQtime.
To learn how to launch tested applications from scripts, see Working With Tested Applications in Tests.
If you want to launch all tested applications from your keyword test, simply add the Run TestedApp keyword operation to the keyword test and select All Applications from the list of tested applications in the operation’s properties.
Deleting applications from the list
-
Select the desired application in the tested applications list.
-
Right-click the application and select
 Delete from the context menu or press Del.
Saving the changes
To save changes made to the tested applications list, select File > Save from the TestComplete main menu.
To discard any changes, close the editor and click No when TestComplete asks if you want to save the changes.


 To open the editor
