Region checkpoints and other operations and scripting methods which you use to verify, compare and find images in tests have parameters that let you make the comparison and search procedures “smarter”. For complete information about the parameters, see the How Image Comparison Works or descriptions of the methods and operations. Here we would like to outline the main ideas:
 Ignoring a slight difference between images
 Comparing images in which some parts are variable
 Including the mouse cursor image
 Searching within some area of an image
 Comparing and finding images when the Aero UI theme is active
Ignoring a slight difference between images
To ignore a slight difference between images, use the PixelTolerance parameter. If the number of different pixels is less than or equal to PixelTolerance, TestComplete treats the images as equal. By default, this parameter is 0, which means that if one pixel is different, the images are considered unequal.
| Tip: | If the comparison fails and the compared images are slightly different, TestComplete calculates a recommended value for the PixelTolerance parameter and posts it to the Details panel of the test log. After you set the PixelTolerance parameter value to the recommended value, the images will be treated as equal during the next comparison. |
For example, the following two images of edit boxes are equivalent, with the exception of the input cursor’s image and some font smoothing artifacts. Yet, a pixel-by-pixel comparison will report that the images are different.
| Image1 | Image2 | Image Difference |
|---|---|---|
 |
 |
 |
In the described case, a possible solution is to specify a pixel “gap” of 50 pixels. This will solve the problem.
Regions.Edit1_png.Check("Edit2_png", false, false, 50);
Ignoring the color difference
The ColorTolerance parameter allows you to ignore certain difference between the colors of compared pixels. When ColorTolerance is 0, which is the default value, the compared pixels are considered identical only if they have exactly the same color. When ColorTolerance is 255, pixels of any color are considered identical.
By assigning an appropriate value to this parameter, you can compare UI elements whose color is different - windows and controls captured in different UI themes, skins, color schemes and so on.
For example, the two images below display the same button whose image was taken in various color schemes. If they are compared without additional parameters, they will be definitely reported as unequal.
| Image1 | Image2 | Image Difference |
|---|---|---|
 A button captured in the Blue Windows XP scheme. |
 A button captured in the Silver Windows XP scheme. |

|
However, comparing them with the ColorTolerance parameter set to 50 makes TestComplete consider these images as equal.
Regions.ButtonSilver_png.Check("ButtonBlue_png", false, false, 0, 50);
Comparing images in which some parts are variable
As a rule, image comparison is performed in order to find dissimilarities between images and to draw your attention to them. However, images may contain certain areas that are known to be different, and which should not be taken into account during comparison. The typical examples of such areas are backgrounds, semi-transparent borders or editors, or labels that display the current date/time, user name or other information that should be ignored in the given context.
There are at least two ways to compare images ignoring some variable parts in them: fill the part to be ignored with a “transparent” color, or create a mask that will define which parts to compare. The sections below describe each of the approaches.
Filling With Transparent Color
The Transparent parameter lets you compare window images in which some parts are variable. This technique implies modifying of the baseline image used by the comparison engine.
If the Transparent parameter is True, TestComplete treats the color of the top-left pixel of the baseline image as a “transparent” color and excludes all the pixels that have this color from comparison.
You can use a “transparent” color to mark image areas that should not be compared. To do this, you need to modify the baseline copy of an image in the following manner:
- Open the baseline image in an image editor (for instance, in MSPaint).
- Select the color that you will use as the “transparent” color.
- Change the color of the top-left pixel to the “transparent” color.
- Use the “transparent” color to fill image areas that you want to exclude from comparison.
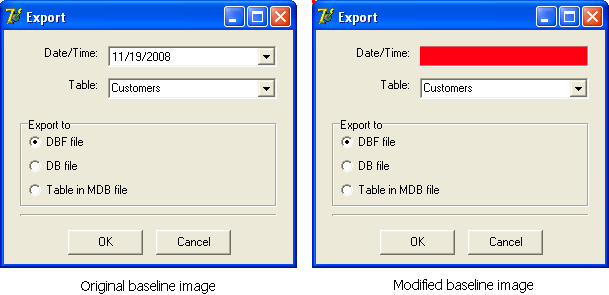
After you perform these actions, you can use the baseline copy for comparison. For instance, in the picture below, the “transparent” color is red and the Date/Time edit field will be excluded from comparison:

Using Comparison Mask
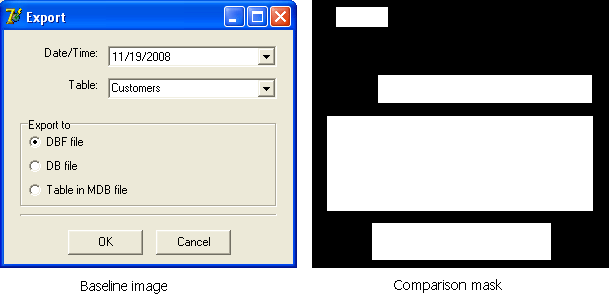
Another parameter that allows comparing images with variable parts is Mask. To use this parameter, you need to create a third image that should be used during comparison - a comparison mask. It is another Picture object that contains a black-and-white image. White pixels on the mask are taken into account during comparison, whereas black pixels are ignored.
To create a comparison mask:
- Specify the desired comparison mask while creating a region checkpoint.
– or –
- Open the baseline copy of the image in an image editor (for instance, in MSPaint).
- Select the areas you want to be compared and fill them with the white color.
- Fill the rest of the image with the black color.
- Save the created image under another name.
For instance, the following image is a comparison mask for the Export dialog.

Including the mouse cursor image
Generally, the captured screenshots do not contain the image of the mouse cursor, thus, image comparison does not depend on the cursor position. However, sometimes, you may need to pay attention to the exact position of the mouse pointer. In this case, you should enable the Mouse comparison engine parameter that commands TestComplete to capture screenshots along with the mouse pointer image and take it into account when comparing images.
IncludeMouse=true;
Regions.FindDialog_png.Check(Aliases.MyApp.dlgFind, false, IncludeMouse);
Searching within some area of an image
The Find and FindRegion methods have special parameters that let you perform a search within some area of an image. This lets you significantly increase the search speed, especially if the image is large. For more information on these parameters, see Regions.Find, Regions.FindRegion and Picture.Find.
To specify an image rectangle where you would like to perform the search, pass the appropriate parameters (the top and left coordinates and the width and height) to the Picture method, which you use to obtain the Picture object. That is, instead of –
pict = w.Picture()
– use –
pict = w.Picture(10, 10, 200, 300)
Comparing and finding images when the Aero UI theme is active
The Aero theme uses visual effects like translucency and image overlaying that decrease the quality of image comparison. In addition, screenshots of application windows captured by TestComplete may include a redundant frame around the window. This is caused by the operating system Desktop Window Manager (DWM) component that affects the screen rendering. See Capturing Images When the Aero UI Theme Is Active for more information.
Therefore, we recommend that you disable the Desktop Window Manager before capturing screenshots. As an alternative, you can enable the Disable DWM before capturing image option in the TestComplete project. This will command TestComplete to disable the Desktop Window Manager upon capturing screenshots automatically.
If the Desktop Windows Manager is enabled and the project option is disabled, use any of the following methods:
 Save the baseline image retaining the alpha channel
 Compare the images combining the transparent areas and color tolerance
Save the baseline image retaining the alpha channel
Screenshots that TestComplete captures contain data on the transparency of each pixel - the so-called alpha channel. You need to save the needed screenshot in the BMP, PNG or TIFF format which supports the alpha channel and use it as the baseline image for comparison. TestComplete recognizes the pixel transparency data provided by the alpha channel and performs the comparison appropriately.
For instance, the first of the images below contains the alpha channel. When it is compared against the second image, TestComplete considers the two images to be identical:
| Image1 | Image2 |
|---|---|
 |
 |
Compare the images combining the transparent areas and color tolerance
That is, you need to combine the techniques described in the Comparing images in which some parts are variable and Ignoring the color difference sections when comparing images. Thus, you will have to use a “transparent” color or a comparison mask to mark the regions to be compared and to specify the color tolerance to ignore hue differences between semi-transparent controls.
For instance, the images below depict a fragment of the same dialog captured on different backgrounds. None of the images has the alpha channel. As a result, a pixel-by-pixel comparison will fail:
| Image1 | Image2 | Image Difference |
|---|---|---|
 |
 |
 |
However, specifying a comparison mask and setting ColorTolerance to 50 will solve the problem.
Regions.TranslucentDlg1_png.Check("TranslucentDlg2_png", false, false, 0, 50, "TranslucentMask.png");
The last method is less reliable and requires more efforts, therefore, we recommend using images with the alpha channel to compare screenshots.
See Also
Region Checkpoints
About Region Checkpoints
How Image Comparison Works
Factors Affecting Image Comparison
Why Image Comparison Fails
Alternatives to Region Checkpoints
Finding an Image Within Another Image
