A Microsoft Access database or project typically contains tables, queries, forms that are used to view, input and modify data, macros, different reports and various other objects. You can test your Microsoft Access databases (projects) in the same way you would test any other Windows application: by simulating mouse clicks and keystrokes. Also, you can use low-level procedures and other features provided by TestComplete for testing black-box applications (see Project Items).
To obtain access to elements of a Microsoft Access form and to element’s properties and methods, you should use the Microsoft Active Accessibility Support plugin and work with Microsoft Access via COM. Most likely, you will use these technologies together since MSAA does not provide you access to internal properties and methods while the COM-based approach does not let you simulate user actions. The rest of the topic provides more information on these approaches:
Accessing Form Elements and Simulating User Actions
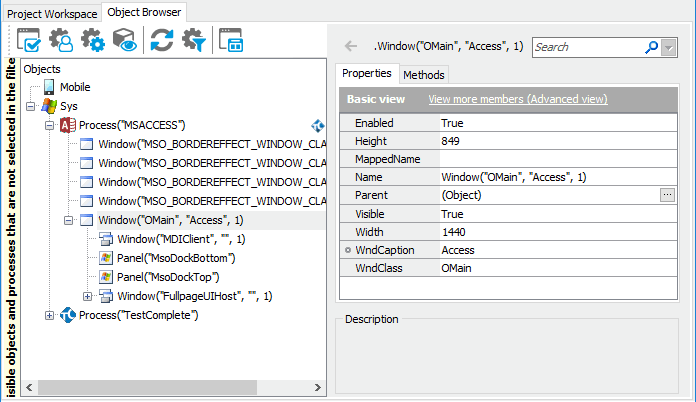
Before you start simulating user actions, you have to obtain access to the desired UI forms and elements. If you explore a Microsoft Access database or project in the Object Browser (for instance, the sample Northwind database shipped with Microsoft Access), you can see that by default TestComplete can access application forms, but it does not have access to form elements. You need a way to make the form elements visible to TestComplete in order to simulate actions over them.

To access form elements, use the TestComplete MSAA engine. Since Microsoft Access supports Microsoft Active Accessibility (MSAA), you can use the TestComplete MSAA engine to access form elements. This engine is included in the Microsoft Active Accessibility Support plugin. This plugin is installed and enabled by default during the TestComplete installation. You can check the plugin status in the File > Install Extensions dialog. You can find the plugin in the Common group.
Configure your project to apply the MSAA engine to Microsoft Access windows:
- Right-click your project in the Project Explorer panel and choose Edit | Properties from the context menu. TestComplete will open the Project Properties page in the Workspace panel.
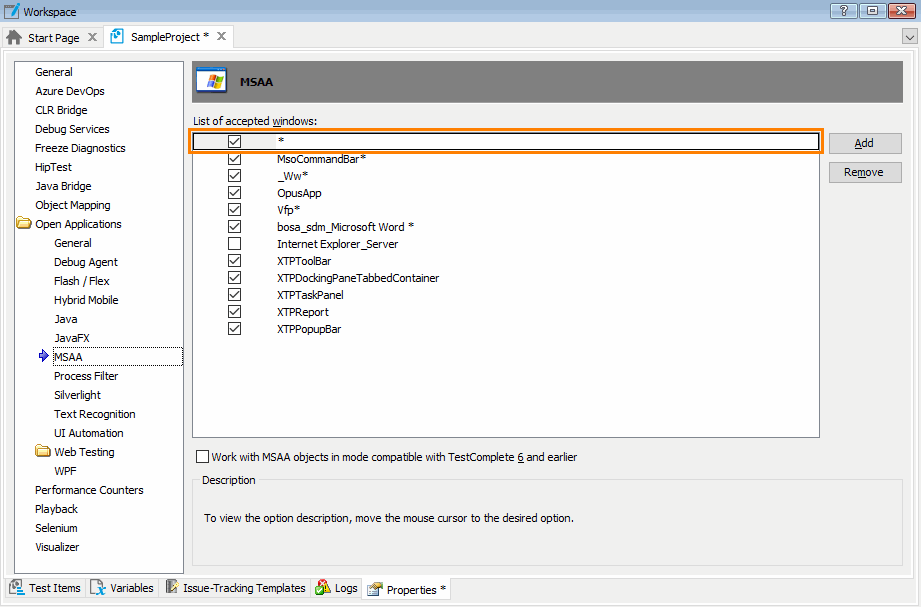
- In the page, select Open Applications | MSAA from the list on the left. This will open the project’s MSAA options for editing.
- Select the check box corresponding to the asterisk (*) class name:
TestComplete will then use the MSAA engine to expose methods and properties of any existing window.

- Save all project changes, for example, by pressing Ctrl+S or selecting File | Save All from the TestComplete main menu.
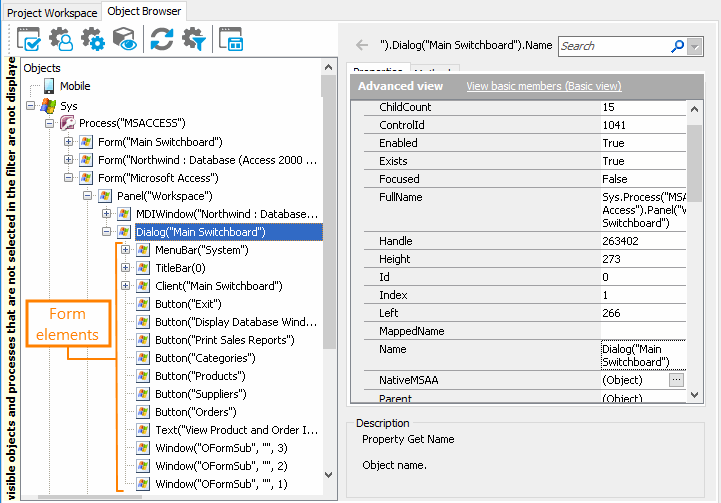
TestComplete now has access to form elements. These elements are accessible via the MSAA engine and are shown with the  icon. The name of each MSAA node consists of its type name, which indicates the element’s accessible role, and the element’s accessible name. For example, on the following figure the
 Button("Products") object on the image below corresponds to the Products button of the Main Switchboard form of the Northwind database:

If the element does not have an accessible name, TestComplete generates and assigns a name to it (for more information, see Using Microsoft Active Accessibility).
The Button("Products") object contains methods and properties exposed by the Microsoft Active Accessibility Support plugin as well as methods, properties and actions provided by TestComplete for onscreen objects. The actions provided by TestComplete include the Click, ClickR, DblClick and other “click” actions that you can use to simulate user actions over the button. The following code demonstrates how you can simulate a mouse click over the Products button of the Main Switchboard form:
JavaScript, JScript
var p, frm;
p = Sys.Process("MSACCESS");
frm = p.Form("Microsoft Access").Panel("Workspace").Dialog("Main Switchboard");
frm.Activate();
frm.Button("Products").Click();
Python
p = Sys.Process("MSACCESS");
frm = p.Form("Microsoft Access").Panel("Workspace").Dialog("Main Switchboard");
frm.Activate();
frm.Button("Products").Click();
VBScript
Dim p, frm
Set p = Sys.Process("MSACCESS")
Set frm = p.Form("Microsoft Access").Panel("Workspace").Dialog("Main Switchboard")
frm.Activate
frm.Button("Products").Click
DelphiScript
var p, frm;
begin
p := Sys.Process('MSACCESS');
frm := p.Form('Microsoft Access').Panel('Workspace').Dialog('Main Switchboard');
frm.Activate;
frm.Button('Products').Click;
end;
C++Script, C#Script
var p, frm;
p = Sys["Process"]("MSACCESS");
frm = p["Form"]("Microsoft Access")["Panel"]("Workspace")["Dialog"]("Main Switchboard");
frm["Activate"]();
frm["Button"]("Products")["Click"]();
The following code demonstrates how to simulate user input into the Bill To box and the Products and Quantity columns in the Orders form of the Northwind database.
| Note: | To execute this code, the Main Switchboard form of the Northwind database must be visible on screen. |
JavaScript, JScript
function Test()
{
var p, workspace, frmSwitchboard, frmOrders, frmSubform, colProduct, colQuantity;
// NB: The "Main Switchboard" form of the Northwind database must be visible on screen
// Obtain the Access process and the "Main Switchboard" form
p = Sys.Process("MSACCESS");
workspace = p.Form("Microsoft Access").Panel("Workspace");
frmSwitchboard = workspace.Dialog("Main Switchboard");
// Open and obtain the "Orders" form
frmSwitchboard.Activate();
frmSwitchboard.Button("Orders").Click();
frmOrders = workspace.MDIWindow("Orders");
// Add a new record
frmOrders.Window("OSUI").Click(210, 8);
// Populate the "Bill To" field
frmOrders.ComboBox("Bill To:").Keys("Around the Horn[Enter]");
// Populate the "Products" grid
frmSubform = frmOrders.Window("OFormSub", "", 2).Panel("Orders Subform");
colProduct = frmSubform.ComboBox(1);
colQuantity = frmSubform.Edit(3);
// Add a product
colProduct.Click();
colProduct.Keys("Alice Mutton[Enter]");
colQuantity.Keys("10");
// Add another product
frmSubform.Keys("[Down][Home]");
colProduct.Keys("Chocolade[Enter]");
colQuantity.Keys("20");
}
Python
def Test():
  # NB: The "Main Switchboard" form of the Northwind database must be visible on screen

  # Obtain the Access process and the "Main Switchboard" form
  p = Sys.Process("MSACCESS");
  workspace = p.Form("Microsoft Access").Panel("Workspace");
  frmSwitchboard = workspace.Dialog("Main Switchboard");

  # Open and obtain the "Orders" form
  frmSwitchboard.Activate();
  frmSwitchboard.Button("Orders").Click();
  frmOrders = workspace.MDIWindow("Orders");

  # Add a new record
  frmOrders.Window("OSUI").Click(210, 8);

  # Populate the "Bill To" field
  frmOrders.ComboBox("Bill To:").Keys("Around the Horn[Enter]");

  # Populate the "Products" grid
  frmSubform = frmOrders.Window("OFormSub", "", 2).Panel("Orders Subform");
  colProduct = frmSubform.ComboBox(1);
  colQuantity = frmSubform.Edit(3);

  # Add a product
  colProduct.Click();
  colProduct.Keys("Alice Mutton[Enter]");
  colQuantity.Keys("10");

  # Add another product
  frmSubform.Keys("[Down][Home]");
  colProduct.Keys("Chocolade[Enter]");
  colQuantity.Keys("20");
VBScript
Sub Test
Dim p, workspace, frmSwitchboard, frmOrders, frmSubform, colProduct, colQuantity
' NB: The "Main Switchboard" form of the Northwind database must be visible on screen
' Obtain the Access process and the "Main Switchboard" form
Set p = Sys.Process("MSACCESS")
Set workspace = p.Form("Microsoft Access").Panel("Workspace")
Set frmSwitchboard = workspace.Dialog("Main Switchboard")
' Open and obtain the "Orders" form
frmSwitchboard.Activate
frmSwitchboard.Button("Orders").Click
Set frmOrders = workspace.MDIWindow("Orders")
' Add a new record
frmOrders.Window("OSUI").Click 210, 8
' Populate the "Bill To" field
frmOrders.ComboBox("Bill To:").Keys("Around the Horn[Enter]")
' Populate the "Products" grid
Set frmSubform = frmOrders.Window("OFormSub", "", 2).Panel("Orders Subform")
Set colProduct = frmSubform.ComboBox(1)
Set colQuantity = frmSubform.Edit(3)
' Add a product
colProduct.Click
colProduct.Keys("Alice Mutton[Enter]")
colQuantity.Keys("10")
' Add another product
frmSubform.Keys("[Down][Home]")
colProduct.Keys("Chocolade[Enter]")
colQuantity.Keys("20")
End Sub
DelphiScript
procedure Test;
var p, workspace, frmSwitchboard, frmOrders, frmSubform, colProduct, colQuantity;
begin
// NB: The 'Main Switchboard' form of the Northwind database must be visible on screen
// Obtain the Access process and the 'Main Switchboard' form
p := Sys.Process('MSACCESS');
workspace := p.Form('Microsoft Access').Panel('Workspace');
frmSwitchboard := workspace.Dialog('Main Switchboard');
// Open and obtain the 'Orders' form
frmSwitchboard.Activate;
frmSwitchboard.Button('Orders').Click;
frmOrders := workspace.MDIWindow('Orders');
// Add a new record
frmOrders.Window('OSUI').Click(210, 8);
// Populate the 'Bill To' field
frmOrders.ComboBox('Bill To:').Keys('Around the Horn[Enter]');
// Populate the 'Products' grid
frmSubform := frmOrders.Window('OFormSub', '', 2).Panel('Orders Subform');
colProduct := frmSubform.ComboBox(1);
colQuantity := frmSubform.Edit(3);
// Add a product
colProduct.Click;
colProduct.Keys('Alice Mutton[Enter]');
colQuantity.Keys('10');
// Add another product
frmSubform.Keys('[Down][Home]');
colProduct.Keys('Chocolade[Enter]');
colQuantity.Keys('20');
end;
C++Script, C#Script
function Test()
{
var p, workspace, frmSwitchboard, frmOrders, frmSubform, colProduct, colQuantity;
// NB: The "Main Switchboard" form of the Northwind database must be visible on screen
// Obtain the Access process and the "Main Switchboard" form
p = Sys["Process"]("MSACCESS");
workspace = p["Form"]("Microsoft Access")["Panel"]("Workspace");
frmSwitchboard = workspace["Dialog"]("Main Switchboard");
// Open and obtain the "Orders" form
frmSwitchboard["Activate"]();
frmSwitchboard["Button"]("Orders")["Click"]();
frmOrders = workspace["MDIWindow"]("Orders");
// Add a new record
frmOrders["Window"]("OSUI")["Click"](210, 8);
// Populate the "Bill To" field
frmOrders["ComboBox"]("Bill To:")["Keys"]("Around the Horn[Enter]");
// Populate the "Products" grid
frmSubform = frmOrders["Window"]("OFormSub", "", 2)["Panel"]("Orders Subform");
colProduct = frmSubform["ComboBox"](1);
colQuantity = frmSubform["Edit"](3);
// Add a product
colProduct["Click"]();
colProduct["Keys"]("Alice Mutton[Enter]");
colQuantity["Keys"]("10");
// Add another product
frmSubform["Keys"]("[Down][Home]");
colProduct["Keys"]("Chocolade[Enter]");
colQuantity["Keys"]("20");
}
Accessing Element Properties and Methods
When exploring your Access application in the Object Browser, you may notice that even though the Microsoft Active Accessibility Support plugin provides access to form elements, it does not expose the element’s properties and methods that you can edit in the Microsoft Access’s Properties window. To get these properties in TestComplete, you can create a script that will work with Microsoft Access via COM. Microsoft Access is a COM server and its internals can be accessed from a COM client application. To explore the internal object structure, you can use the TestComplete Object Browser:
-
Open the desired database in Microsoft Access.
-
Switch to the Object Browser panel in TestComplete.
-
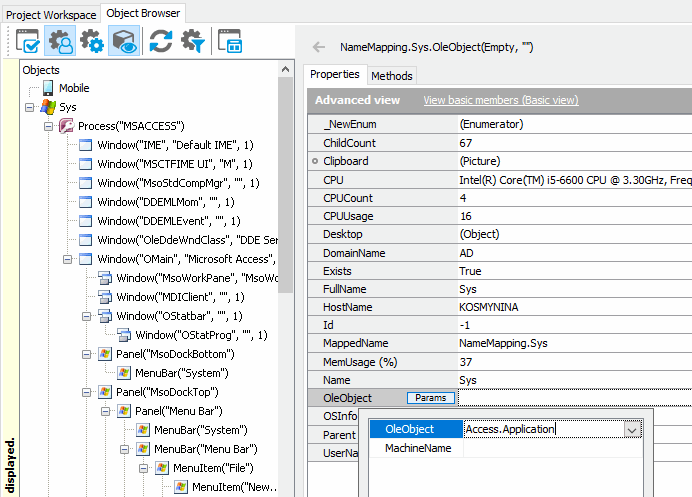
Select the Sys node in the object tree and switch to the Properties tabbed page.
-
Press the Params button of the OleObject property. This will call a window where you can specify the COM server to be explored.
-
Type Access.Application into the OleObject edit box and press OK.

TestComplete will connect to Microsoft Access via OLE and it will display (Object) for the
OleObjectproperty in the Object Browser. Thus, you get the access point to the Microsoft Access application. -
Press the ellipsis button of the
OleObjectproperty. TestComplete will update the Object Browser and display methods and properties of the Access’sApplicationobject. By using methods and properties of this object you can get access to form elements and their properties and methods. For instance, to explore properties of the Products button that reside on the Main Switchboard form, you should go through the following sequence of properties:OleObject (IDispatch) -> Forms -> Item("Main Switchboard") -> Products
| Note: | For complete information on Microsoft Access objects, properties and methods, see Microsoft Access documentation. |
The following code snippet demonstrates, how to modify the caption of the Products button that resides on the Main Switchboard form of the Northwind database. Note that before working with a form via OLE, make sure the form is visible on screen.
JavaScript
var App, Frm, Btn;
// The Main Switchboard form must be visible
App = getActiveXObject("Access.Application");
Frm = App.Forms.Item("Main Switchboard");
Btn = Frm.Controls.Item("Products");
Btn.Caption = "&New caption";
JScript
var App, Frm, Btn;
// The Main Switchboard form must be visible
App = Sys.OleObject("Access.Application");
Frm = App.Forms.Item("Main Switchboard");
Btn = Frm.Controls.Item("Products");
Btn.Caption = "&New caption";
Python
# The Main Switchboard form must be visible
App = Sys.OleObject("Access.Application");
Frm = App.Forms.Item("Main Switchboard");
Btn = Frm.Controls.Item("Products");
Btn.Caption = "&New caption";
VBScript
' The Main Switchboard form must be visible
Set App = Sys.OleObject("Access.Application")
Set Frm = App.Forms.Item("Main Switchboard")
Set Btn = Frm.Controls.Item("Products")
Btn.Caption = "&New caption"
DelphiScript
var
App, Frm, Btn : OleVariant;
begin
// The Main Switchboard form must be visible
App := Sys.OleObject['Access.Application'];
Frm := App.Forms.Item('Main Switchboard');
Btn := Frm.Controls.Item('Products');
Btn.Caption := '&New caption';
end;
C++Script, C#Script
var App, Frm, Btn;
// The Main Switchboard form must be visible
App = Sys["OleObject"]("Access.Application");
Frm = App["Forms"]["Item"]("Main Switchboard");
Btn = Frm["Controls"]["Item"]("Products");
Btn["Caption"] = "&New caption";
The following code demonstrates how to change the value of the Bill To box that resides on the Orders form of the Northwind database.
JavaScript
var App, Frm, EditBox;
// The Orders form must be visible
App = getActiveXObject("Access.Application");
Frm = App.Forms.Item("Orders");
EditBox = Frm.Controls.Item("CustomerID");
EditBox.Text = "Around the Horn";
JScript
var App, Frm, EditBox;
// The Orders form must be visible
App = Sys.OleObject("Access.Application");
Frm = App.Forms.Item("Orders");
EditBox = Frm.Controls.Item("CustomerID");
EditBox.Text = "Around the Horn";
Python
# The Orders form must be visible
App = Sys.OleObject("Access.Application");
Frm = App.Forms.Item("Orders");
EditBox = Frm.Controls.Item("CustomerID");
EditBox.Text = "Around the Horn";
VBScript
' The Orders form must be visible
Set App = Sys.OleObject("Access.Application")
Set Frm = App.Forms.Item("Orders")
Set EditBox = Frm.Controls.Item("CustomerID")
EditBox.Text = "Around the Horn"
DelphiScript
var
App, Frm, EditBox : OleVariant;
begin
// The Orders form must be visible
App := Sys.OleObject['Access.Application'];
Frm := App.Forms.Item('Orders');
EditBox := Frm.Controls.Item('CustomerID');
EditBox.Text := 'Around the Horn';
end;
C++Script, C#Script
var App, Frm, EditBox;
// The Orders form must be visible
App = Sys["OleObject"]("Access.Application");
Frm = App["Forms"]["Item"]("Orders");
EditBox = Frm["Controls"]["Item"]("CustomerID");
EditBox["Text"] = "Around the Horn";
See Also
Testing Microsoft Access Applications
Retrieving Data From Access Reports
Using Microsoft Active Accessibility
Working With COM Objects

 Accessing Form Elements and Simulating User Actions