About
Typically, TestComplete recognizes windows and controls by their properties (for example, by their class names, captions, IDs, and so on). However, there can be situations when TestComplete cannot access properties of a control or window in your tested application. This can happen, for example, if TestComplete does not support the control, or if the needed control is a graphical element rendered directly on the screen (for example, a bitmap or chart).
To test such windows and controls, you can command TestComplete to capture their text contents. To do this, TestComplete uses optical character recognition (OCR). It translates images of rendered text into computer-readable characters and works with the areas that contain the needed text. This helps you have more stable and flexible tests in comparison with tests that use coordinate-based mouse clicks.
Video Tutorial
When to use optical character recognition
You can use the optical character recognition to:
-
Get the text contents of your tested application or a specific UI element to verify your tested application’s data or state.
- Verify data displayed in a tabular form.
-
Find the needed UI element in your tested application by its text contents and simulate user actions on it.
Requirements
-
Your TestComplete version must be 12.60 or later.
-
You need an active license for the TestComplete Intelligent Quality add-on.
-
The Intelligent Quality add-on must be enabled in TestComplete.
You can enable the add-on during TestComplete installation. If you did not enable the add-on during the installation, you can do this at any moment later via the File > Install Extensions dialog. To do that, select File > Install Extensions from the TestComplete main menu and enable the Intelligent Quality > Intelligent Quality Core plugin in the resulting dialog.
-
Optical Character Recognition support must be enabled in TestComplete.
By default, it is enabled automatically if you enable the Intelligent Quality add-on during TestComplete installation. If you experience issues with optical character recognition in your tests, select File > Install Extensions from the TestComplete main menu and make sure the Optical Character Recognition plugin is enabled (you can find it in the Intelligent Quality group). If the plugin is disabled, enable it. In the confirmation message that TestComplete shows when you enable the plugin, click the link to read a third-party license agreement. If you agree to the license terms, click Enable OCR.
In addition, make sure that you do not have the legacy OCR plugin installed and enabled. You can find the plugin in the Common group.
-
Your computer must have access to the ocr.api.dev.smartbear.com web service. If you have firewalls or proxies running in your network, they should allow your computer to access the web service.
-
Your firewall must allow traffic through port 443.
For detailed information on requirements that must be met and on how you can configure your test environment, see Optical Character Recognition - Requirements.
How it works
TestComplete can recognize the text of UI elements you select on screen as well as the text in images you capture from screen or load from files. TestComplete sends the data to be recognized to the ocr.api.dev.smartbear.com web service by SmartBear. This web service forwards incoming requests to Google Vision API and transfers the recognition results back to TestComplete.
In your tests, you can access the entire recognized text or individual text blocks or tabular data. If the recognized text belongs to a UI element, you can command TestComplete to locate that element on screen by its text and simulate various actions on it, for instance, clicks or touches. To learn how to do that, see below.
Security
To recognize text, TestComplete uses the ocr.api.dev.smartbear.com service, which, in its turn, uses Google Vision API. Data to recognize and recognition results are sent to the service via HTTPS, that is, the connection is secured and the data is encrypted. SmartBear neither stores, nor shares the sent data with any other third-parties.
For information on how Google Vision API handles data, please see cloud.google.com/vision/docs/data-usage.
Create OCR-based tests
Automatically
The easiest way to create a test is to record it:
Before you start recording
Select Tools > Options from the TestComplete main menu and enable the Engines > Recording > Record unsupported controls using OCR option. TestComplete will automatically identify unsupported controls by their text during recording and will record your actions on screen areas that contain this text.
If the option is off, TestComplete will record coordinate-based actions (if you have a non-instrumented Android application, it will record image-based actions).
Record
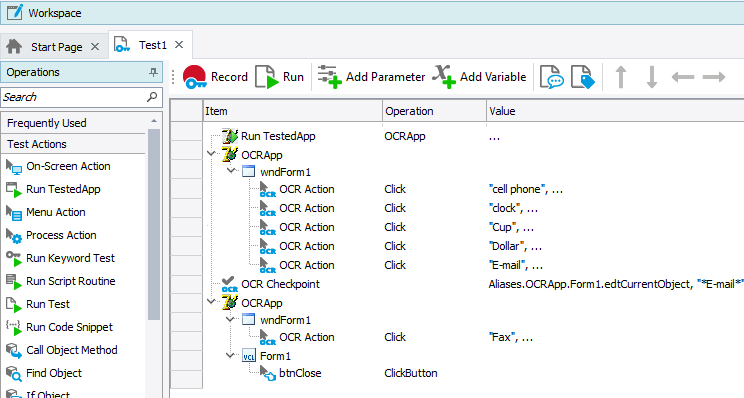
During recording, TestComplete automatically detects windows and controls with which you are interacting. If a window or control is supported by TestComplete, the latter records a test command that is specific to that window or control. If a window or control is not supported, TestComplete will record coordinate-based mouse actions and keyboard events for it. The OCR engine helps you record object-based commands for unsupported controls and make the recorded test more independent from screen coordinates, that is, more stable.
The following image shows an example of a recorded test that uses optical character recognition:

Manually
-
Prepare your application for testing. The way you do this depends on the application type. See Applications Testing.
-
For mobile applications: connect TestComplete to your mobile device. To learn how to do that, see Preparing iOS Devices (Legacy) or Connecting TestComplete to Android Devices (Legacy) (depending on your device type). Open the Mobile Screen window.
-
Launch your tested application.
-
In your application, locate the areas where you will recognize text by using optical character recognition.
-
In your test, add the commands that will recognize the text, verify it or use it to find the tested object on screen:
In keyword test
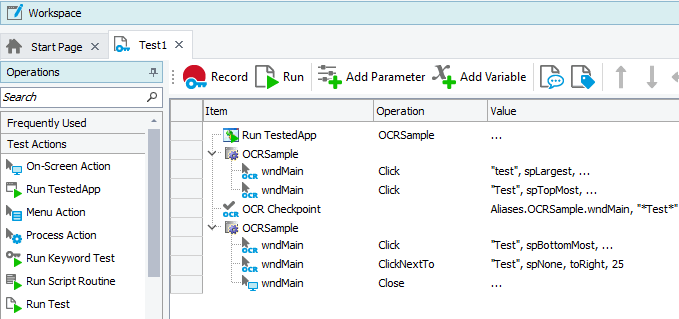
To recognize the text content of an onscreen object and check whether it is correct, use the OCR Checkpoint operation. To locate a control by its text content (or by surrounding text) and to simulate user actions on the control, use the OCR Action operation.
The image below shows a sample keyword test that works with an application using OCR:

Script
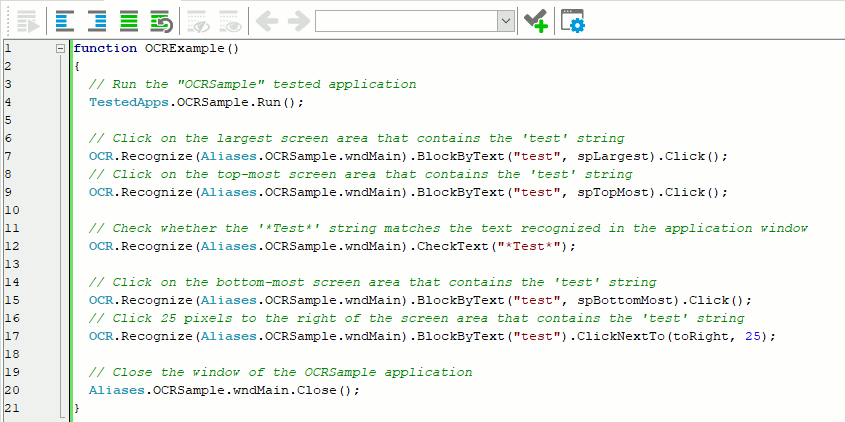
Use the
OCR.Recognizemethod in your script tests to recognize the text rendered on screen. The method will return an object that provides access to the area that contains the recognized text:-
To get all the recognized text, use the
OCR.Recognize.FullTextproperty. -
To access individual fragments (blocks) of the recognize text, use the
OCR.Recognize.Blockproperty or theOCR.Recognize.BlockByTextmethod. -
To access tabular data, use the
OCR.Recognize.AsTableproperty or theOCR.Recognize.DetectTableproperty. Use the latter to get the tabular data if there are several tables within the same recognition area. -
To verify that the tested application contains the specified text, use the
OCR.Recognize.CheckTextmethod. -
To verify that a grid control in your tested application contains the specified text, use a table checkpoint.
-
To simulate user actions over an individual fragment (block) of the recognized text, use the methods that the
OCR.Recognize.BlockandOCR.RecoginzeBlockByTextobjects provide. For example, theClickorHoverMousemethods. -
To simulate user actions over an area that is next to a fragment (block), use the
ClickNextTo,TouchNextToandSendKeysmethods that theOCR.Recognize.BlockandOCR.RecoginzeBlockByTextobjects provide. -
To simulate user actions over a text block in a table cell, use the methods of the object that the
Cellproperty returns.
For example:

-
Addressing objects by their text content
In keyword tests, you use the OCR Action operation to find an area of a specified on-screen object containing the needed text and simulate user actions on it:

In script tests, to access an object by its text, use the OCR.Recognize.Block or OCR.Recognize.BlockByText methods. The methods recognize the text of an on-screen object and provide access to an individual portion of recognized text by its index among other recognized text portions or by its contents.
JavaScript, JScript
Python
VBScript
DelphiScript
C#Script
More information on optical character recognition
| To learn more about | See |
|---|---|
| Recognizing and checking text contents | Verify Text Contents |
| Recognizing and verifying text contents of grid controls | About Table Checkpoints |
| Locating controls by their text to simulate user actions on them | Simulate User Actions |
| Alternative approaches you can use to recognize objects that you cannot recognize by any standard means | Possible Alternatives to Optical Character Recognition |
| Resolving issues that may occur in OCR-based tests | Optical Character Recognition - Troubleshooting |
| Migrating your tests created in versions prior to 12.60 to the current OCR | Migrate Tests Created in Earlier Versions |
How do I start?
Follow this tutorial to learn how to create a simple test that uses optical character recognition to locate a UI element in an application:
See Also
Optical Character Recognition
Optical Character Recognition - Requirements

 Optical Character Recognition - Tutorial