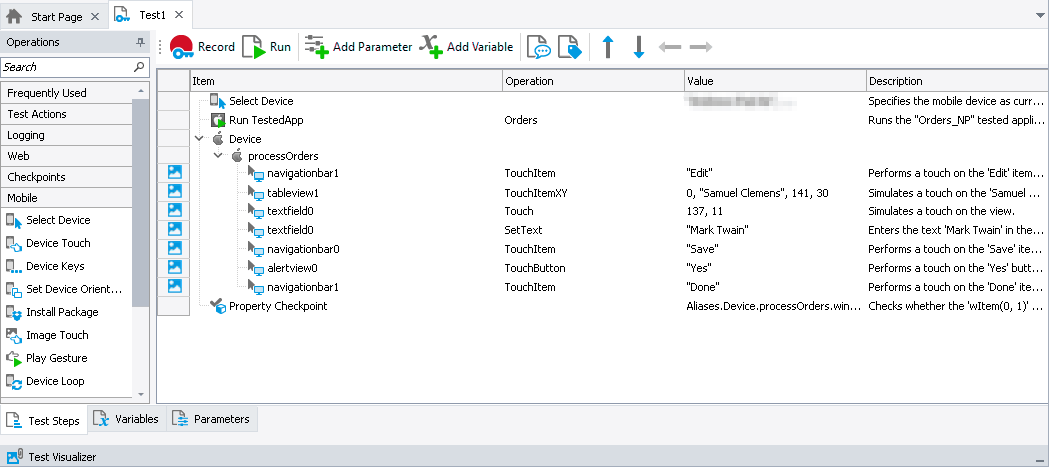
After you finish recording, TestComplete opens the recorded keyword test for editing and displays the test contents in the Keyword Test editor:

The recorded test is similar to the test shown in the image above. Your actual test may differ from this one. For example, it may contain some unnecessary touch actions.
The test contains the commands that correspond to the actions you performed on the Orders application during test recording. We call these test commands operations.
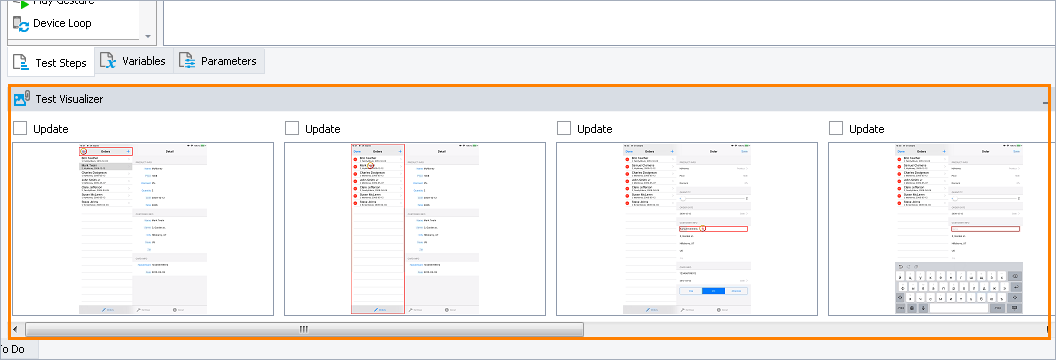
Below the commands there is the Test Visualizer panel that displays images which TestComplete captured for operations during test recording:

These images illustrate the recorded operations and help you better understand which action each operation performs. TestComplete captures images only for those operations that correspond to user actions (touching, dragging, typing text, and so on).
When you choose an operation in the editor, Test Visualizer automatically highlights the appropriate image, so you can easily see in which state the application was before the operation was executed. For more information on working with images, see the topics in the Test Visualizer section.
The first operation in the test is Select Device. It specifies the mobile device the test should work with. The other test operations refer to this device.

The second operation is Run TestedApp. It is used to launch the tested application (in our case, it is the Orders application) from a keyword test. TestComplete automatically records this operation when it launches the application automatically or when it detects that the application has been launched from the Recording toolbar.

Then there are the operations that simulate your actions with the application. These operations click the Edit button, select an item in the orders list, change the value of the text field, save the changes, and click the Done button.

For more information on simulating touch events, text input and other user actions from your tests, see Simulating User Actions on iOS Applications and Working With iOS Controls.
Finally, there is the comparison operation that you added during test recording:

As you can see, TestComplete automatically organizes the operations into groups that correspond to the mobile devices and processes you worked with. Grouping makes the test structure easier to understand and also provides some information on the object hierarchy that exists in the application under test.
You have recorded user actions on one mobile device and one process. So, you have two group nodes. The “device” node groups processes that were launched on the same device. The “process” node contains all of the actions that you simulated on the process windows and controls.

You may notice that the names of the tested process and its windows and controls differ from the names that you can see in the Object Browser panel. For instance, in the Object Browser, the tested process was named Process("Orders") while in the test it is called ProcessOrders; the navigation bar was called NavigationBar(1) while in the test it is called navigationbar1, and so on.
There is a logical reason for this: by default, TestComplete automatically generates and uses custom names for the objects you worked with during the test recording. Generating and assigning custom names is called name mapping. TestComplete maps the names because the default names may be difficult to understand. It may be difficult to determine which window or control corresponds to a name. Using mapped names makes the test easier to understand and more stable. Along with mapping names, TestComplete also stores images of the mapped objects in the Name Mapping repository. This helps you understand which window or control one or another mapped object matches. For more information on mapping names, see Name Mapping.

 Prev
Prev