
About tested application list
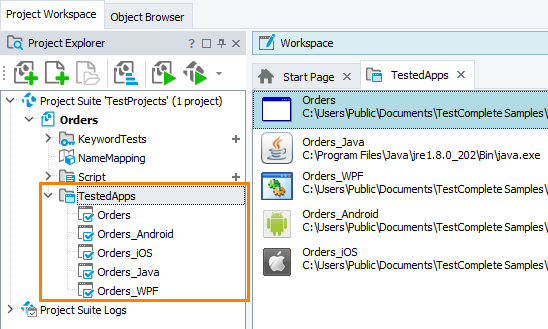
A TestComplete project can include a list of tested applications. You can see them in the Project Explorer under the TestedApps node:
This list helps you manage and work with tested applications easier. For instance:
-
You can configure and store the command-line arguments for the applications to launch, so you will not need to set the command line every time you need to run your application.
-
You can easily run the tested applications from your tests or from the TestComplete UI.
-
During the test recording, TestComplete can start these applications automatically, and so on.
Open the page
In the New Project wizard, you can add desktop tested applications to your project. To do this, you choose the Tested application check box on the first page of the wizard, and on the subsequent page, you select Mobile. Here is a sample view of the page:

Click the image to enlarge it.
When to choose
Select the Mobile application type if you are going to test Android or iOS applications:
-
Android applications (.apk) running on physical or virtual Android devices.
-
iOS applications (.ipa) running on iPhone and iPad devices.
Note that you can skip this step and add tested applications to your project at any time later. See Adding Tested Applications.
If you are going to start test recording right after creating the project, then you can also skip this step: by default, TestComplete will automatically add the applications, which you start during the recording, to the list of tested applications. This is controlled by TestComplete’s Recording > Add applications automatically to the Tested Application list option.
Requirements
To test Android and iOS applications with TestComplete, you need a license for the Mobile module.
Parameters
-
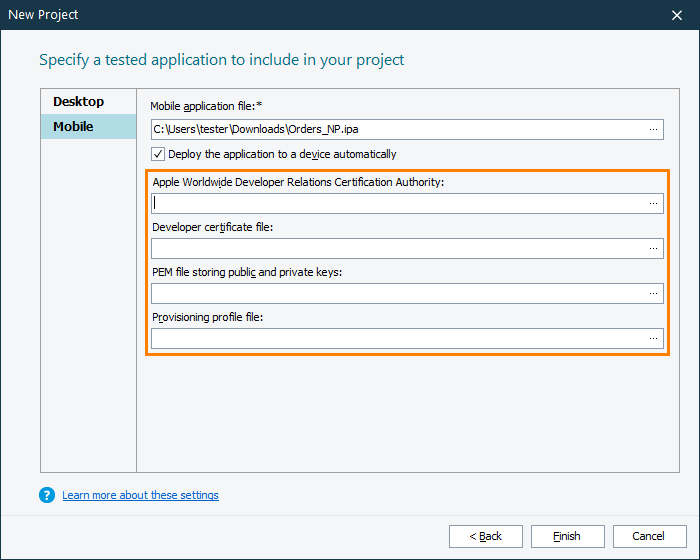
In the Application file text box, specify the package of your tested Android application (.apk) or an iOS archive file (.ipa). You can type the path to the file manually, or you can click the ellipsis button and browse for the file in the subsequent dialog.
-
The application you selected for testing must be instrumented, that is, it must be prepared for testing, so TestComplete can access its internal objects, methods, and properties. TestComplete will automatically check whether the application is instrumented or not. If your Android or iOS application is not instrumented, TestComplete will instrument it automatically. All you need to do is to specify how the application must be signed. The way you do this depends on the application type:
-
Deploy the application to a device automatically – Select this check box to command TestComplete to install the selected Android or iOS application to your mobile device whenever you start that application when recording or playing back a test. If the check box is clear, you will have to deploy the application to the mobile device manually before you start recording or playing back a test.
-
After you configured the parameters, click Finish. TestComplete will create the project and will add the specified application to the project’s TestedApps collection.
 Android applications
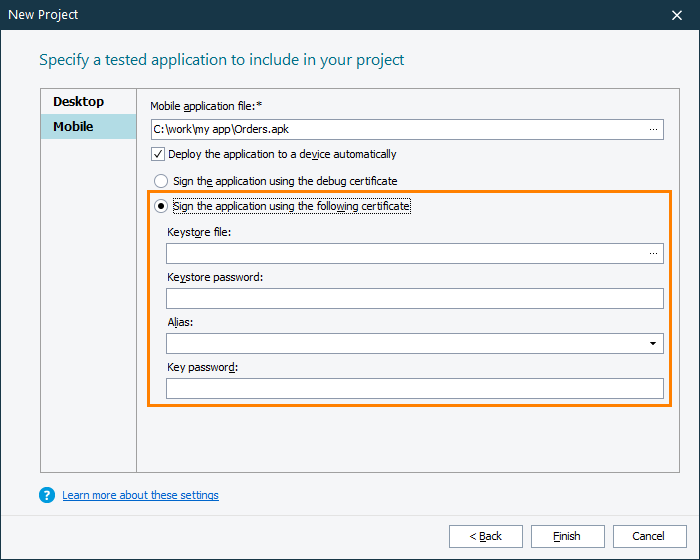
See Also
Create New Project Wizard
About Tested Applications
Creating Projects and Project Suites