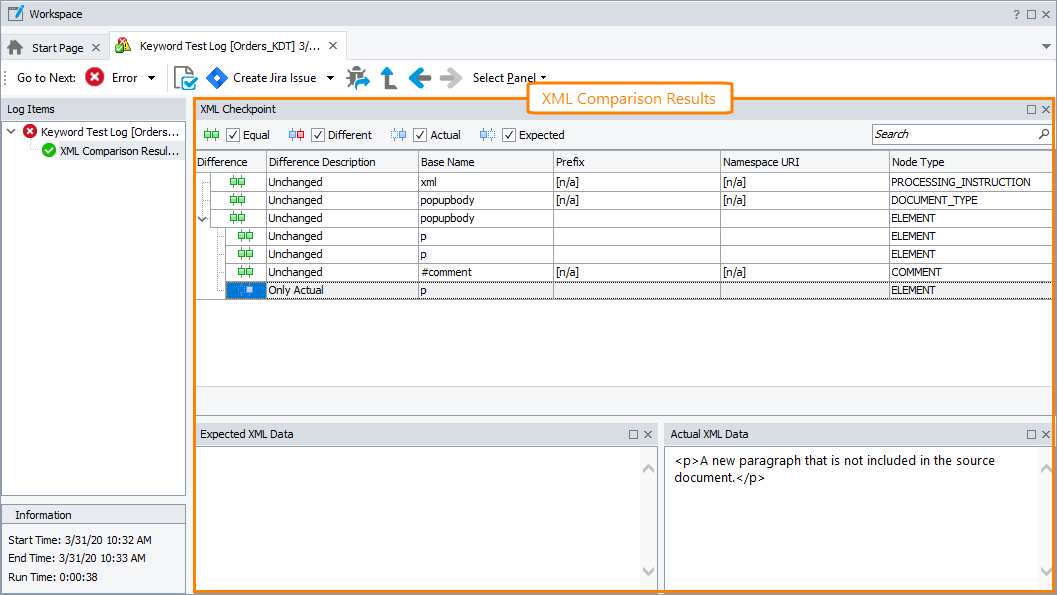
The XML Comparison Results page is formed by the Compare method of the XMLCheckpoint object. The page is displayed when you click the Details link in the Link column of the Test Log panel.The page displays the differences between two XML documents that were compared by this method. One of them is the document stored in the XMLCheckpoint project element that corresponds to the XMLCheckpoint object. This document is called expected. The other is the document passed to the method as a parameter. This document is called actual.
By default, the page displays only the differences between the compared documents’ nodes. If two nodes are the same, they are not displayed on the page. To display information on unchanged nodes, enable the Extended logging checkpoint setting before comparison.
These are the following possible difference types:
-
The node’s expected value differs from the actual value.
-
The node’s attributes differ.
-
The node exists in the expected document, but it is absent from the actual document.
-
The node exists in the actual document, but it is absent from the expected document.
-
The node’s expected and actual values coincide, but some child nodes(s) differ from each other.
The page displays information about the differences using the following columns:
| Column | Description |
|---|---|
| Difference and Difference Description |
Specifies the difference type. Possible values:
|
| Base Name | The node’s name (excluding the namespace prefix). |
| Prefix | The node’s namespace (if any). If the node does not belong to any namespace, the column displays [n/a]. If the prefixes were ignored during the comparison, the column displays [ignored]. |
| Namespace URI | The universal resource identifier of the namespace, to which the node belongs. If the node does not belong to any namespace, the column displays [n/a]. |
| Node Type | Description of the node’s type. |
The column layout is not strictly defined. You can arrange it using the customization capabilities provided by TestComplete. For instance, you can sort records on a column or change their width. For more information, see Arranging Columns, Lines and Panels.
The Expected XML Data and Actual XML Data panes show the expected and actual contents of the selected node. Some parts of the node’s code can be replaced with ellipsis to make the analysis of differences easier.
By selecting or unselecting the check boxes at the top of the XML Comparison Results page, you can easily filter the results so that the panel displays differences of the selected type. For instance, by selecting the Expected check box and unselecting other check boxes, you can command the page to display only the nodes that exist in the expected document and absent from the actual document.
Also, you can navigate to the next node that has the specified status. For this purpose, use the Go to Next drop-down list shown on the page’s toolbar. For instance, if you want to switch to the next Changed node, select Changed from the Go to Next drop-down list and TestComplete will automatically switch to the next changed node shown in the XML comparison results (if any).
See Also
About XML Checkpoints
About Web Service Checkpoints
Compare Method
Creating XML Checkpoints
XMLCheckpoint Element Editor - Comparison Settings

