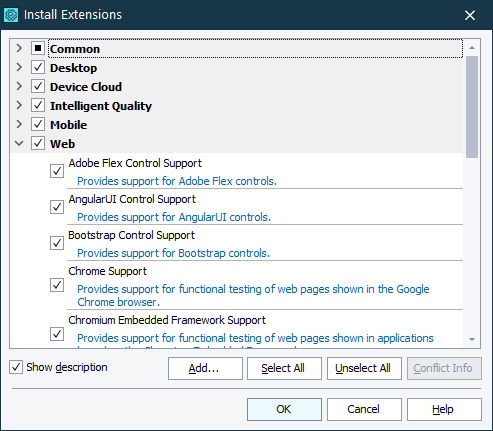
The Install Extensions dialog displays the list of registered TestComplete plugins. The list includes both plugins installed by the TestComplete installation program and third-party plugins. Using the dialog you can deactivate and activate the plugins and view conflicted information (in case a plugin conflicts with any other plugin).
To display the dialog, select File > Install Extensions from the TestComplete main menu.

| Note: | If you have TestComplete version 12.50 or later, you can launch TestComplete using the EnableModule command-line parameter. In this case, the dialog will not be available. |
Plugins are grouped by the modules and add-ons, to which they belong:
-
Common - This group includes plugins that are always available.
-
Desktop - This group includes the Desktop module’s plugins. They are available if you have a license key for the Desktop module.
-
Web - This group includes the Web module’s plugins. They are available if you have a license key for the Web module.
-
Mobile - This group includes the Mobile module’s plugins. They are available if you have a license key for the Mobile module.
-
Device Cloud - This group includes the Device Cloud plugin. The group is available if you have a license for the Device Cloud add-on.
-
Intelligent Quality - This group includes the Intelligent Quality plugins. They are available if you have a license key for the Intelligent Quality add-on.
Select or clear the Show description check box to view or hide the plugin descriptions.
To add a third-party plugin to TestComplete, click Add and browse for the desired plugin file in the subsequent dialog. The plugin will be added to the plugin list (unless specified otherwise, the plugin will be added to the Common group). Press OK to save the changes. This is what actually installs the plugin.
After the plugin is added to the plugin list, TestComplete checks whether this plugin conflicts with any other plugins. To view information about the conflicts, select the desired plugin in the list and click Conflict Info.
The Active column indicates whether the plugin is enabled. If Active is unchecked, the plugin is registered, but not loaded. When the plugin is deactivated, it releases all of its occupied memory. You can deactivate unnecessary plugins to get more memory resources for your system.
To deactivate a plugin, uncheck it in the dialog and click OK to save the changes.
For more information on installing and uninstalling plugins, see Installing Extensions.
